https://productiveorganizing.com/blogs/news.atomProductive Organizing - News2023-06-29T09:13:50-04:00Productive Organizinghttps://productiveorganizing.com/blogs/news/the-5-inch-gap-between-this-kitchen-s-oven-and-waterfall-edge-was-a-chance-for-storage2023-06-29T09:13:50-04:002023-06-29T09:13:50-04:00The 5-Inch Gap Between This Kitchen’s Oven and Waterfall Edge Was a Chance for Storageadmin
We may earn revenue from the products available on this page and participate in affiliate programs.
You’ve probably heard of the kitchen triangle or that the typical countertop height is 36 inches, but despite many layout standards, kitchens are not a one-size-fits-all equation. In Made to Measure, we offer a glimpse of the math that went into creating some of our favorite kitchens.
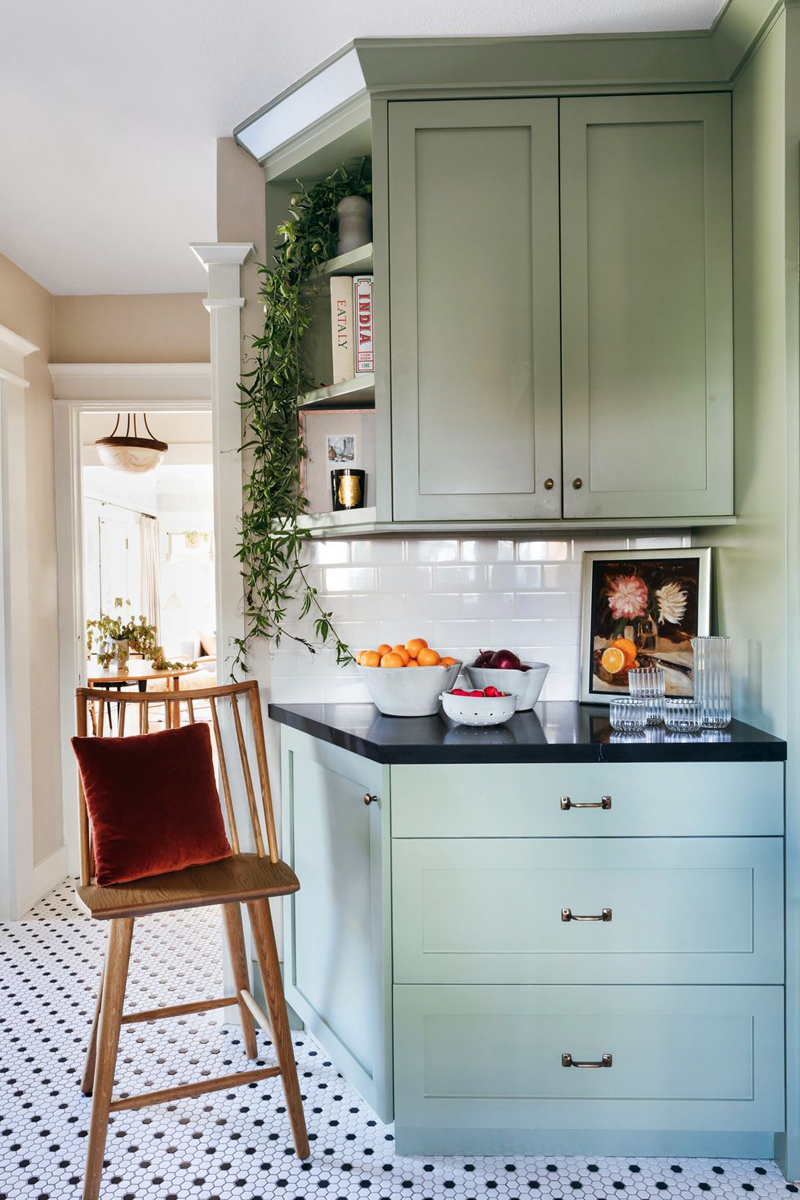
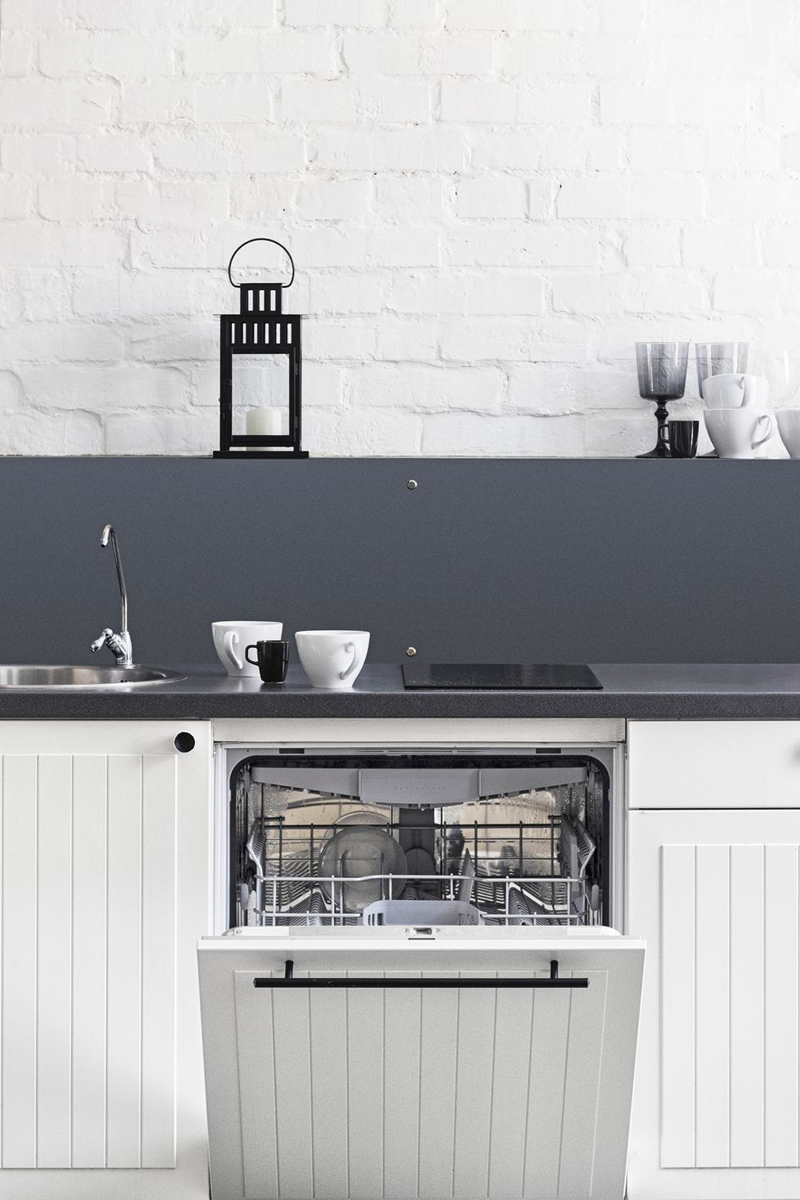
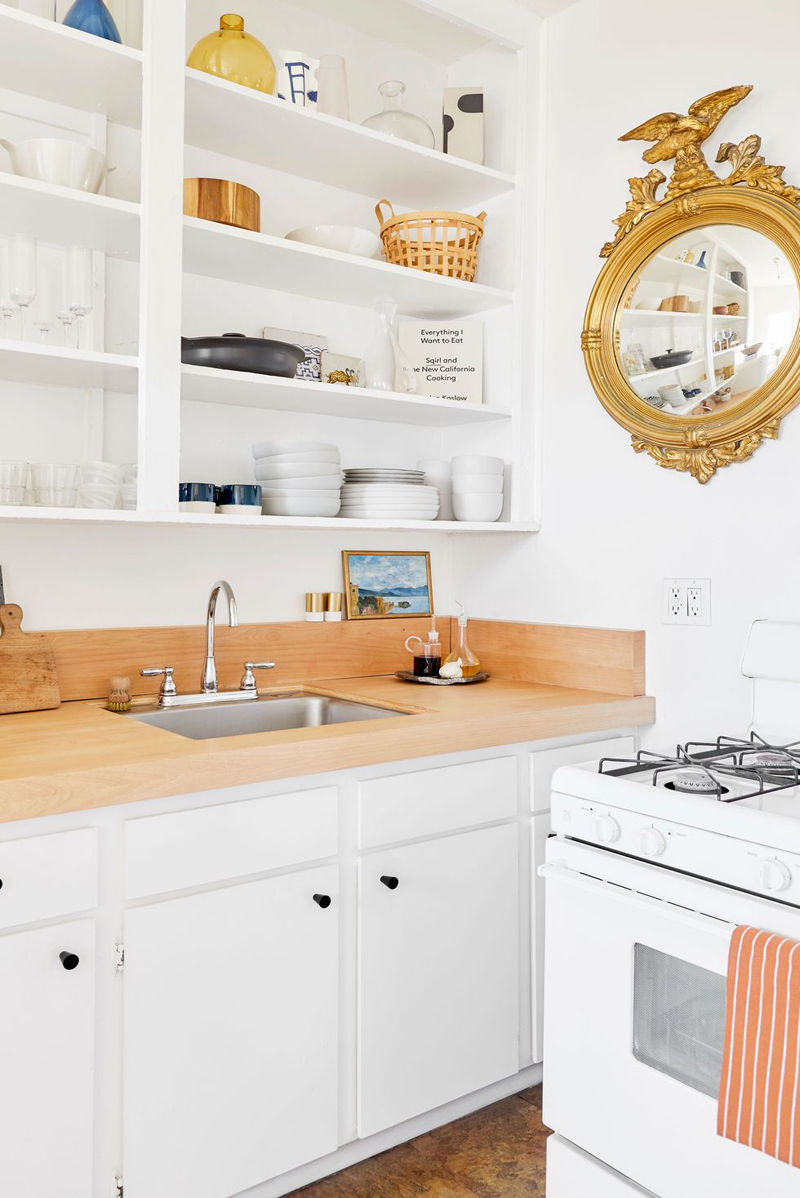
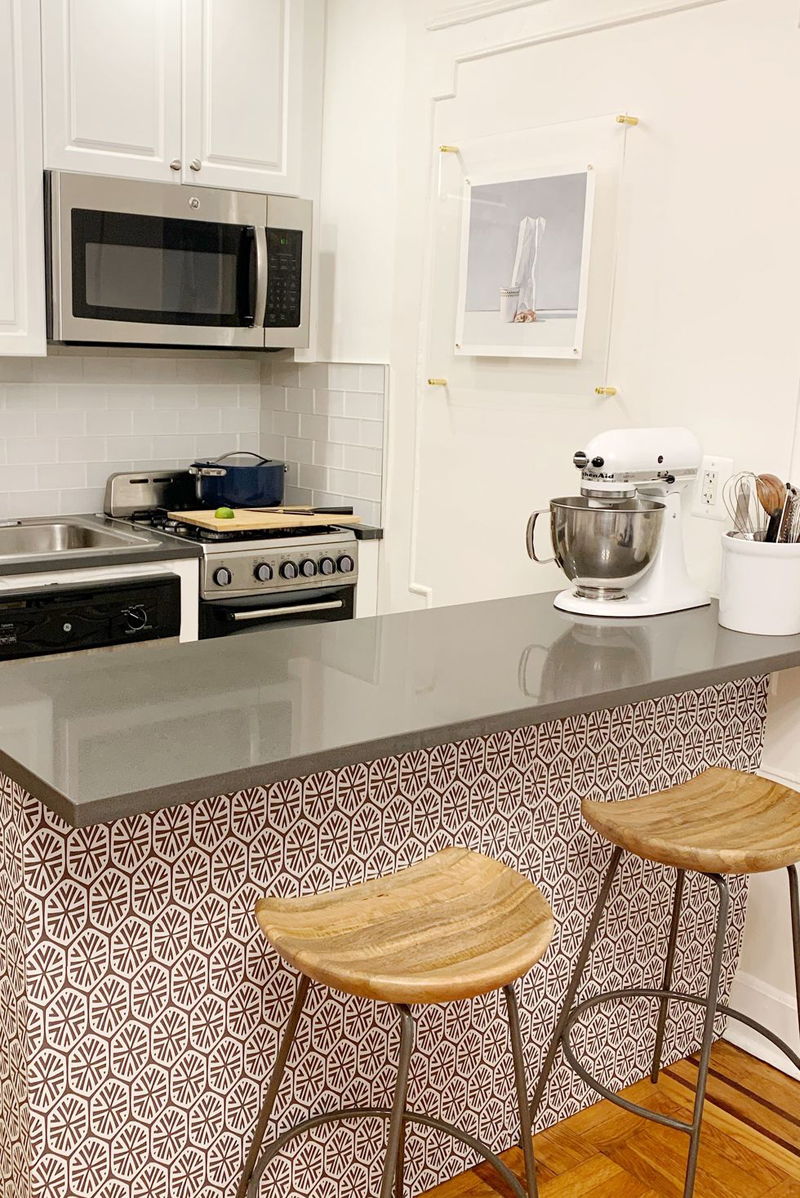
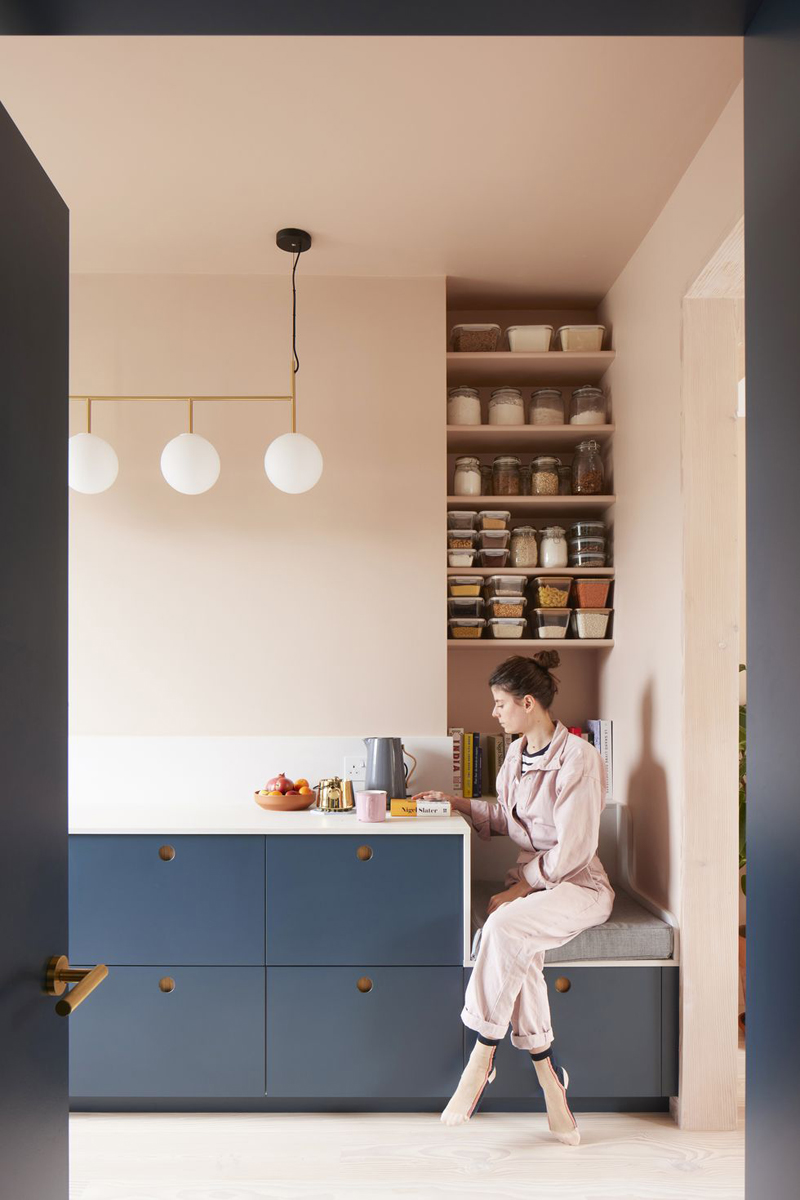
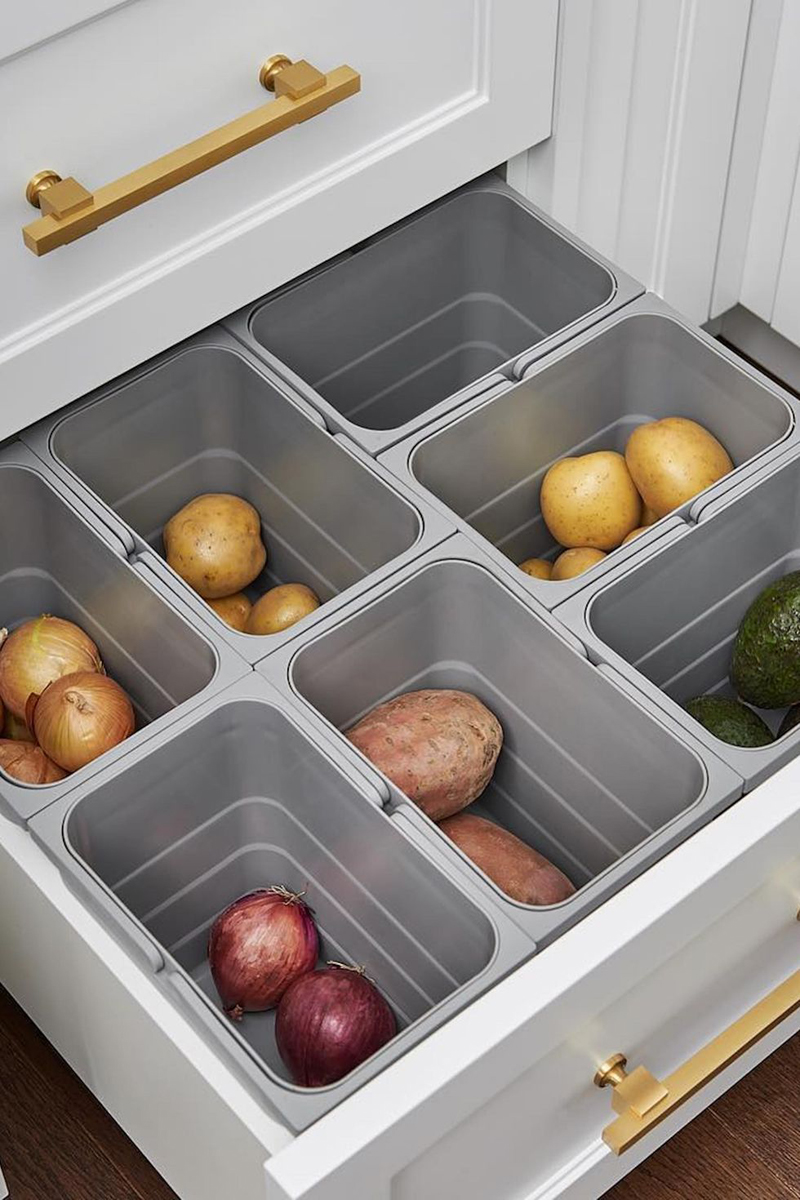
When Megan Ananian and Andrew Ginn bought their Park Slope, Brooklyn, apartment, they quickly realized their 56-square-foot kitchen was operating at minimum capacity. The 24-inch-wide dishwasher, while average size, took up valuable space that could otherwise be dedicated to extra drawers, there was barely any room for utensils, and there was a big gap between the upper cabinets and the ceiling. A renovation was inevitable.
With Ginn largely overseeing the planning and construction, the couple gutted the cramped space, adding IKEA cabinets with sleek Semihandmade fronts, a marble countertop and backsplash, and a slim spice drawer that serves as a buffer between the oven and the waterfall edge. In the illustration, below, Ananian offers a peek at some of their math, plus what they’d do differently if they had to lay it all out again.
Raising the upper cabinets to the ceiling and shrinking the dishwasher from 24 to 18 inches wide.
If we could change one thing, we’d…
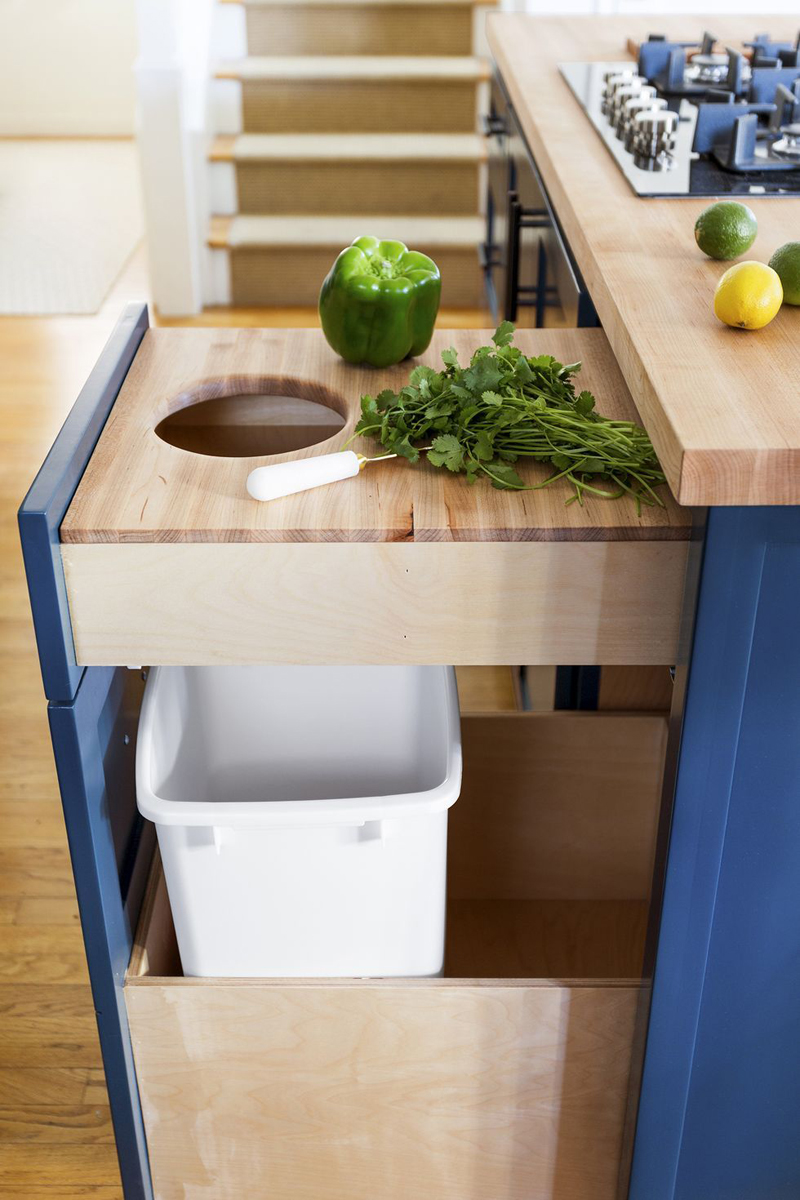
In a dream world, we’d have room for pull-out trash, but this is New York City.
The one thing we’d add more of if we could…
More pull-out drawers, or room for an appliance garage.
The most difficult measurement to determine…
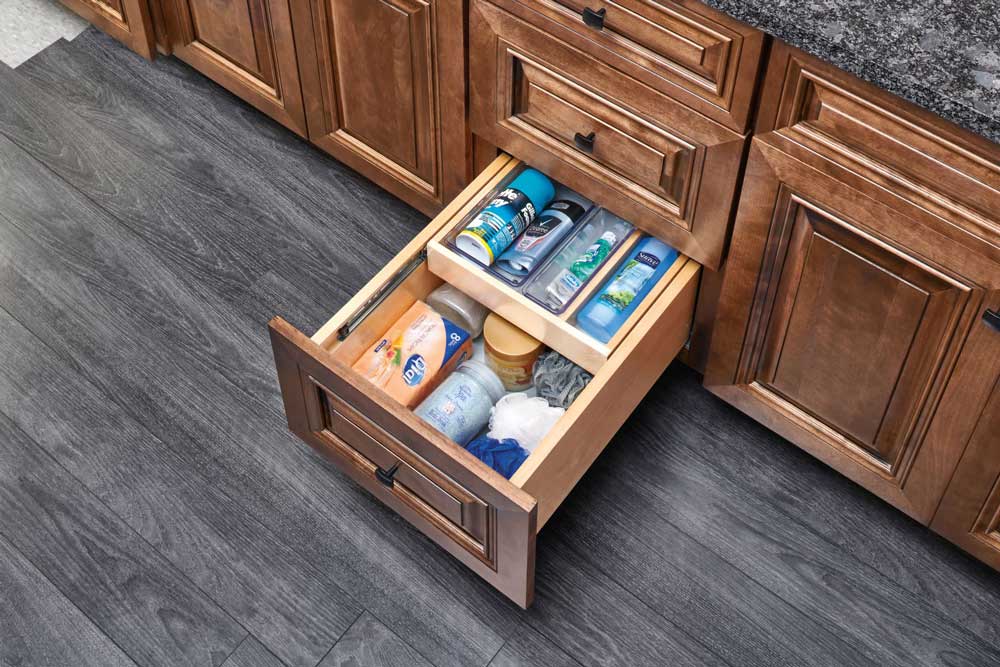
Figuring out what to do with the 5-inch gap next to the oven. We decided to add the spice cabinet (Andrew cut a larger IKEA cabinet base to size and then we bought an insert from Rev-a-Shelf).
]]>
https://productiveorganizing.com/blogs/news/9-best-nutritional-yeast-substitutes2023-06-28T21:13:51-04:002023-06-28T21:13:51-04:009 Best Nutritional Yeast SubstitutesadminWhat do you do if you don’t have nutritional yeast? No worries! In this article, we’ll review my 9 best nutritional yeast substitutes from white miso to cashews that you can use in recipes.
As a plant-based dietitian and recipe developer, I love using nutritional yeast in recipes to add some savory, “cheesy” flavor to a dish but without the dairy. Not only is nutritional yeast a handy ingredient to keep in your plant-based pantry, but it is also surprisingly high in protein and packed with many B vitamins.
What do you do if you don’t have nutritional yeast? No fear! In this article, we’ll review my 9 favorite nutritional yeast substitutes that you can use in recipes.
What is Nutritional Yeast?
Nutritional yeast flakes (ie. “nooch”) is a food beloved by vegans and vegetarians for its unique cheese-like flavor. This fun ingredient is an inactivated version of a species of yeast called Saccharomyces cerevisiae that is the same type of yeast used for bread and beer. However, since it is an inactive yeast, it won’t react in the same way as the baker’s yeast used for bread.
What does Nutritional Yeast Taste Like?
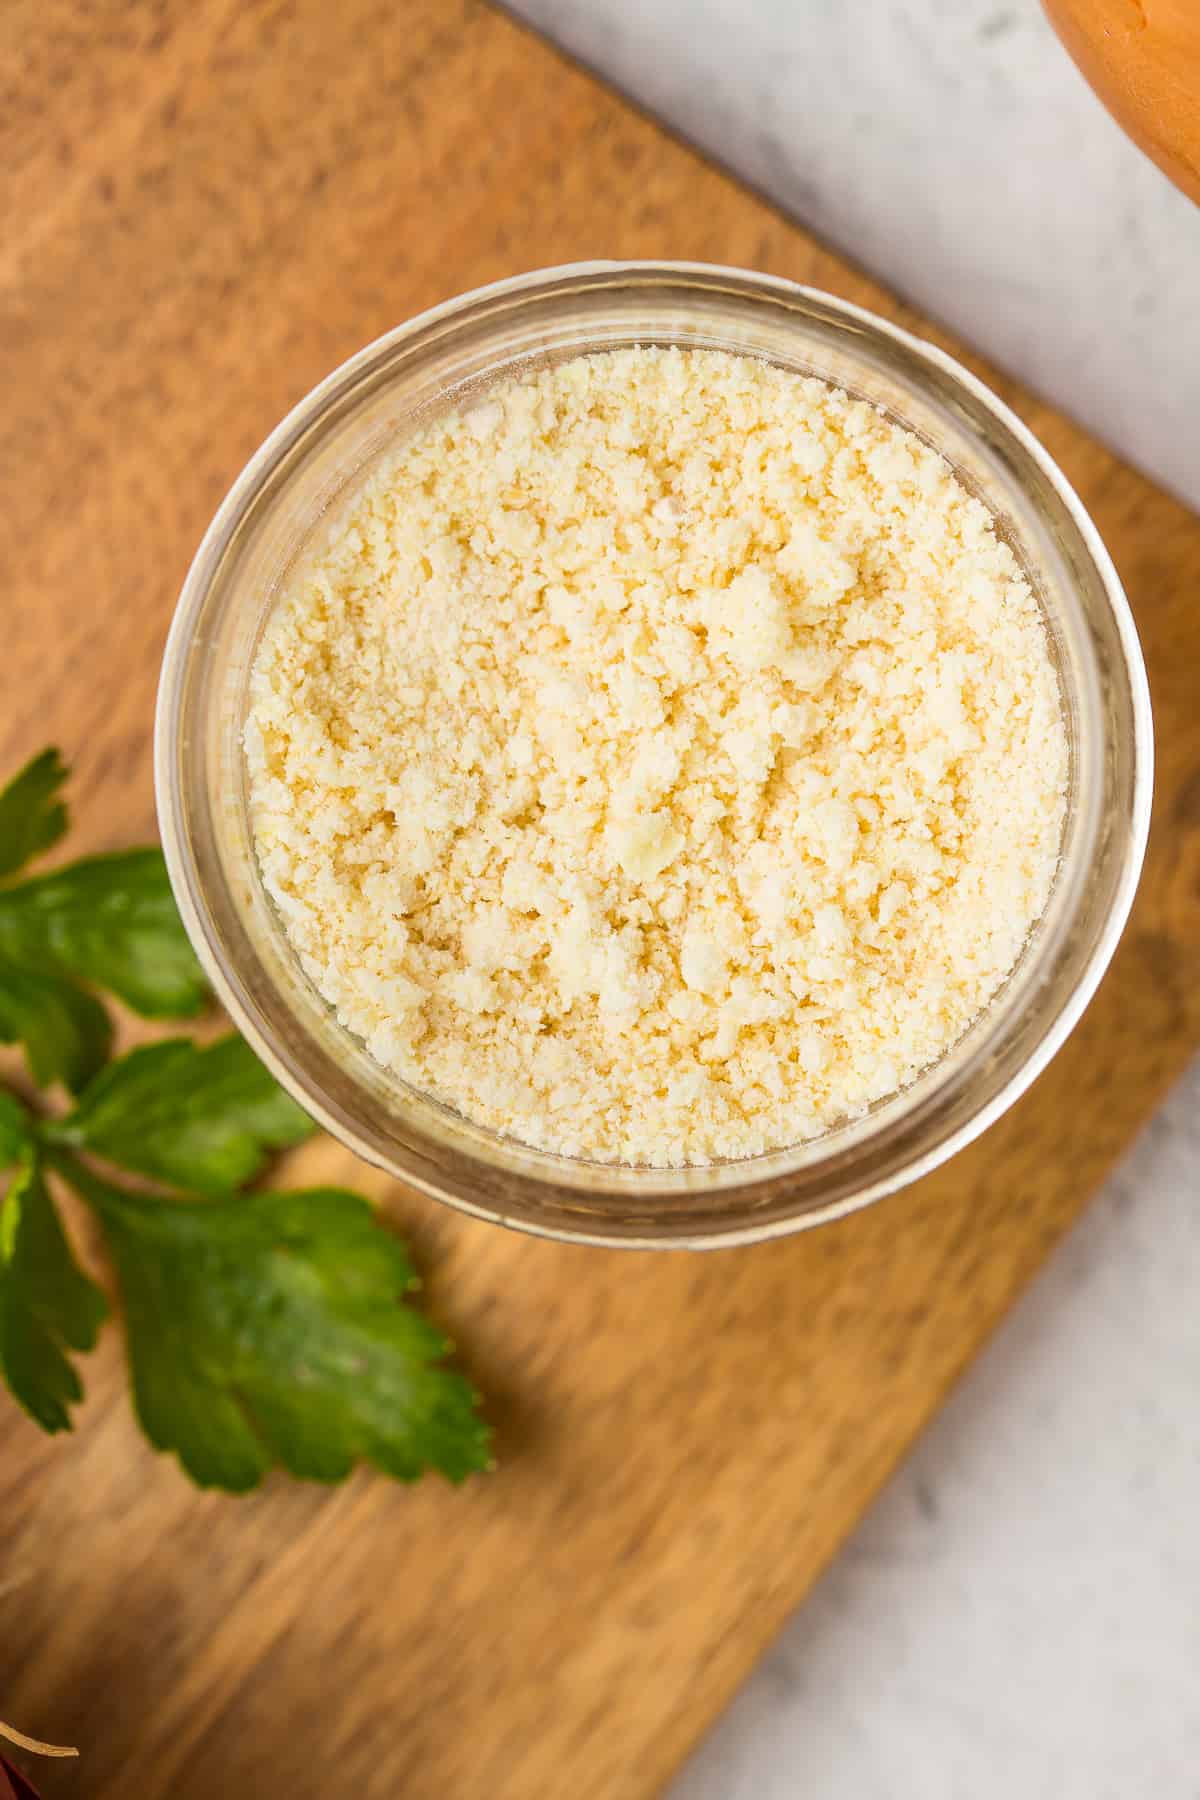
The flavor of nutritional yeast is sometimes hard to describe, but it comes across as nutty, savory, and cheesy. It is typically used in recipes to add “umami” (ie. savory) notes to a dish. The cheesy flavor profile makes it a popular ingredient in dairy-free or vegan dishes that don’t use animal products like dairy cheese. (I love to use it for my vegan parmesan cheese recipe!)
Nutritional Yeast Substitutes
Maybe you’re in the middle of making a recipe and you’ve run out of nutritional yeast or you can’t find it in the store. You may find yourself wondering, what can I use instead of nutritional yeast? Don’t worry – I’ve got you covered! Here are 10 of the best substitutes for nutritional yeast.
Vegan Cheese
This is probably my go-to substitute for nutritional yeast in recipes! Nutritional yeast is often added to plant-based dishes instead of cheese to provide that cheesy flavor, but without the dairy. If I’ve run out of nutritional yeast, I will often just use a bit of shredded vegan cheddar instead depending on the recipe. Use vegan cheese as a nutritional yeast alternative in pastas and soups.
White Miso
White miso is a paste made from fermented soybeans. There are several types of miso paste that range in flavor and color but I find that white miso makes the best nutritional yeast replacement as it is more mild than the other varieties.
You can find white miso paste in the refrigerator section of the grocery store, usually near the tofu and other plant-based products. Use white miso as a substitute for nutritional yeast in soups, dressings and sauces.
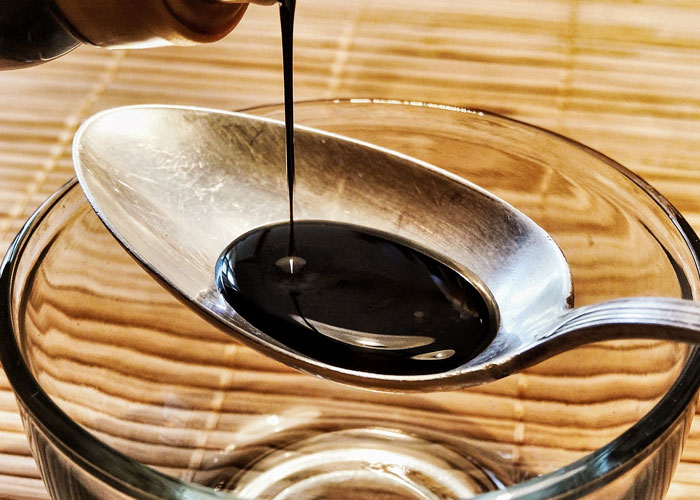
Soy Sauce
Soy sauce can also be described as umami so it makes a great nutritional yeast substitute in a pinch. Use about 1/2 tablespoon of soy sauce as a substitute for a tablespoon of nutritional yeast in stir fry, marinades, sauces, and dressings. You may also want to reduce the salt in the recipe when using soy sauce as it add some saltiness.
Liquid Aminos
Liquid aminos or coconut aminos are made from fermented soy beans or coconut and have a flavor that is very similar to soy sauce. The savory and salty taste means it can be a great option instead of nutritional yeast for stews, casseroles, stir fry, dressings, and sauces. Use about half as much aminos as nutritional yeast and reduce the salt in the recipe to taste.
Dried Mushrooms
Dried mushrooms (like shiitake mushrooms) have the same rich, earthy flavor as nutritional yeast. Grind up your dried mushrooms into a fine powder with a blender or food processor and sprinkle on a dish the same way you would nutritional yeast. You can usually use about the same amount of dehydrated mushrooms as nutritional yeast.
You can also rehydrate the mushrooms and use the soaking liquid or chop up the mushrooms and use in place of the nutritional yeast.
Cashews
Cashews can mimic the mild, nutty flavor of nutritional yeast so you can use often use them as a substitute. Add cashew butter to creamy sauces for pasta or casseroles, soups, stews, and dressings instead of nutritional yeast. Sunflower seeds are also a great option.
Pulse your cashews in a food processor or blender to create a powder when using in place of nutritional yeast. You can use is as a 1 to 1 replacement for nooch.
Vegemite/Marmite
Although there are slight differences between the two, Vegemite and marmite are both made from the yeast extract that is leftover from brewing beer. (This article from The Spruce Eats reviews the differences between Vegemite and marmite.)
The rich, salty and savory flavor of either one make them a good option as a nutritional yeast substitute in a variety dishes from sauces to soups. It has a much stronger flavor so you’ll want to use less vegemite/marmite than nutritional yeast. I’d recommend you start by adding 1/2 teaspoon at a time and taste as you go until you get the right amount of umami flavor you are looking for.
Garlic Powder
If you are looking to add some savory or umami flavor notes to a recipe without nutritional yeast, you can also reach into your spice cabinet for garlic powder – we always have some on hand! You can easily add garlic powder to any dish from pasta to soup to dressing that uses nutritional yeast. You only need a teaspoon or so of garlic powder for recipes.
Tahini
Tahini is a paste made from ground up sesame seeds and has the same mildly nutty taste that nutritional yeast does. Use tahini instead of nutritional yeast in dishes like dressings, dips, and sauces. You can use the same about of tahini as nutritional yeast in most dishes.
FAQs
Is nutritional yeast necessary in recipes?
It depends on the recipe! If there is only a tablespoon or two of nutritional yeast in a main dish you can likely skip it. However, if you are making a sauce, marinade, or dish that is using the nutritional yeast to add that cheesy flavor (like a vegan cheese sauce or my vegan broccoli cheddar soup) – you’ll want to make sure to actually use nutritional yeast in the recipe or it won’t turn out.
Is nutritional yeast gluten free?
Yes, nutritional yeast is gluten free so it can be used in recipes made for those with celiac or a gluten intolerance.
Is nutritional yeast the same as brewer’s yeast?
No, nutritional yeast and brewer’s yeast are not the same. Nutritional yeast is an inactivated yeast. While brewer’s yeast is still alive so that it can be used to make bread or beer. Brewer’s yeast has a bitter flavor and it sometimes used as a nutritional supplement.
Is nutritional yeast a good source of B vitamins?
Not always! Some brands are fortified with B vitamins, but not all brands. If you are looking to get some extra B vitamins in your diet (like vitamin B12 for those on a vegan diet), you’ll want to double check the label to make sure your nutritional yeast is fortified.
Is nutritional yeast a good source of protein?
Nutritional yeast is high in protein (there are 3 grams of protein in 2 tablespoons), but we don’t generally eat enough of it in a dish to provide a substantial amount of protein. (But a few grams here or there over the course of a day does add up!)
This easy vegan parmesan made with pistachios, nutritional yeast, and garlic is super simple to whip up and a delicious addition to a variety of dishes like pasta, soup, popcorn, and more.
This vegan broccoli cheddar soup is a big bowl of comfort food for the rainiest of days. Serve it up with some crunchy croutons and a sprinkle of paprika.
You’ll love this vegan version of a classic comfort food, macaroni and cheese! A simple cashew sauce add richness and broccoli give it a a pop of color.
This vegan stuffed shells recipe transforms the traditional comfort food dish filled with cheese into a yummy meal that anyone can enjoy! You'll make a quick tofu ricotta for these jumbo shells and then top with your favorite pasta sauce and a vegan mozzarella.
]]>
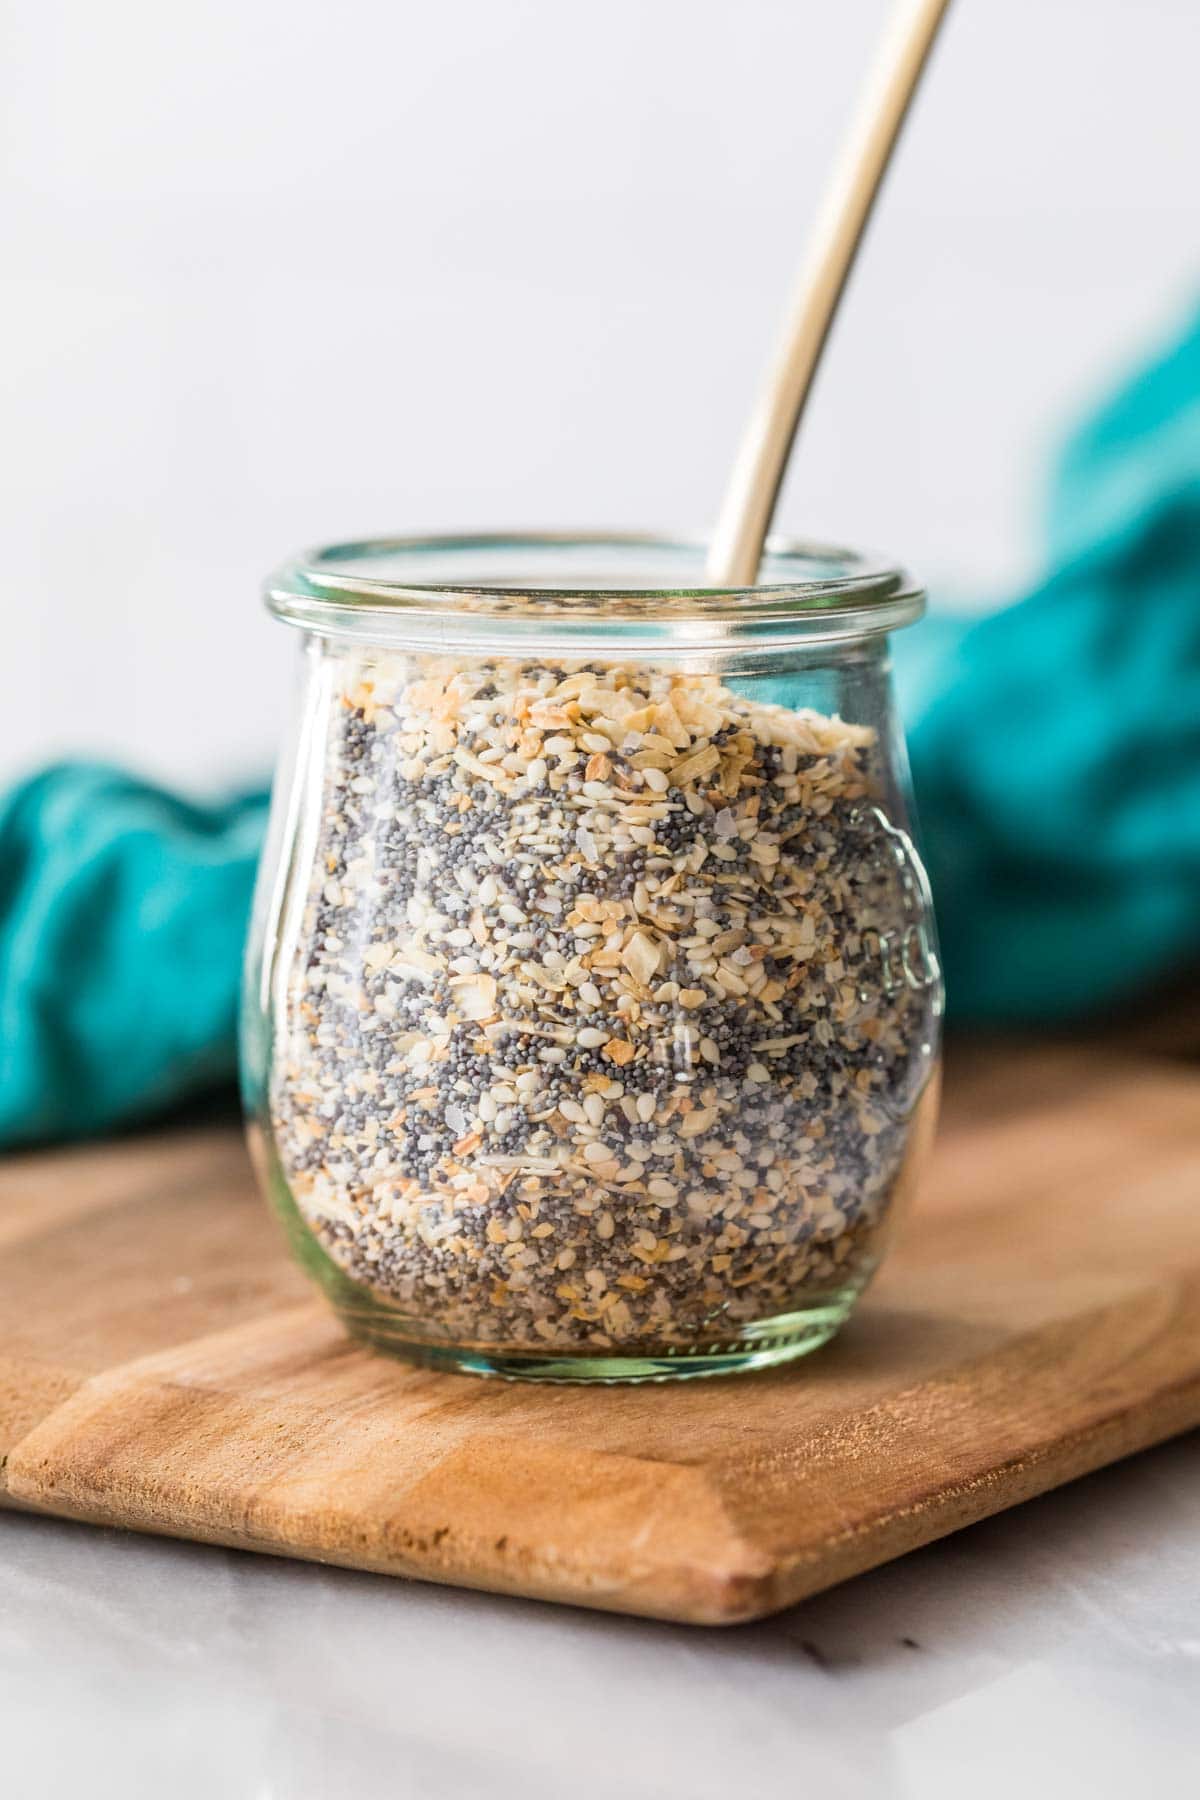
https://productiveorganizing.com/blogs/news/italian-seasoning-12023-06-28T09:13:51-04:002023-06-28T09:13:51-04:00Italian Seasoningadmin
This Italian seasoning recipe is a great way to improve your spice cabinet. You can use it in so many dishes, and it’s way better than the kind you’ll find in the grocery store.
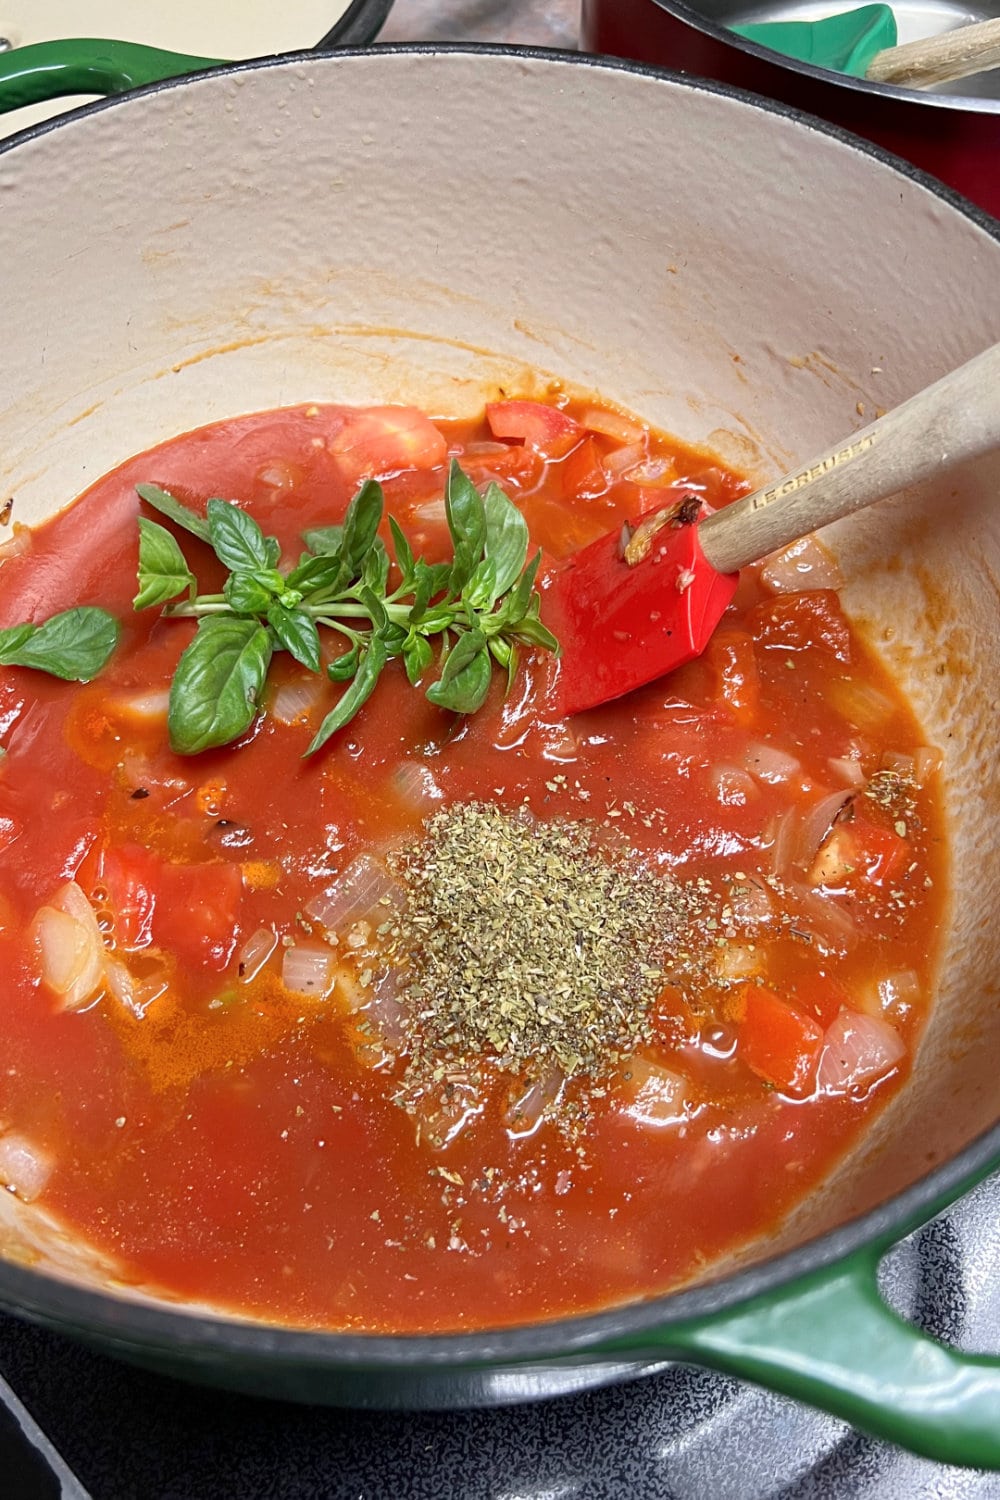
One of my favorite things to do in the kitchen is to make my own spice blends. There’s something magical about seasoning food with a blend of spices that you made all on your own. Handmade spice blends taste a lot better than the kind you’ll buy at the grocery store, but it’s also just special to have your meal be extra homemade. This Italian seasoning recipe is one of my favorite spice blends to make, largely because I use it so much when I cook.
Italian seasoning is a common spice blend made up of dried herbs. I use it in a lot of recipes, for everything from seasoning sauces, to adding flavor to breading, to just sprinkling on top of food. There’s so much flavor from the dried herbs … even more than you would get if you used fresh herbs. If you’re not already cooking with Italian seasoning, then you’ve got to start. And if you already are, then it’s time to start making your own!
Why You’ll Love This Homemade Herb Blend
I always have a jar (or two!) of Italian seasoning on my spice rack. Here’s why I know you’ll love this recipe.
Easy. Recipes seriously don’t get easier than this one. All you have to do is mix up the ingredients and you’re done! It’s the simplest way possible to elevate your cooking.
Versatile. Even though Italian seasoning is meant to use when cooking, it also works as a great topping. I love to sprinkle some on top of pizza and pasta or put this herb blend in my sandwiches. And when I do cook with it, it gets used in more than just Italian recipes. It’s a versatile spice blend that gets a lot of use in my kitchen.
Great gift. One of my go-to gifts is a homemade spice blend. People absolutely love homemade spices. Put some of this Italian seasoning in a cute spice jar with a ribbon on top, and you have a holiday gift that’s easy, cheap, and everyone will love.
Ingredients Needed
Here are all of the ingredients that you’ll need to make this tasty herb blend. Check out the recipe card at the bottom of the page to see the quantities for each ingredient.
Dried basil
Dried oregano
Dried rosemary
Dried thyme
Dried marjoram
Dried sage
How to Make Italian Seasoning
Here’s how to make this remarkably easy recipe.
Mix. Put all of the ingredients in a bowl, and stir until they’re well mixed.
Package. Place the Italian seasoning in a jar or bag, and you’re done!
Tips, Tricks, and Variations
This recipe is as simple as it gets, but I have a few tricks and variations that you can try.
Don’t use old herbs. Dried herbs and spices lose some of their flavors over time. For best results, make this Italian seasoning with dried herbs that you have recently purchased.
Buy bulk. Herbs and spices are almost always cheaper if you buy them at a store that sells them in bulk. If you buy your dried herbs in bulk, you’ll be able to make Italian seasoning for a fraction of what it costs in the grocery store.
Add spice. If you want to add a little bit of heat to your Italian seasoning, just add some red chili flakes. Chili flakes and Italian herbs are a classic pairing, so it’s a great addition to this spice blend.
Adjust to your tastes. Every spice company has a different recipe for their Italian seasoning herb blend. So feel free to change the recipe based on your tastes. If you really like certain herbs, add more of them, until the blend tastes perfect to you.
Store in the dark. Make sure to store your homemade Italian seasoning in a dark place. That will ensure that the blend lasts for a long time, and maintains all of its flavor.
How to Use It
You can use this herb blend instead of dried herbs in most recipes. And it makes a great garnish on top of your favorite Italian foods. But Italian seasoning is also a featured ingredient in a lot of recipes. Here are a few of my favorite foods to make that use this blend of classic herbs.
After making this herb blend, store it in an airtight container in a dark place. You don’t want the Italian seasoning to be exposed to direct sunlight. Because it’s made of dried spices, this blend will last indefinitely. However, the flavors will start to fade and get a little stale, so I recommend using this homemade Italian seasoning within a year.
More Spice Blends and Mixes to Make
As I mentioned before, I love to make my own spice blends. Here are a few more blends, mixes, and seasonings that you can make at home.
This Italian seasoning recipe is quick, easy, cheap, and so much better than the kind you find at the store. Use it in your favorite recipes, or put it in on pizza, pasta, and sandwiches!
Prep Time2 minutes
Total Time2 minutes
Ingredients
2 tablespoons dried basil
2 tablespoons dried oregano
1 tablespoon dried rosemary
1 tablespoon dried thyme
1/2 tablespoon dried marjoram
1/2 tablespoon dried sage
Instructions
Mix together all of the ingredients.
Store in an airtight container in the pantry.
Notes
Homemade Italian seasoning will last indefinitely, but it's best if used within a year.
Add chili flakes if you want the herb blend to be spicy.
To make the most affordable Italian seasoning, buy the herbs in bulk.
Nutrition Disclaimer: All information presented on this site is intended for informational purposes only. I am not a certified nutritionist and any nutritional information shared on dinnersdishesanddesserts.com should only be used as a general guideline.
Did you make this recipe?
Please leave a comment on the blog or share a picture on social media!
I created a fun group on Facebook, and I would love for you to join us! It’s a place where you can share YOUR favorite recipes, ask questions, and see what’s new at Dinners, Dishes and Desserts (so that you never miss a new recipe)!
Be sure to follow me on Instagram and tag #dinnersdishes so I can see all the wonderful DINNERS, DISHES, AND DESSERTS recipes YOU make!
Be sure to follow me on my social media, so you never miss a post!
]]>
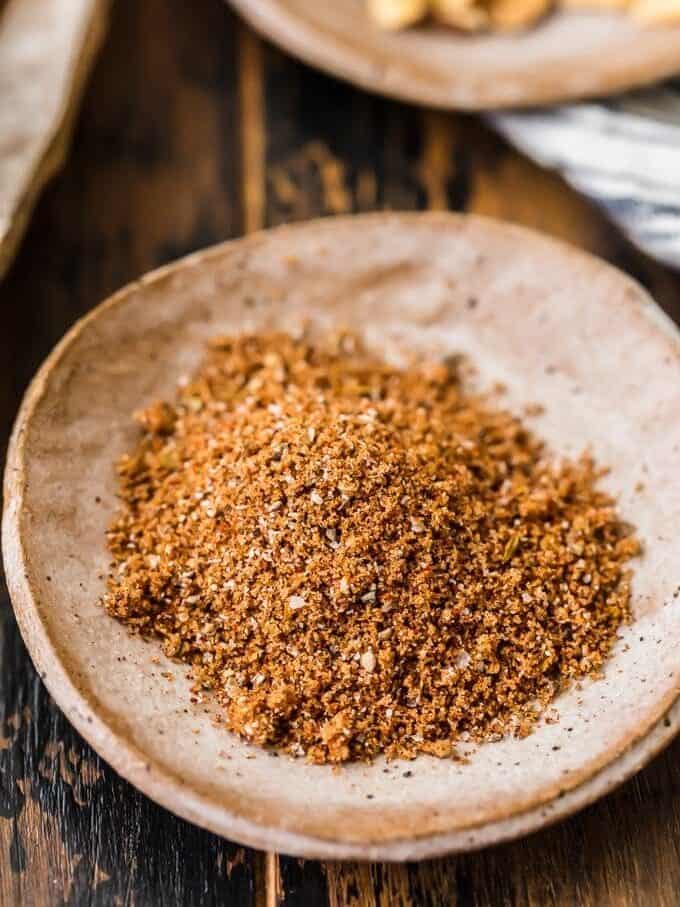
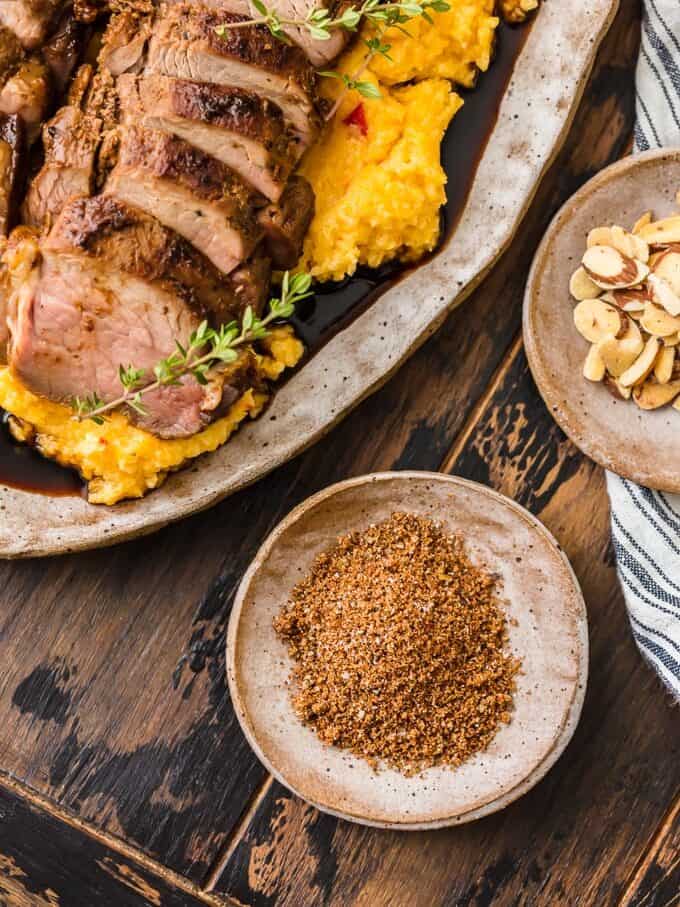
https://productiveorganizing.com/blogs/news/baked-bbq-chicken-thighs2023-06-27T09:13:53-04:002023-06-27T09:13:53-04:00Baked BBQ Chicken ThighsadminThe easiest baked BBQ chicken thighs recipe! Juicy chicken thighs, baked to perfection, slathered in a mouthwatering BBQ rub and sauce that is just waiting to be put on your dinner table.
I love grilling in the warmer weather but honestly sometimes living in the Mid-Atlantic can be rough. The humidity and/or the afternoon thunderstorms really put a damper on grilling. I swear thunderstorms around here love to time themselves around rush hour or dinnertime. The ability to make these baked BBQ chicken thighs in the oven gives a great alternative to being weather-dependent.
I know turning on the oven in the summertime can seem like a sin but it’s not terrible, and these chicken thighs, because they are boneless, they cook up pretty fast. It’s also pretty hands-free and gives you the ability to prep other dishes while it’s cooking up in the oven. The result is a juicy, tender chicken smothered with a thick, tangy, smoky and sweet BBQ sauce.
Why You’ll Love This
Foolproof method. Baking chicken thighs in the oven is an ideal method for beginner cooks or those who prefer a hands-off approach that are short on time. It requires minimal supervision and delivers consistent results.
Incredibly quick and easy. All this recipe involves is generously sprinkling a dry rub on top of the chicken thighs then slathering it with your favorite BBQ sauce. Seriously so easy!
Easy main protein or meal prep. This recipe allows you to make it in bulk (just in a larger baking dish) so you can have this flavorful chicken on hand for the week for meal prep and/or a quick dinner option you just pull out of the refrigerator and reheat.
Ingredients You’ll Need
Baked BBQ chicken thighs require minimal ingredients but still has bold flavor. Here is what you’ll need. Make sure to scroll down to view the full recipe for exact measurements.
Here is a general overview of the steps involved to make oven-baked BBQ chicken thighs. Be sure to scroll to the bottom of this post for the full recipe.
Set the oven and prep baking dish. Preheat oven to 400 degrees Fahrenheit and lightly spray a baking dish with cooking spray.
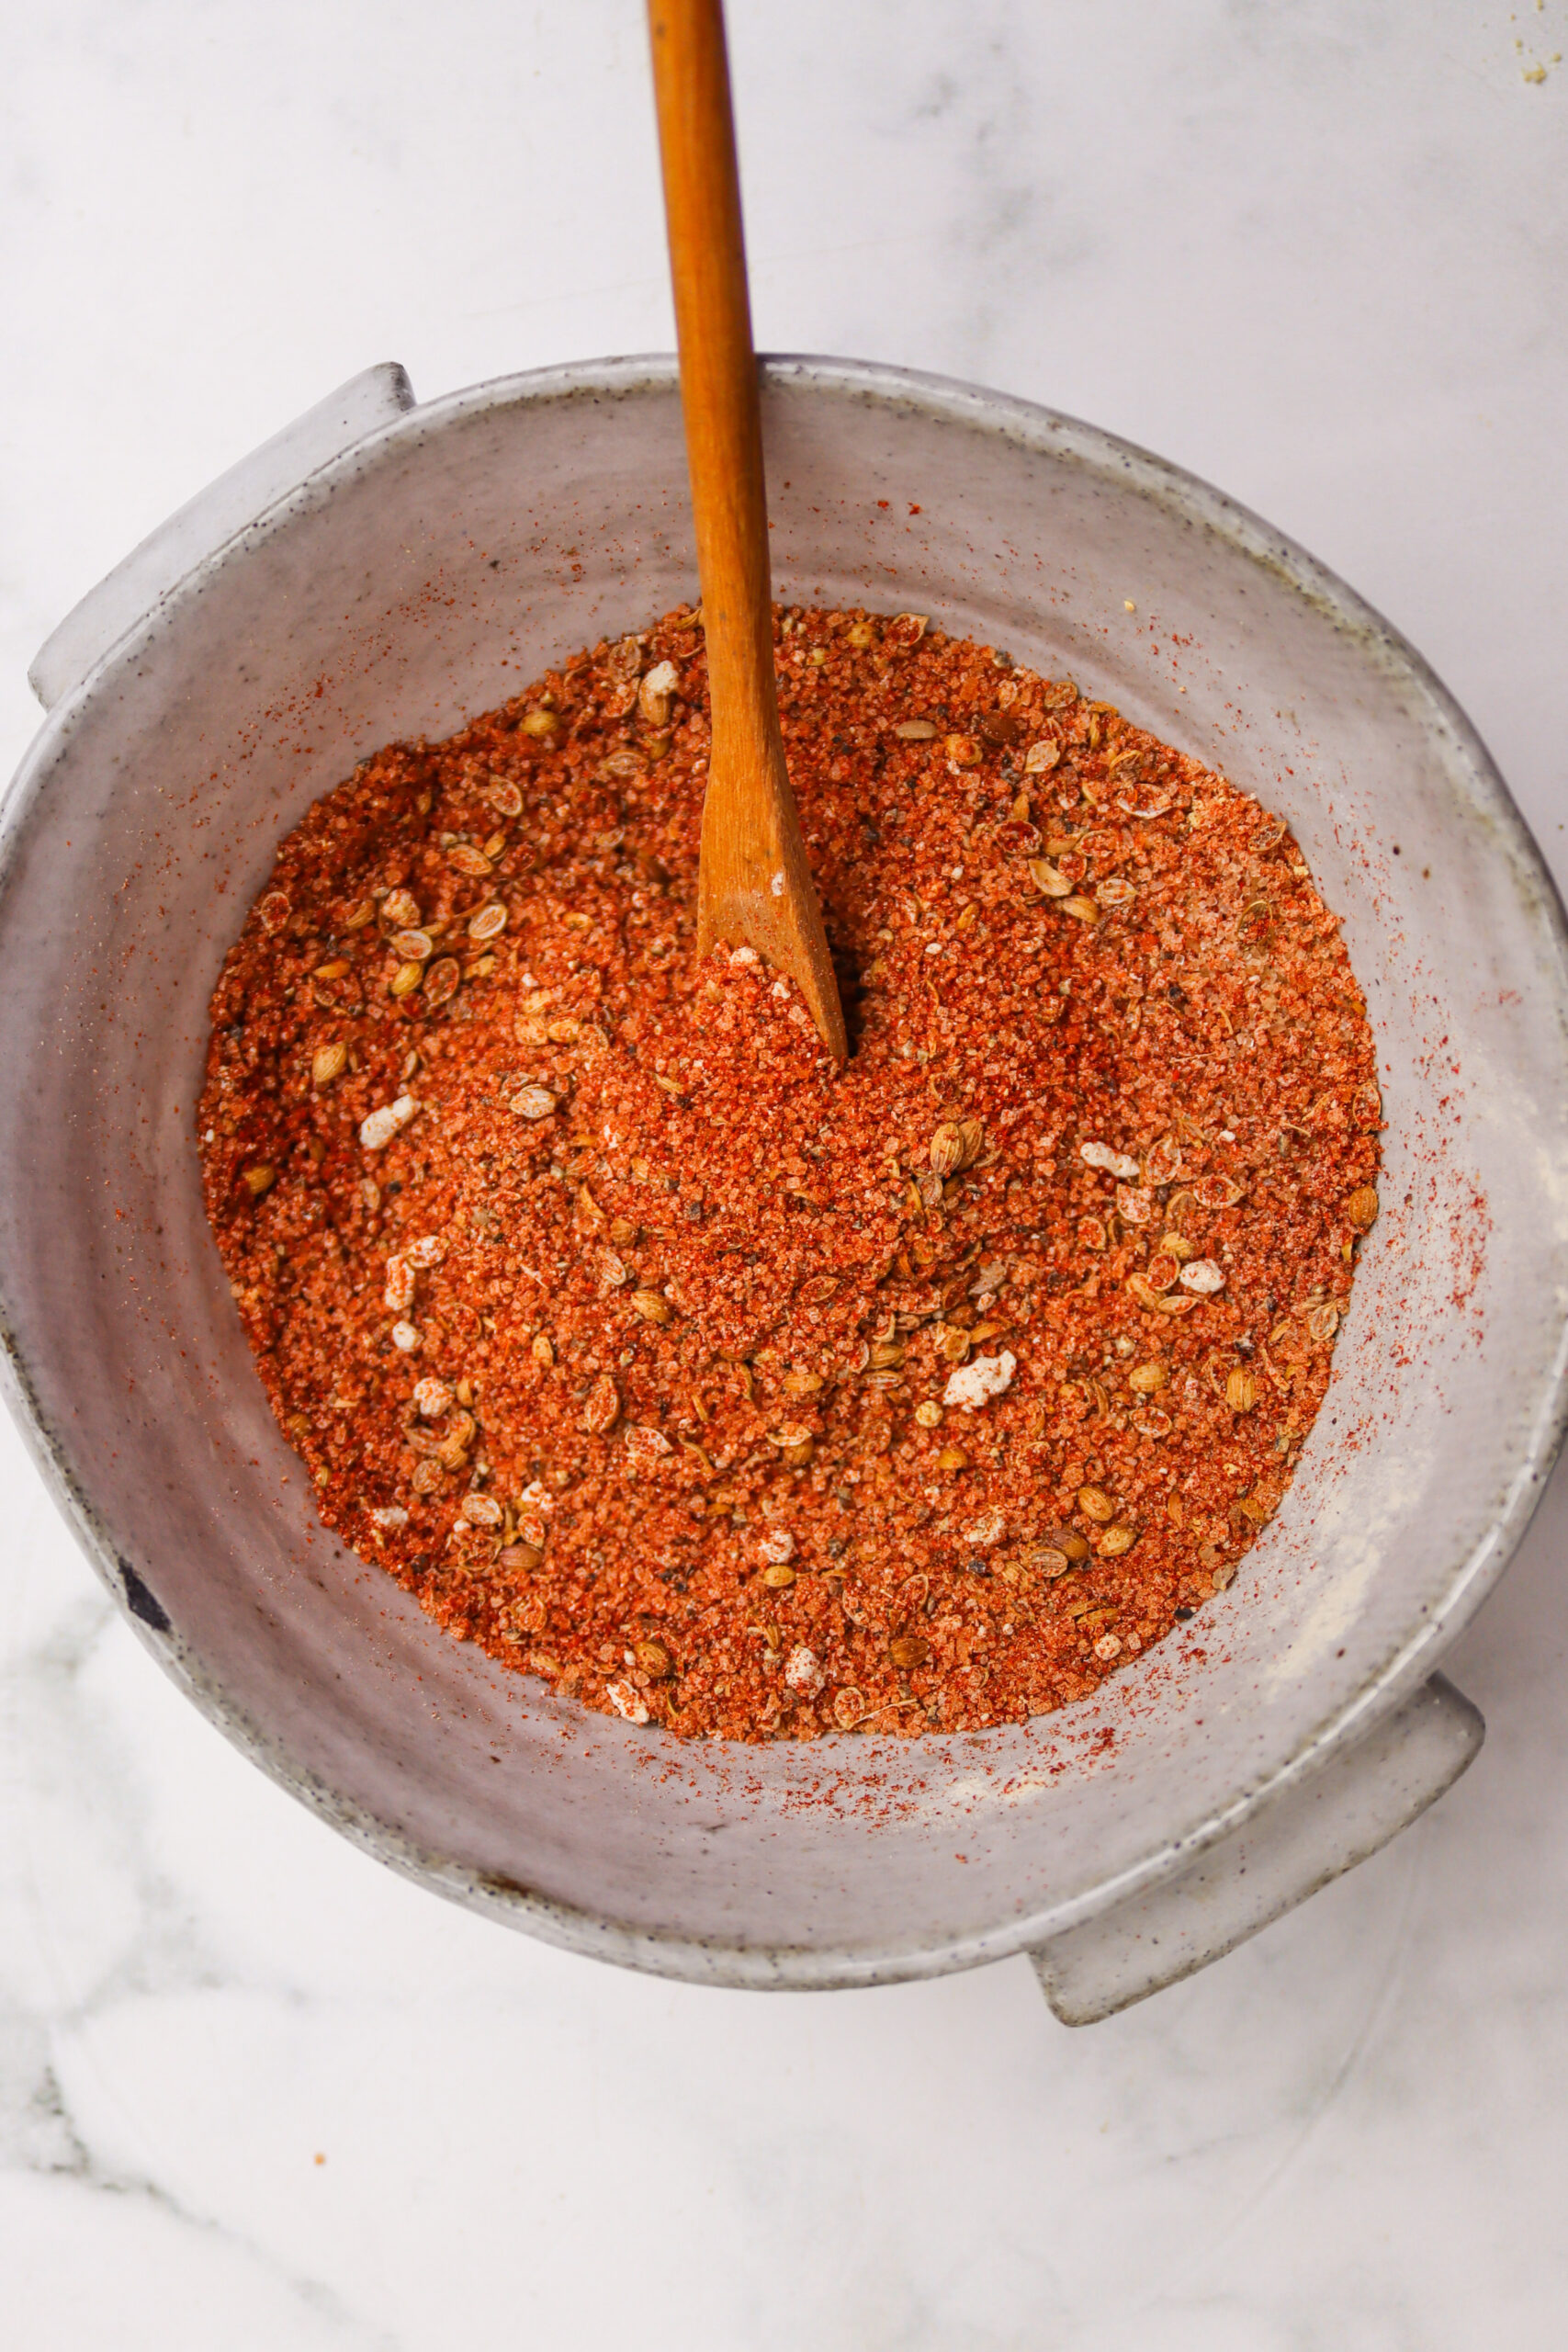
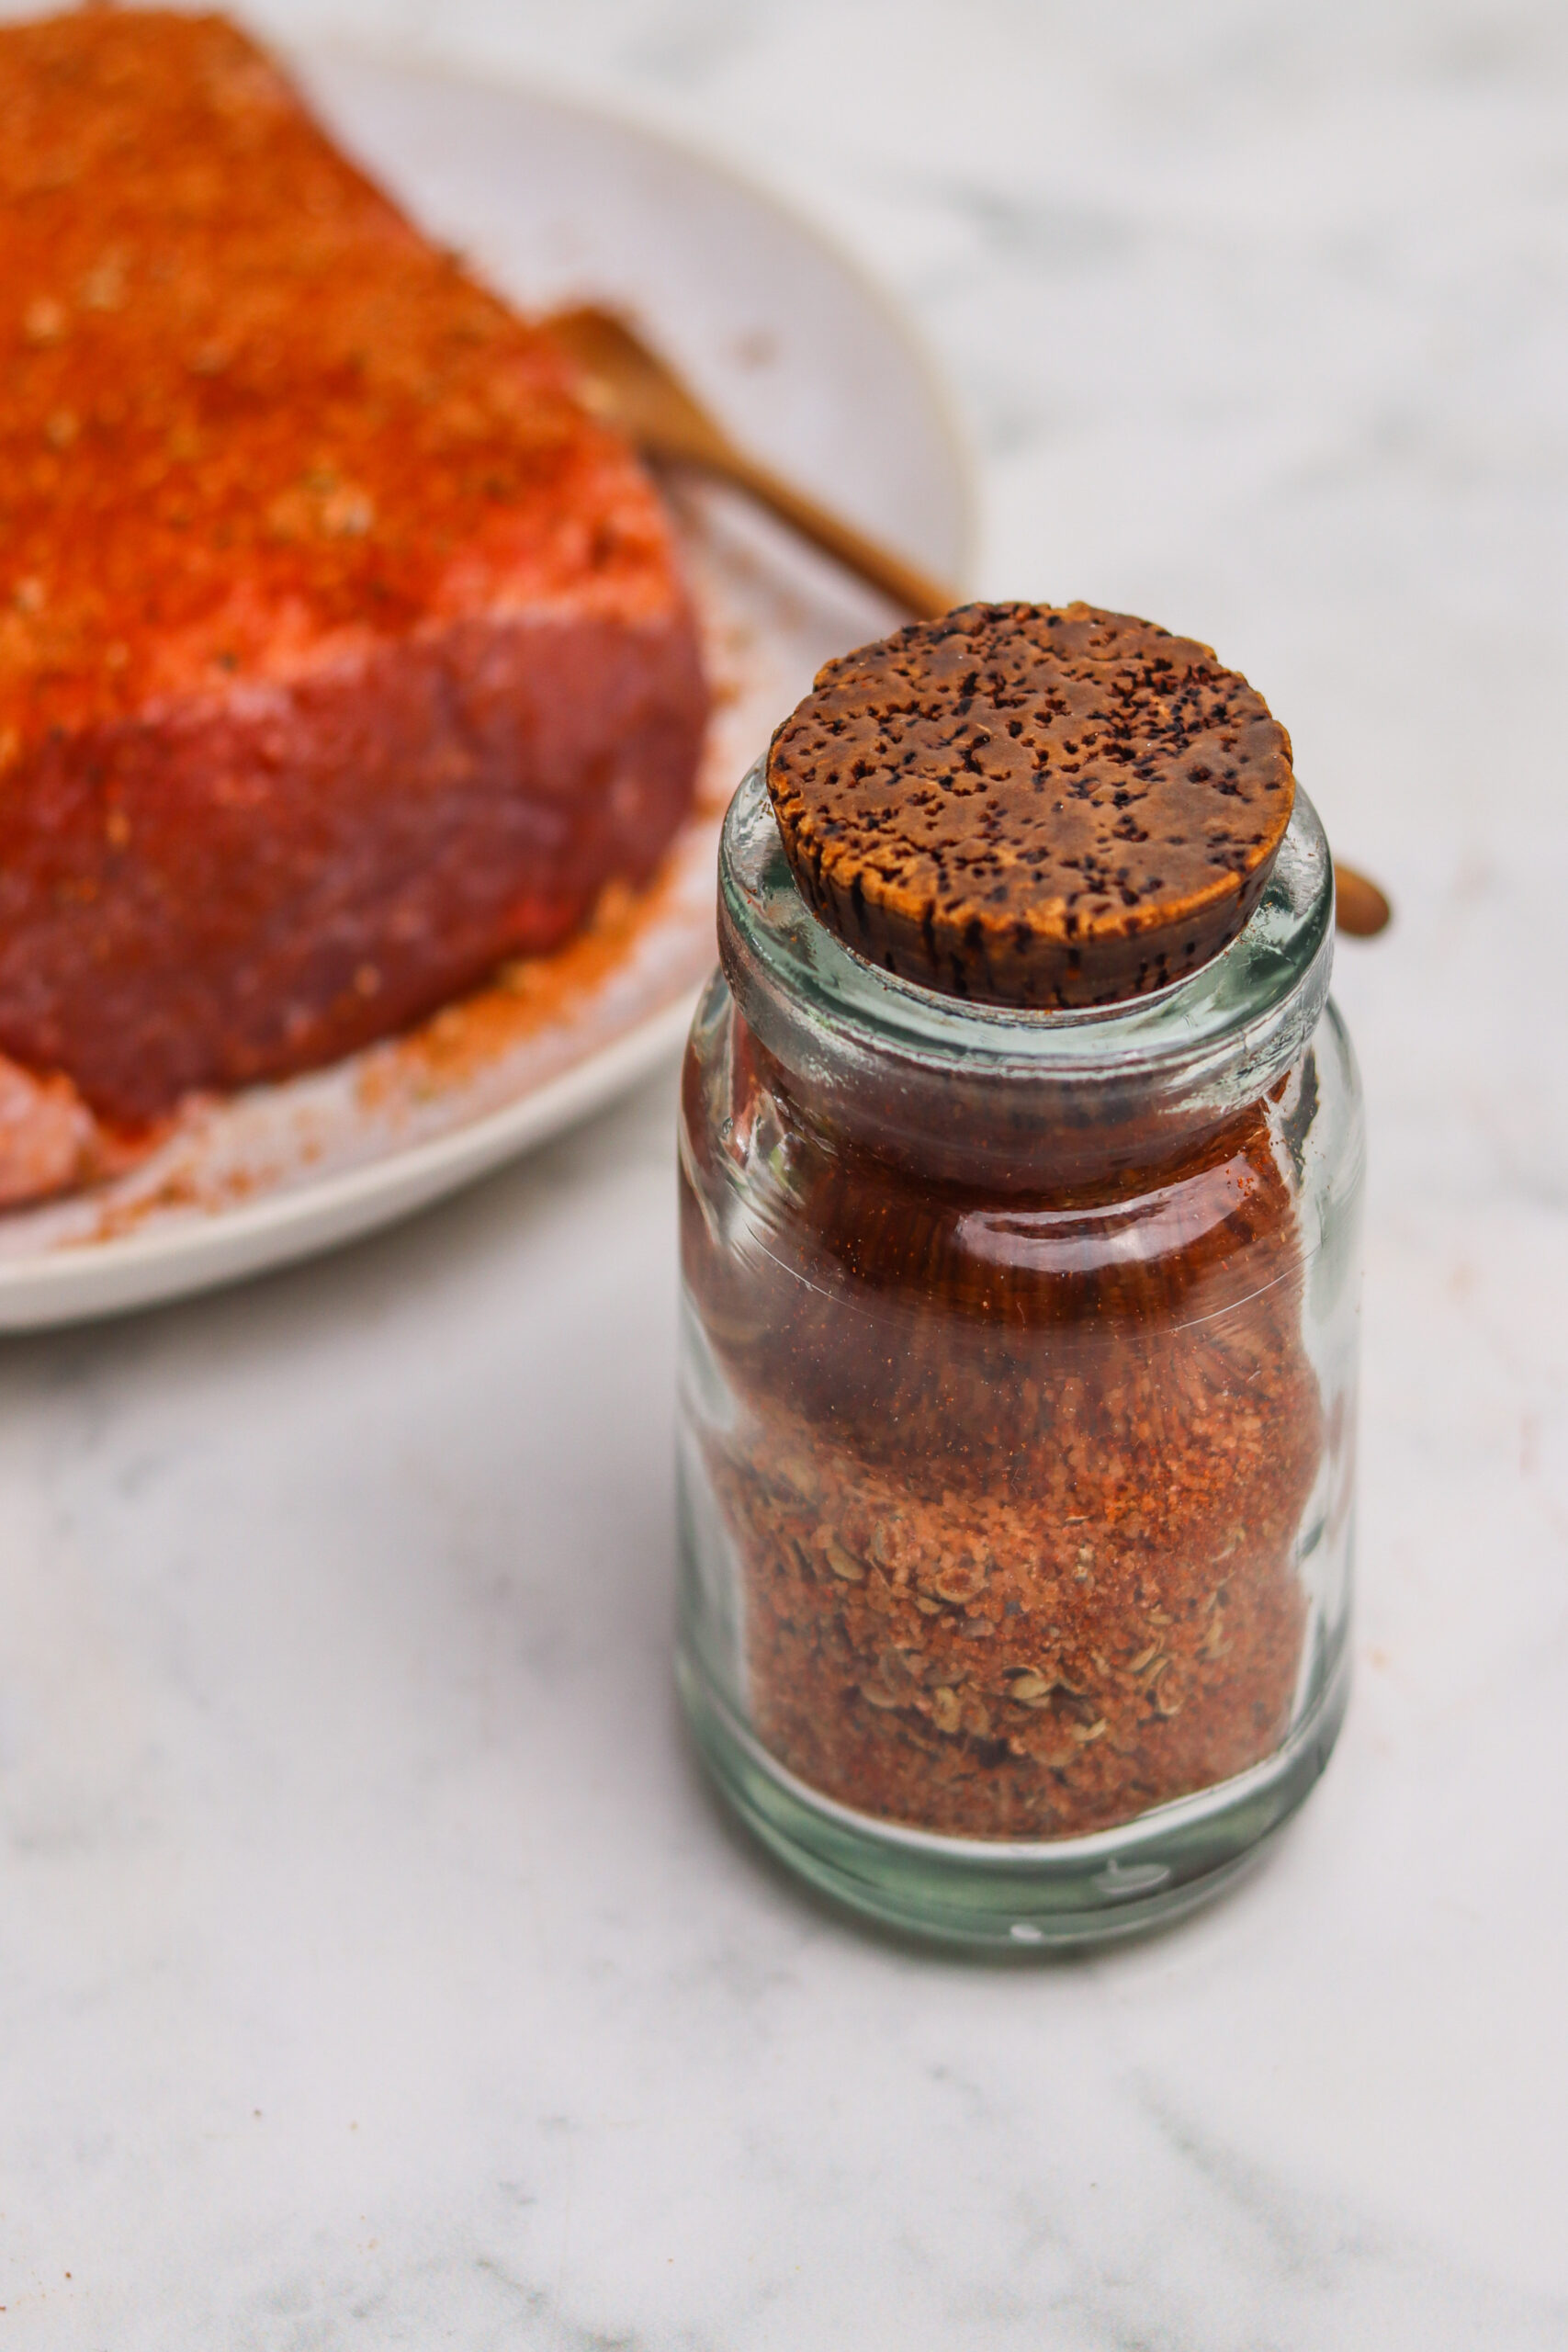
Season the chicken. Brush on BBQ sauce on the chicken thighs then generously sprinkle dry rub on top.
Bake chicken. Bake the chicken for 20 minutes, uncovered, until internal temperature reads 165 degrees Fahrenheit. Brush more BBQ sauce on top then broil for 1-2 minutes, if desired.
Recipe Tips, Substitutions, and Variations
Use a meat thermometer. To ensure you’re cooking chicken to safe temperature, I highly recommend investing an instant meat thermometer. Chicken should be cooked to an internal temperature of 165 degrees Fahrenheit.
Broil the chicken. In the last couple minutes of cooking, broil the chicken so you can get a nice crispy top. Just be sure to keep an eye on it! It can burn faster than a blink of an eye.
Different cuts of chicken. There are a variety of cuts of chicken that would work well in this recipe if you choose to substitute the chicken thighs. Drumsticks, chicken breasts, or chicken wings would work in this recipe. Make sure to adjust cooking time for all these cuts, especially if they’re bone-in.
Kick it up a notch. An easy way to give this a spicy kick is to add extra cayenne pepper to the dry BBQ rub, or use a spicy BBQ sauce! My favorite balance is the sweet heat version from Stubb’s.
Use different BBQ sauces. There always seems to be a battle of BBQ sauces as they vary in different regions of America. One thing is for sure – they’re all tasty and you can use whichever to your liking!
Use a store-bought dry rub. If you have a store-bought BBQ dry rub, feel free to use that, but my homemade one is so good and very easy to make a large batch of to store in your spice cabinet.
Ways to use BBQ chicken thighs. This is just a base recipe to other creations with BBQ chicken! You can shred the chicken and make BBQ chicken sliders, sandwich the BBQ chicken thigh between brioche buns and make a BBQ chicken sandwich, or dice up the BBQ chicken and make mac and cheese or top it on a cornbread pie! Use it in this one pot rice dish if you haven’t tried it yet!
Storage and Reheating Instructions
Allow chicken to cook then either slice up for meal prep or keep whole. Place in an airtight container and put in the refrigerator for up to five days. To reheat, zap in the microwave until warmed through.
What to Serve with Baked BBQ Chicken Thighs
BBQ chicken and side dishes are a pairing that is quintessential and classic! Here are some ideas:
]]>
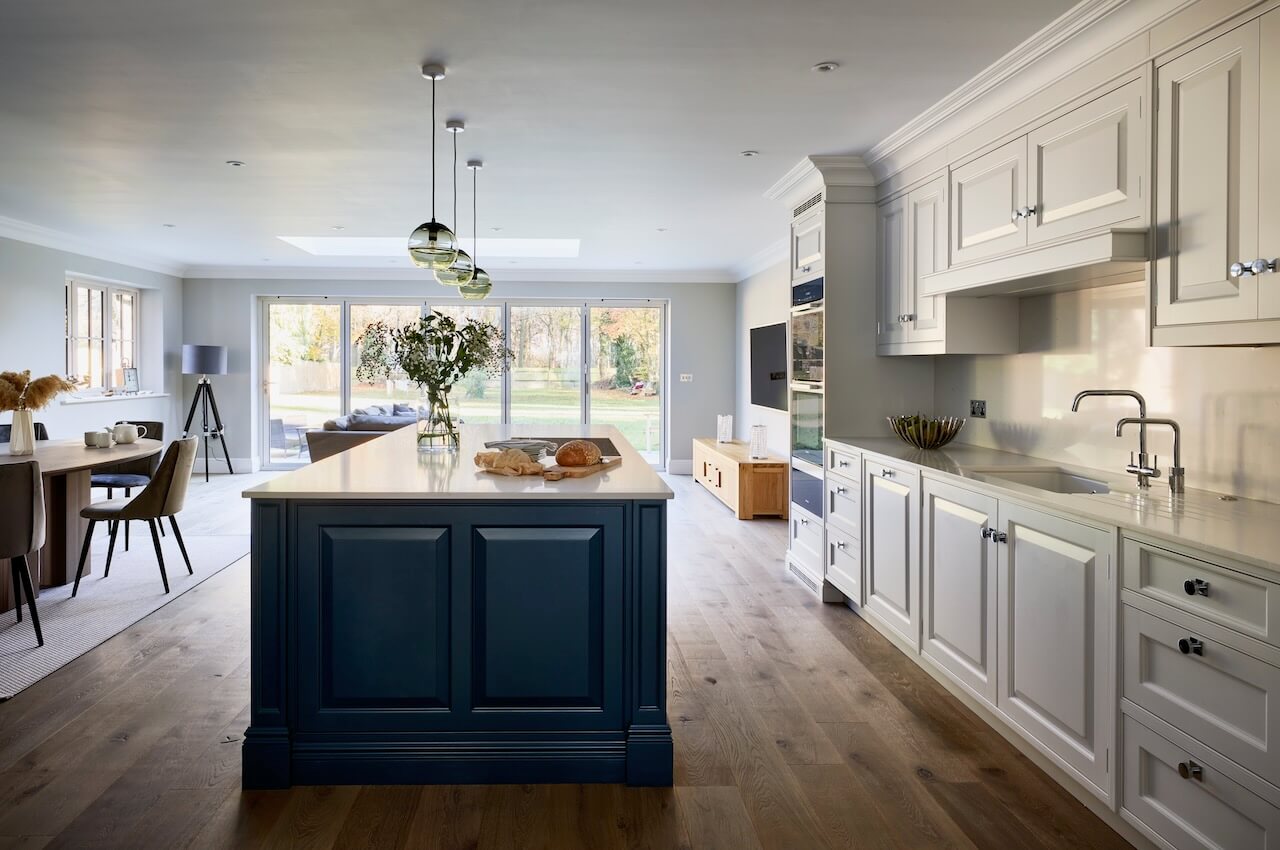
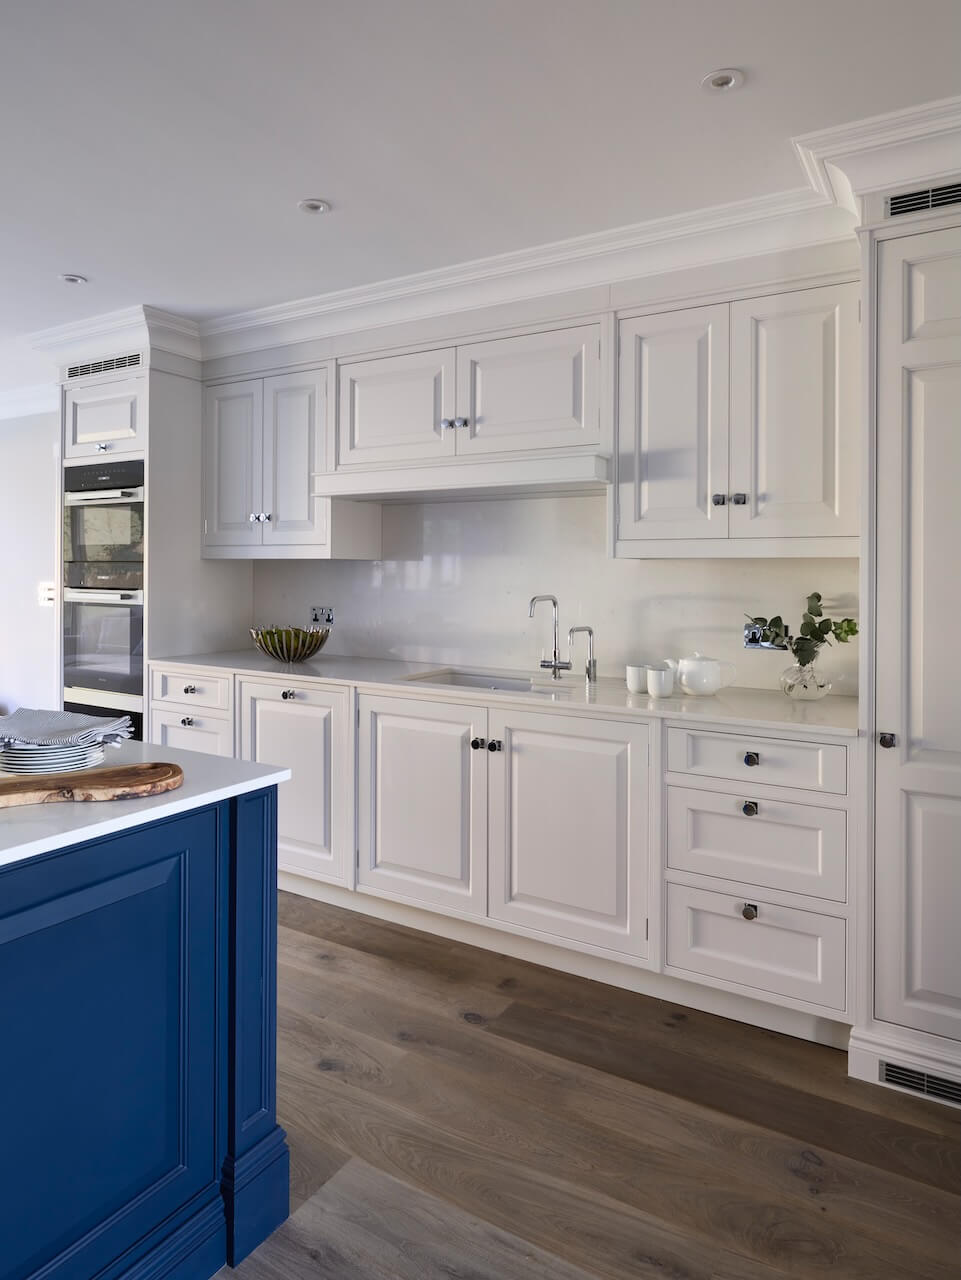
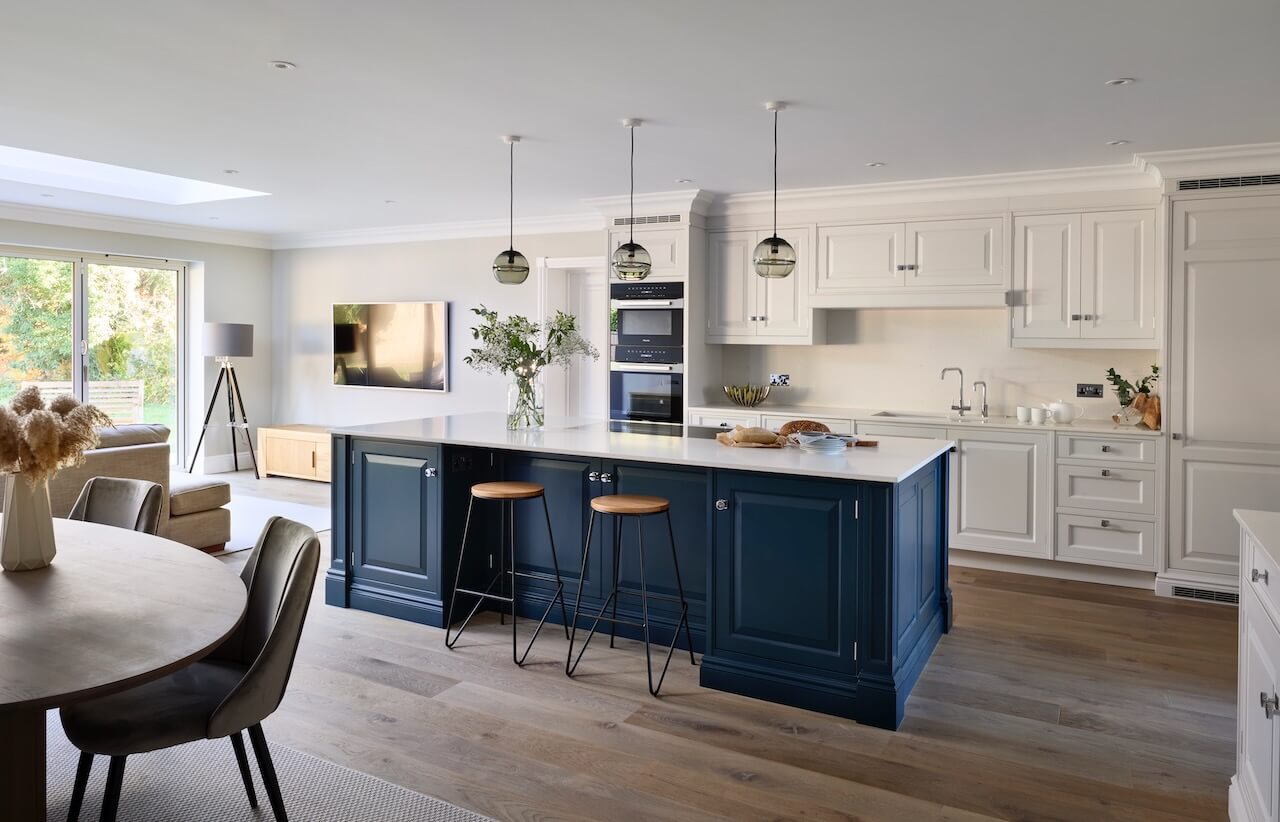
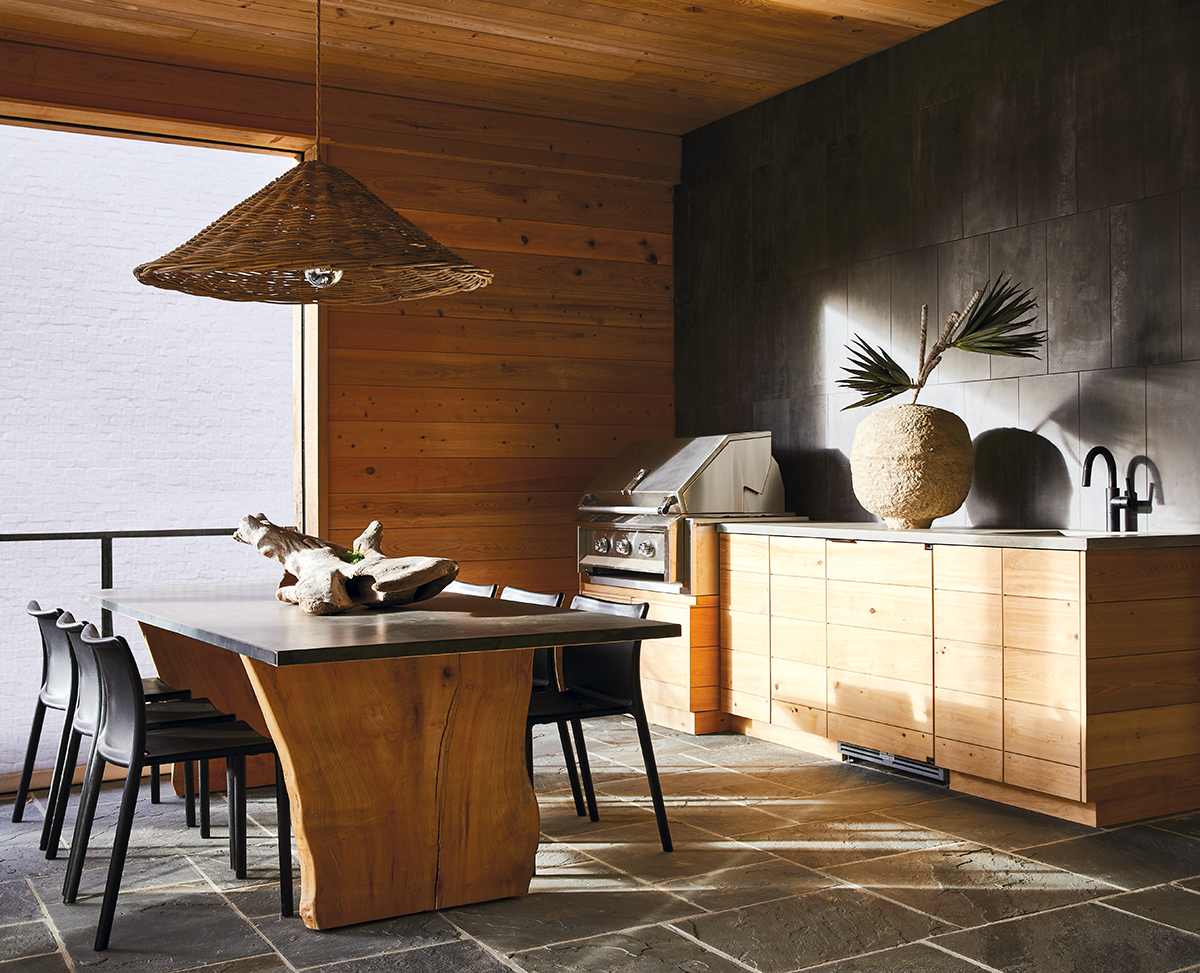
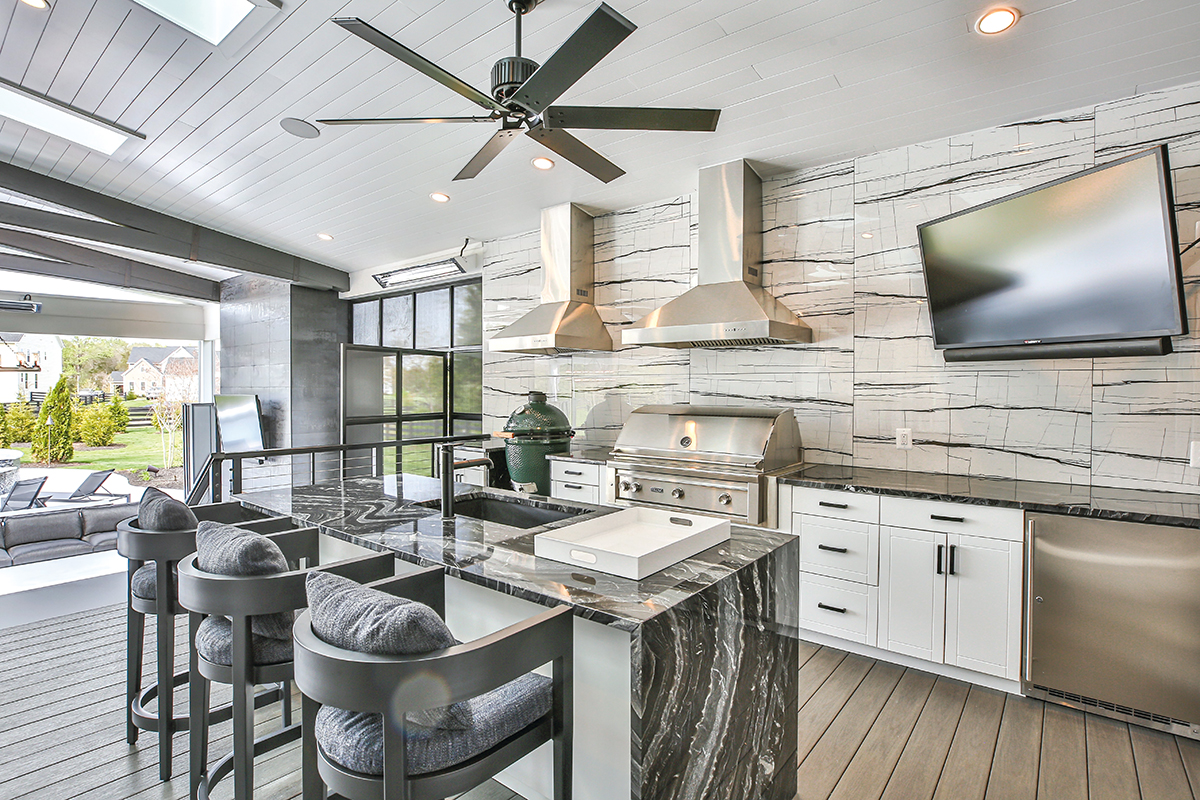
https://productiveorganizing.com/blogs/news/open-plan-traditional-in-frame-hand-painted-kitchen-by-simon-taylor-furniture2023-06-26T21:13:55-04:002023-06-26T21:13:55-04:00Open-plan traditional in-frame hand-painted kitchen by Simon Taylor FurnitureadminThe designer: Tony Lister at Simon Taylor Furniture
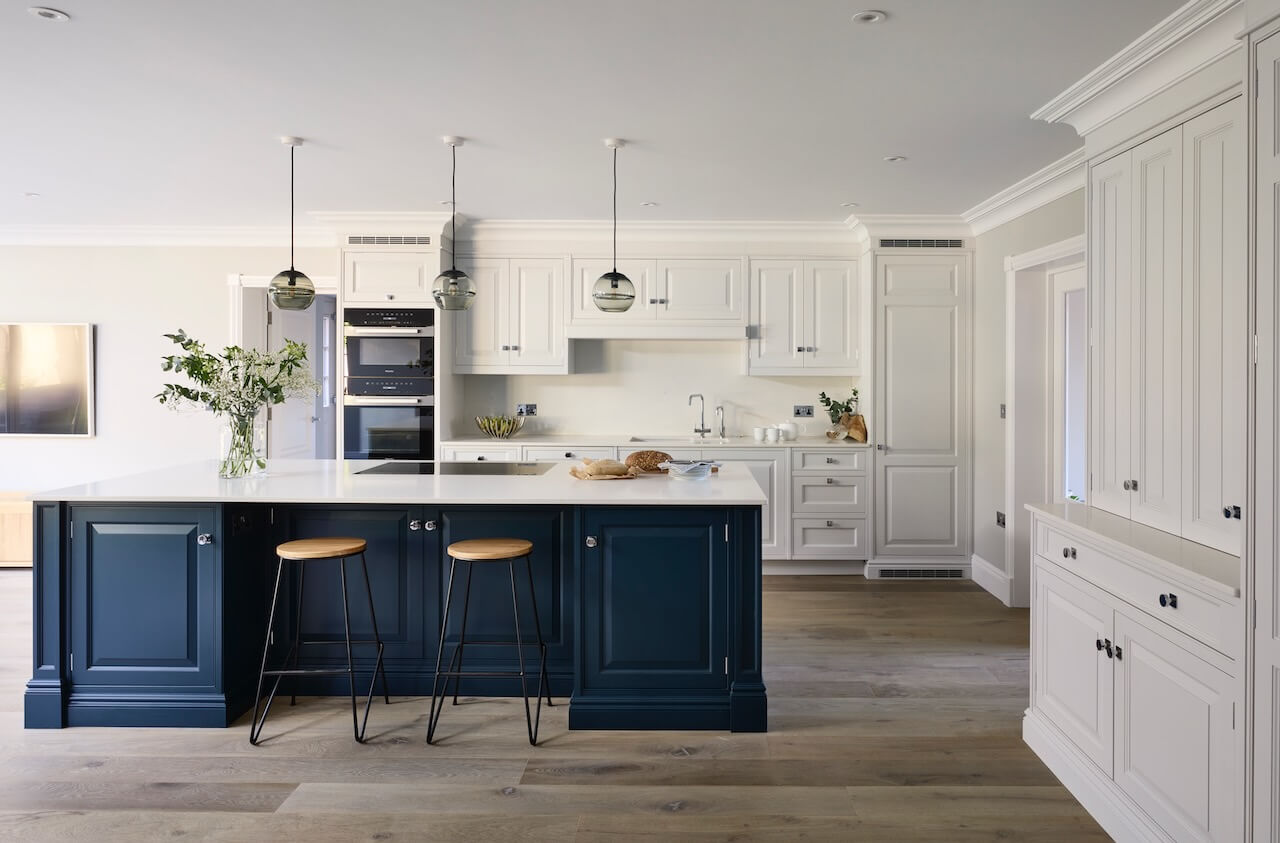
The story: Working alongside the client’s building contractors, Simon Taylor Furniture was commissioned to design and make a bespoke in-frame hand-painted kitchen with a stunning island as the central focus.
Situated in a 40 square metre open-plan space, the 16 square metre kitchen has a door that leads to a utility room, also designed by Simon Taylor Furniture.
Designer Q&A:
Q) What was your brief from the client?
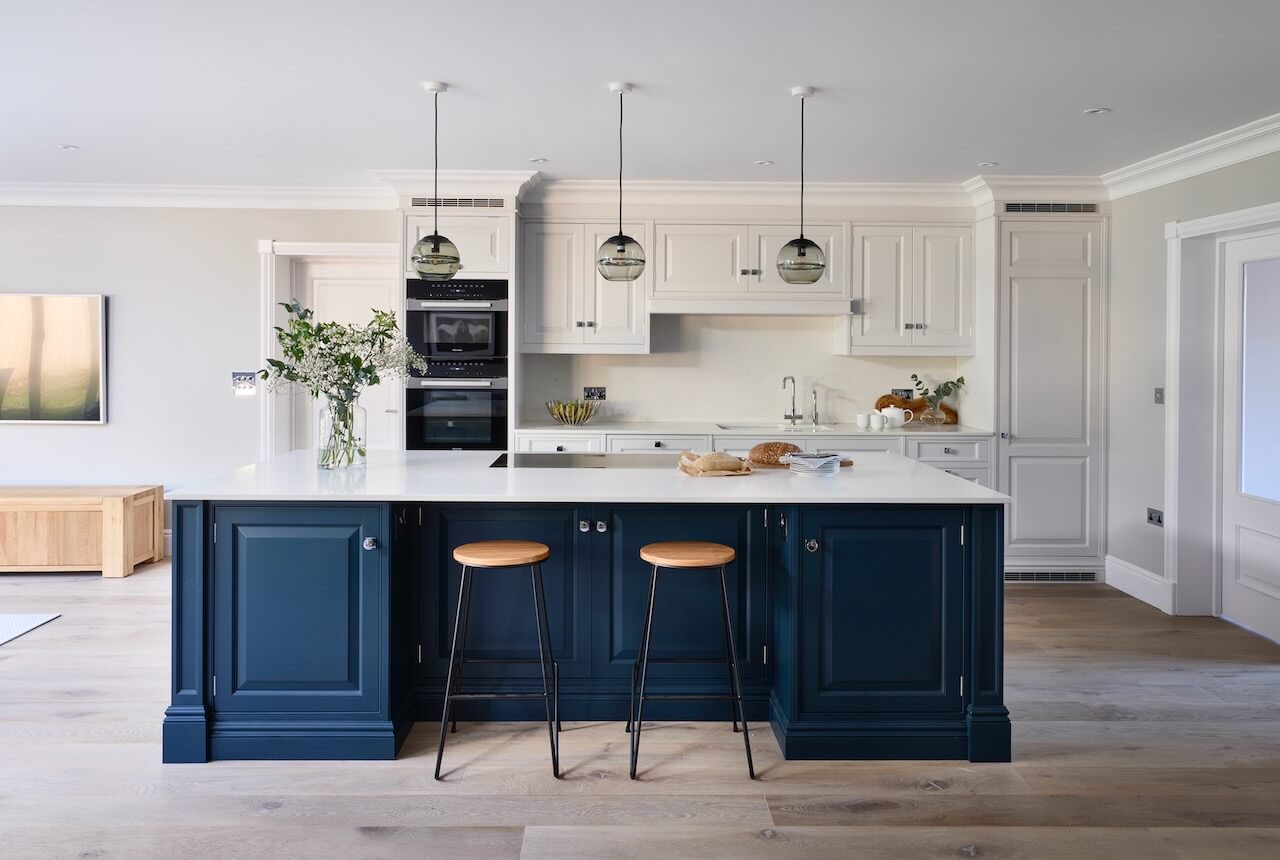
The clients wanted a traditional in-frame hand-painted kitchen with raised and fielded panel doors and end panels with symmetrical framed pilasters on each corner of the island. They required plenty of storage and because of the island’s generous 3m x 1.3m dimensions, we were able to incorporate cupboards on both sides with a recessed area facing the kitchen for two bar stools.
Q) How did you answer the brief?
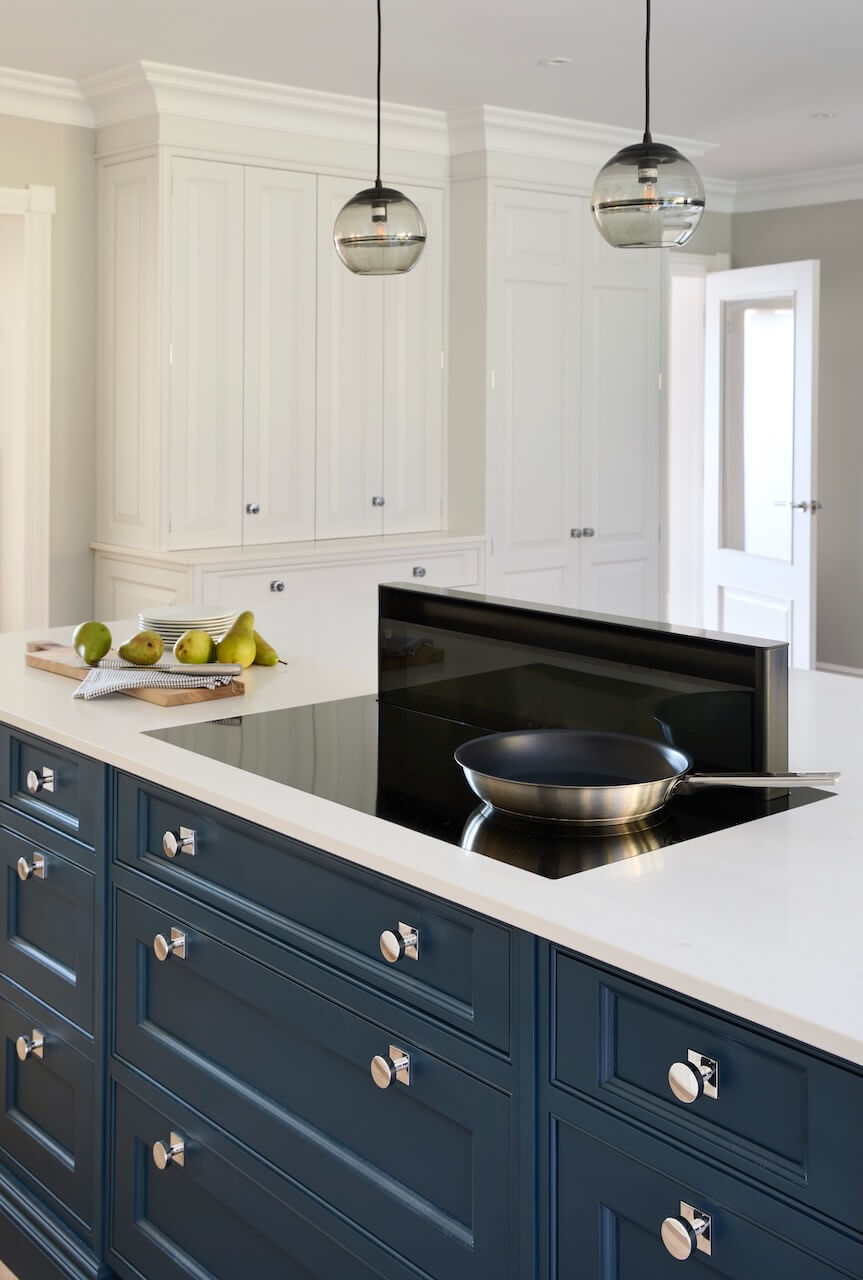
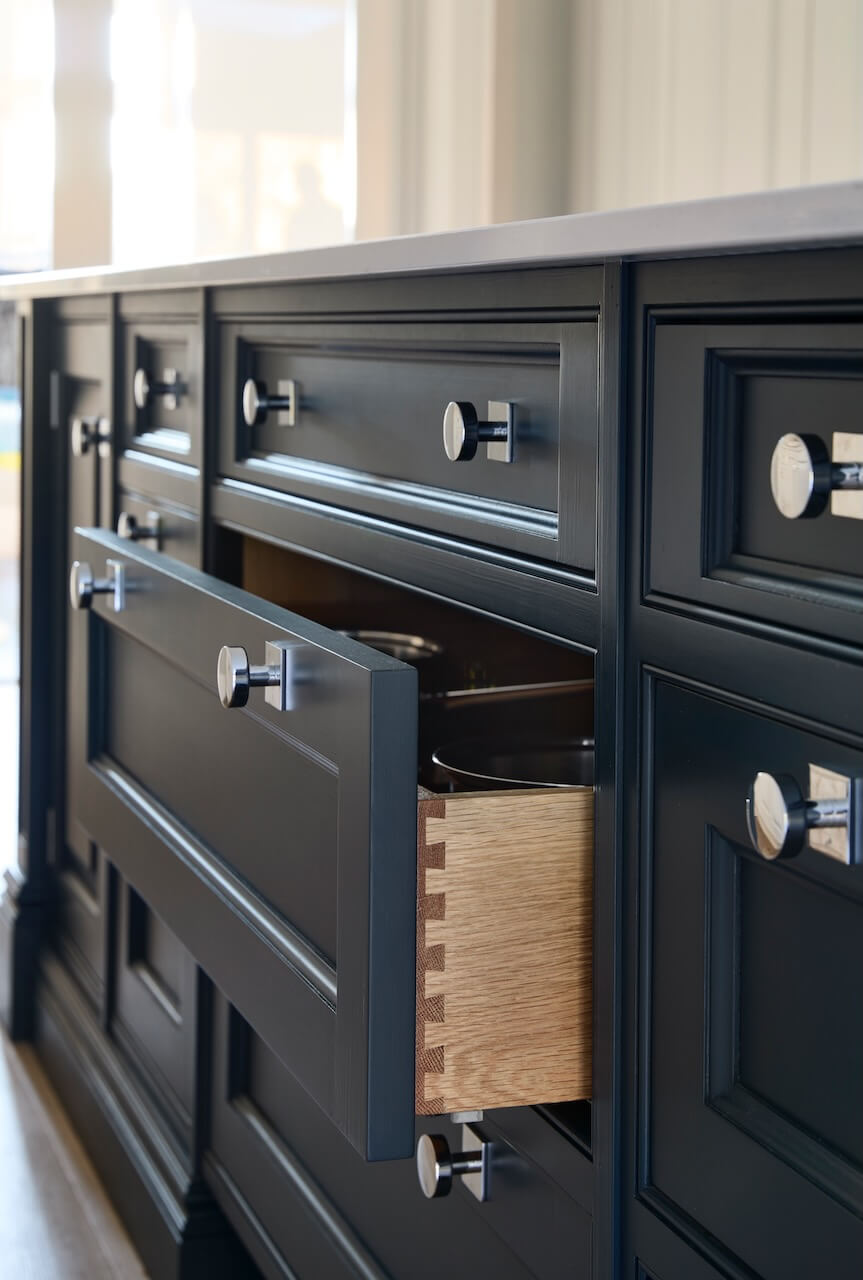
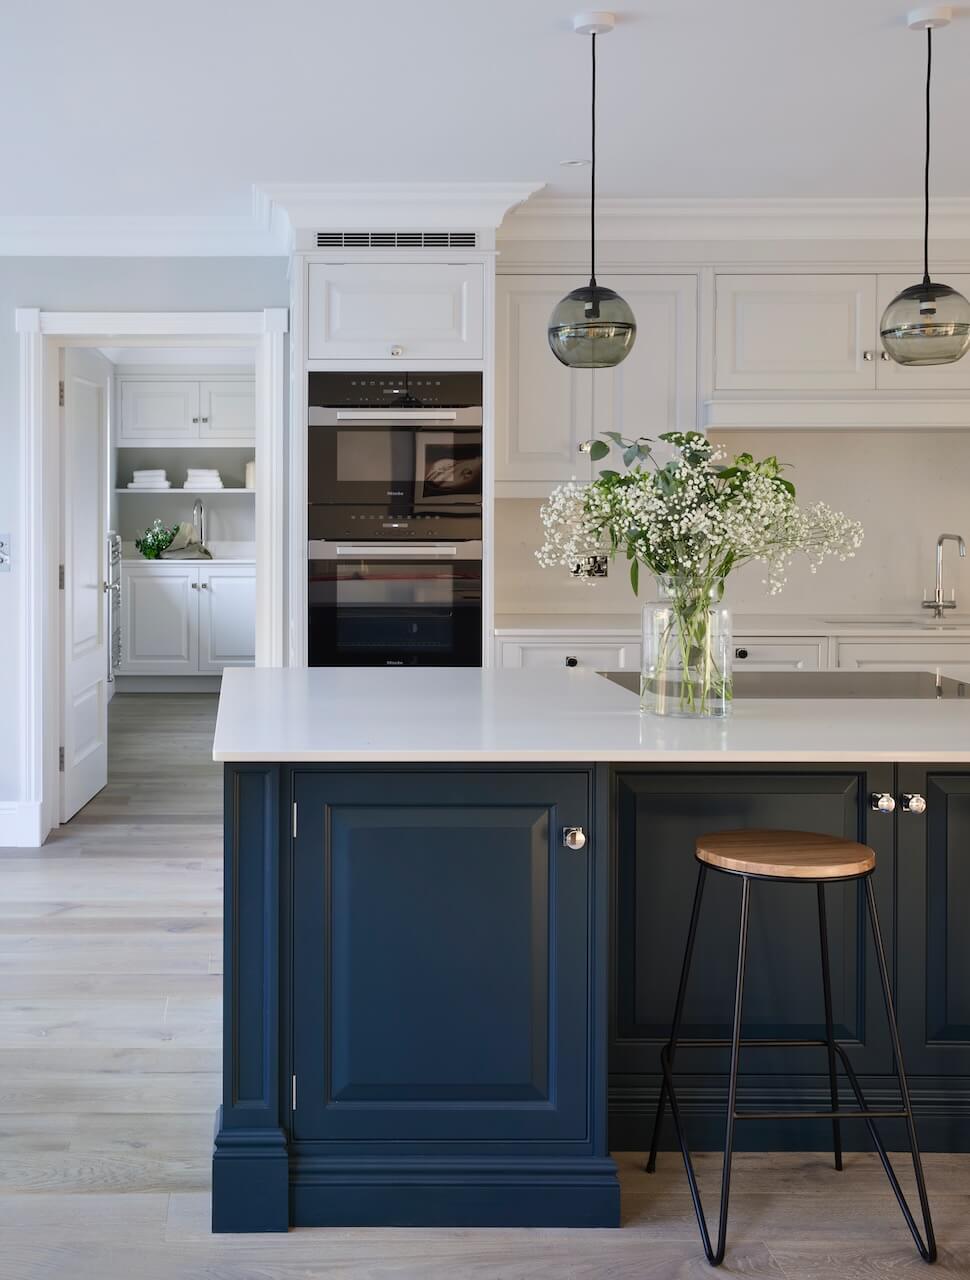
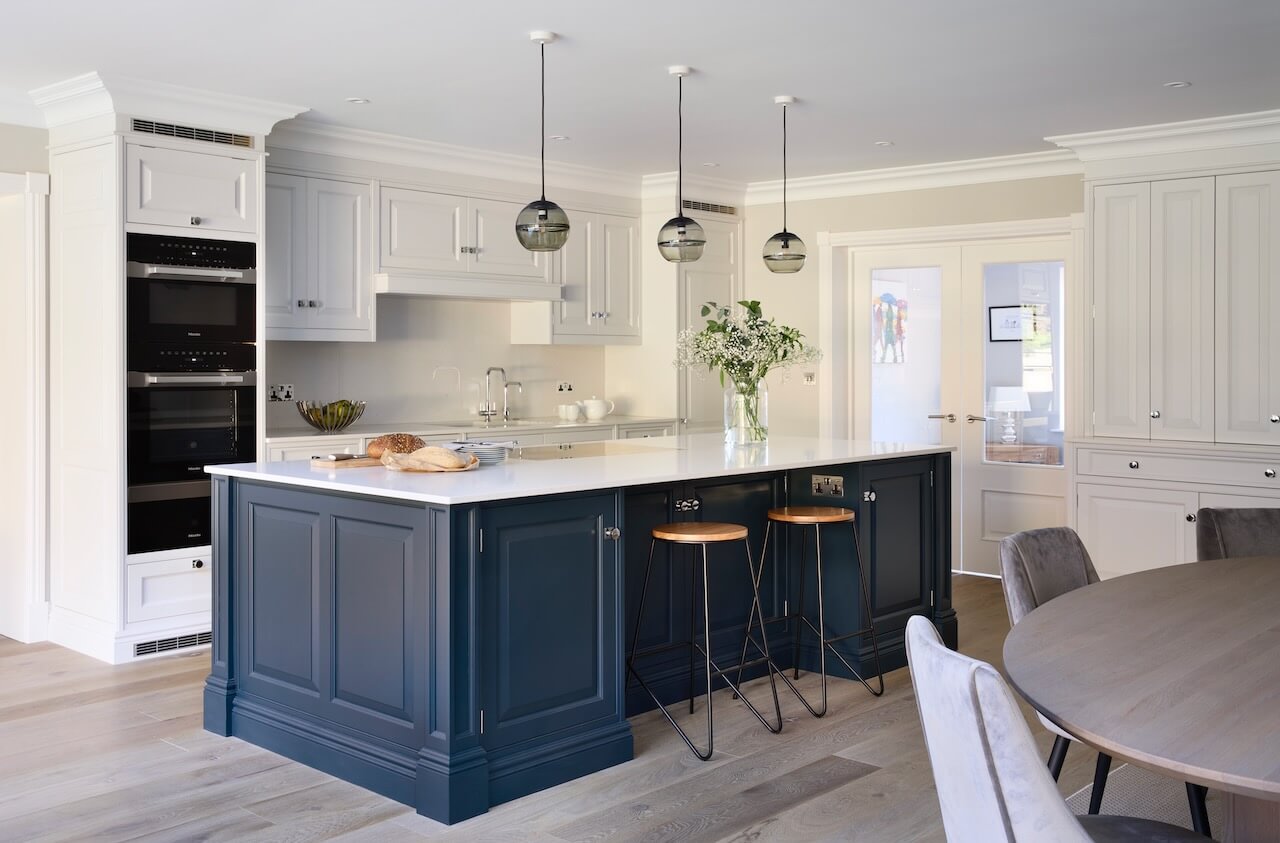
For the task side, we made 45cm oak dovetail drawers on either side of 90cm versions at the centre, with a cupboard at one end and a pull-out bin at the other. The drawers at the centre have a 40cm depth in order to sit in front of the concealed ventilation tower of the Novy Panorama 90cm vented downdraft induction hob that is situated flush within the worktop. When in use, the tower rises by up to 30cm to withdraw cooking odours directly next to the pans, therefore no overhead extraction is required. The island is painted in Hague Blue by Farrow & Ball while the white 20mm worksurfaces are Misty Carrera quartz by Caesarstone.
Q) Which products did you use and why?
The run of cabinetry facing the island is painted in Dimpse by Farrow & Ball and includes a wet area with a 60cm Siemens integrated dishwasher within and a white undermount sink by Shaws of Darwen that includes an InSinkErator food waste disposer.
A Hestia U-spout tap by Franke sits alongside a Quooker PRO3 Nordic Square boiling water tap. Overhead cupboards are in two sizes and base cabinetry features a two-door utility cupboard.
Q) Which appliances did you use in the oven housing?
To the left is a tall floor-to-ceiling housing featuring a bank of cooking appliances from the PureLine collection by Miele – a 45cm combination microwave above a 60cm pyrolytic single oven with a 29cm warming drawer. A storage cupboard sits above the appliance bank with drawer beneath. At the other end of this run is a further floor-to-ceiling door front for a tall integrated larder fridge by Siemens.
Q) And the pantry?
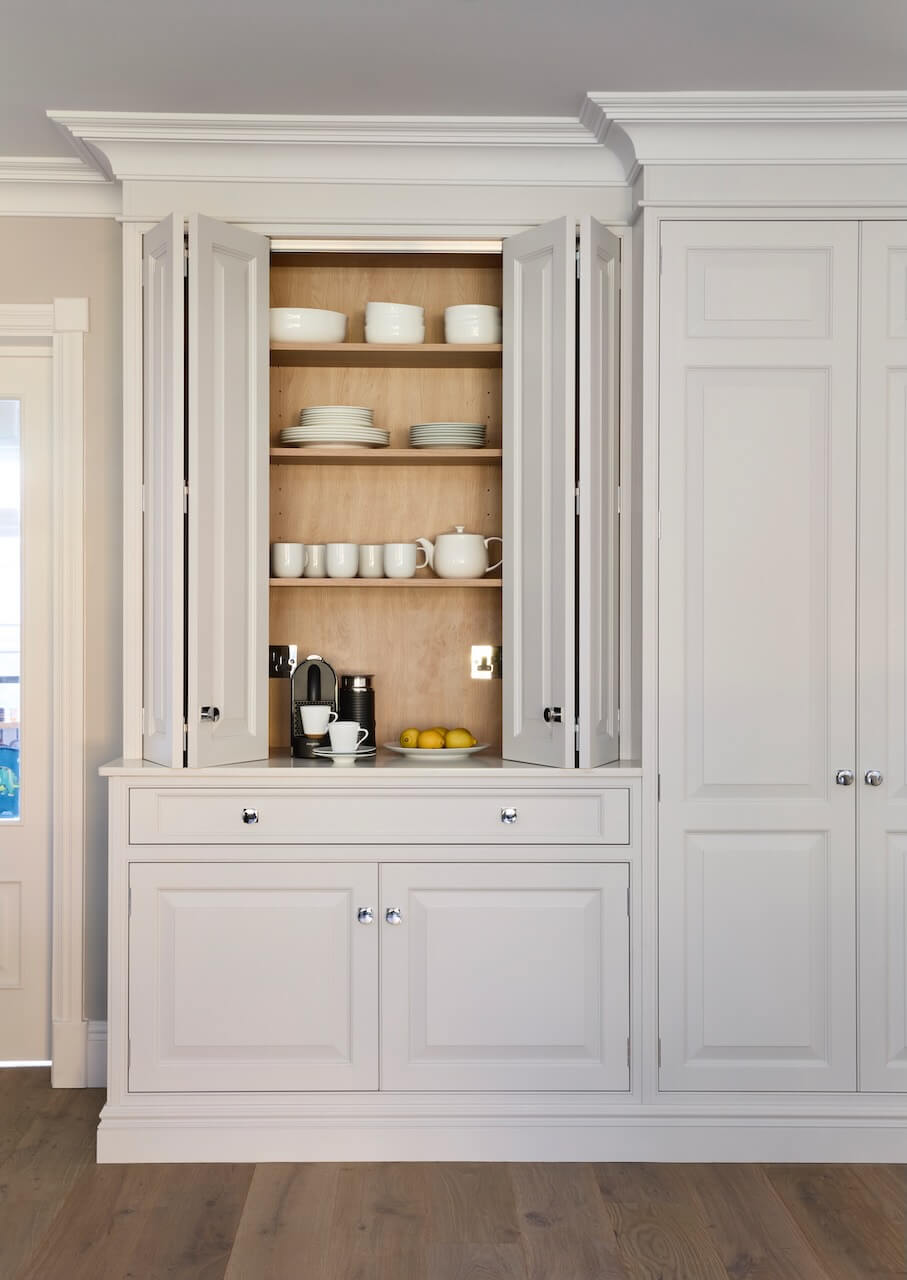
To the left of the double doors leading to the family room is a further run of floor-to-ceiling cabinetry, which incorporates a breakfast cabinet with bi-fold doors, a drawer for napkins and cutlery and a two-door cupboard beneath.
This is next to a full-size pantry larder with oak internals and spice racks built into the doors. All chrome knobs and hinges are by Crofts & Assinder and the pendant lights are by John Lewis. In order to maintain the symmetry of the open-plan room, the ceiling cornicing runs throughout the kitchen above all tall furniture.
]]>
https://productiveorganizing.com/blogs/news/the-ten-best-wooden-play-kitchens-for-kids-12023-06-25T21:13:51-04:002023-06-25T21:13:51-04:00The Ten Best Wooden Play Kitchens For Kidsadmin
Cooking is a timeless fascination for children. This type of play goes beyond gender and teaches kids loads of life skills along the way. An investment in a play kitchen is money well spent, as it can provide hours of entertainment. We've rounded up the ten best wooden play kitchens for kids to help get your little chef's imagination to work. Please note: this post contains affiliate links (including Amazon) but NO paid placements. Affiliate links allow us to earn commission on products we recommend.
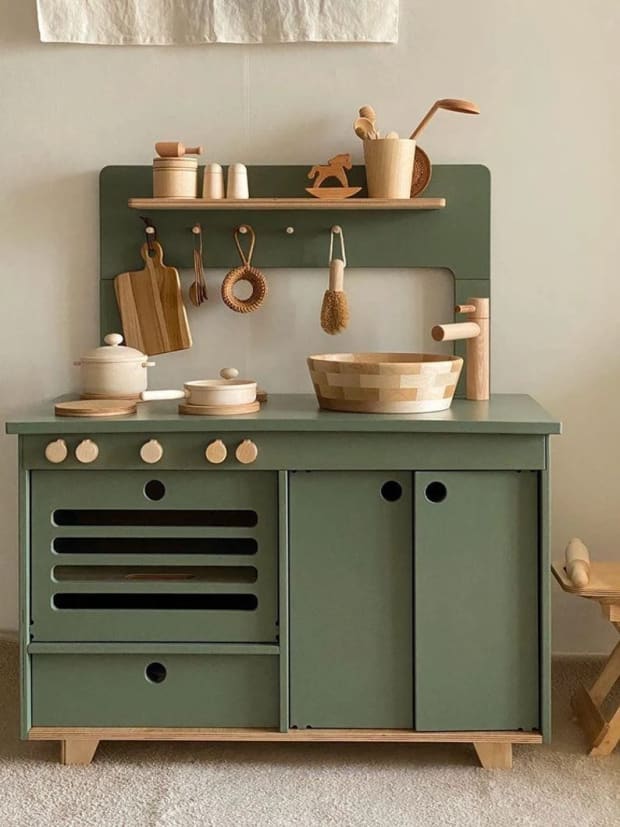
BEST HANDCRAFTED WOODEN PLAY KITCHEN
The ZOE kitchen was spotted on Etsy and has AMAZING reviews. This is the kitchen most likely to get me to play for hours. I love all the hand crafted accessories and the design element makes me swoon. And the artist is willing to CUSTOMIZE this design.
The surface has enough space for them to make a 'bake' which can then be popped in the oven (with magnetic door) or set on the hob to 'cook'. Utensils and equipment can then be packed away in the handy cupboard or placed on the rack above the sink.
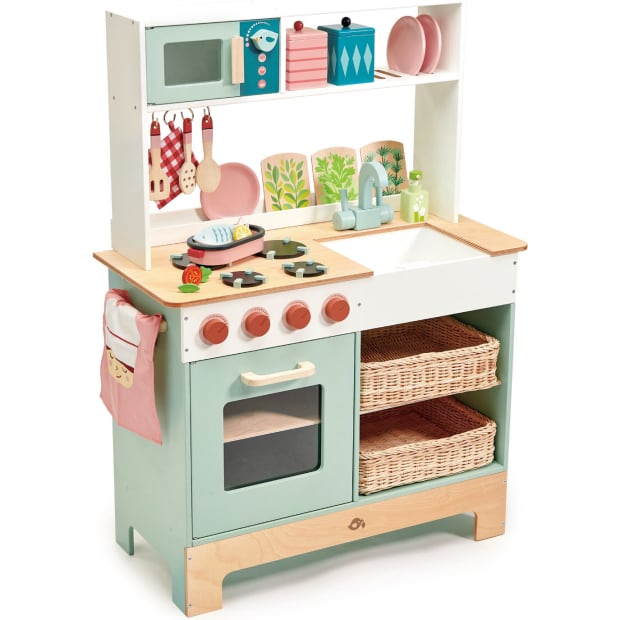
I'm sold on the overall sweetness of this play kitchen. The colors and design harken back to a simpler time when bakers could be found in every home. With an oven and integral microwave and plate rack, this kitchen range is made extra special with a multitude of original accessories.
Two wicker baskets provide lots of storage space for other pretend play food within the mini chef range, two wooden jars, three racks of herbs, three pretty plates, a printed gingham potholder, a printed mini chef tea towel and three cooking utensils. Pretend play food here is a delightful two-part fish with garnishes in an oval fish pan. Lastly but not least, don't forget to wash your hands at the sink with a handy soap dispenser.
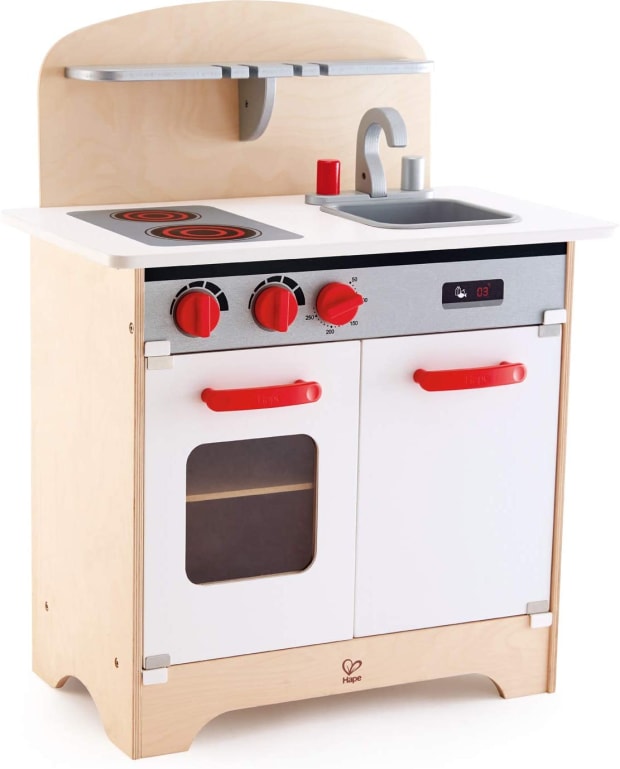
I love the simplicity of the Hape Play Kitchen. It has all a little cook needs with a sink, stove, oven with window, cabinet, spice shelf, and turn able clicking knobs. Hope kitchen and grill Playset is made from durable wood, child safe materials and non-toxic water-based paint. This toy could be passed along for generations. There's nothing trendy about it.
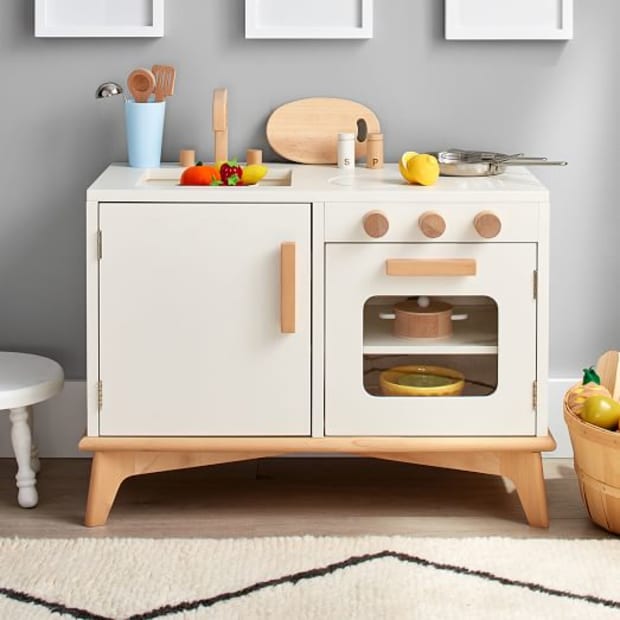
The Sloan Play kitchen from West Elm will have a home in any home that errs on the side of form over substance. The clean simple lines will look good in every living room, though it's missing the bells and whistles of other brand. It's got a solid poplar frame, solid birch legs and engineered wood body and shelves. It features a pretend sink, oven, fridge and set of salt and pepper shakers.
The Ikea Duktig is our pick for the budget play. And if you want to save money and know how to quickly assemble Ikea furniture, this is the one for you! The Ikea kitchen is a dream come true for tiny master chefs and bakers. In this modern the cooktop lights can be switched on/off and give a realistic glow but do not get warm.
If you love Chip and Joanna Gaines and all things farmhouse, the Chelsea kitchen from Williams Sonoma is the one for you. It’s an all-in-one stove, oven and refrigerator with tons of interactive opportunities – knobs turn, doors open and the sink is watertight for real cleanup.
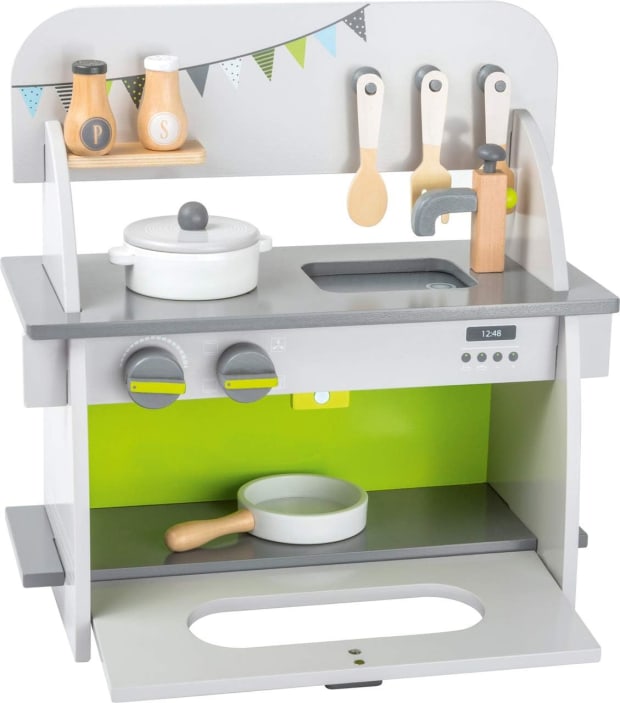
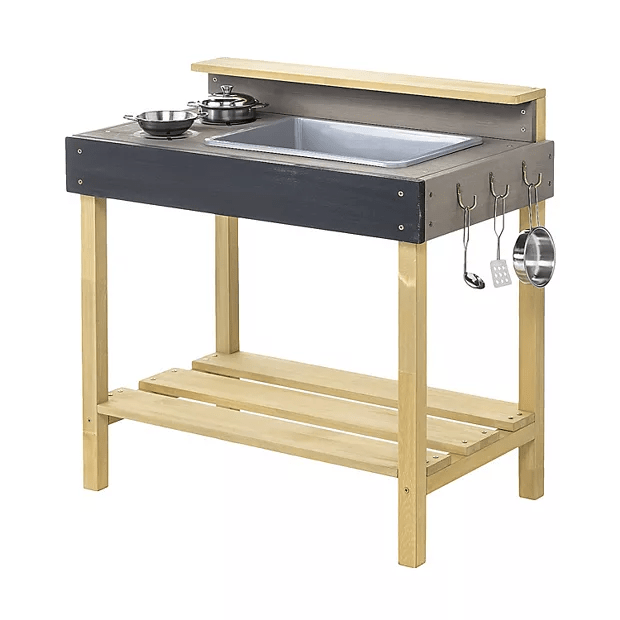
If you have a super small space, this Small Foot mini play kitchen is perfect. The cooking event can begin! This comprehensively equipped play kitchen, made of FSC certified wood, has everything that young chefs need for preparing a feast. Knobs on the stove and oven make realistic clicking sounds. For the price it also includes folding oven, saucepan, lid, pan, salt and pepper shakers and three small kitchen utensils. The toy measures 14.57" H x 6.5" W x 13.98" H.
If you child wants a FULL kitchen with every gadget and loads of counter space, this is the one. It's idea for a large family with a big playroom. the set up comes with an oven, microwave, refrigerator, freezer and washer doors. The burners have realistic lights and sounds and there is shelving and hanging pegs for pots, pans and accessories.
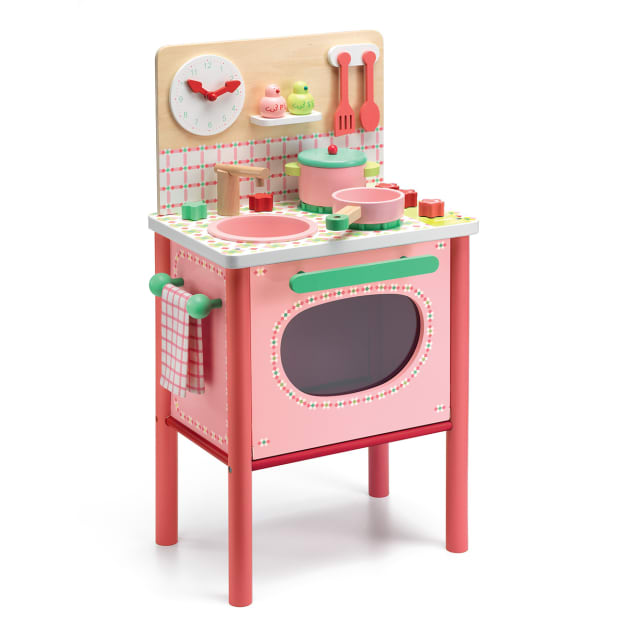
A dream play set for any growing foodie or mini chef, the Djeco Lila’s Cooker is just under 15" wide. I personally love the tea towel. Featuring a range of accessories, your tot can stir, whisk, flip, and mix their creations before adding the finishing touches with the bird-shaped salt and pepper shakers.
If features a play oven, microwave and cupboard with magnetic doors. Plus, the reverse side features a play washing machine with sound-effect buttons and storage shelves for toy food. Includes 7 kitchen accessories.
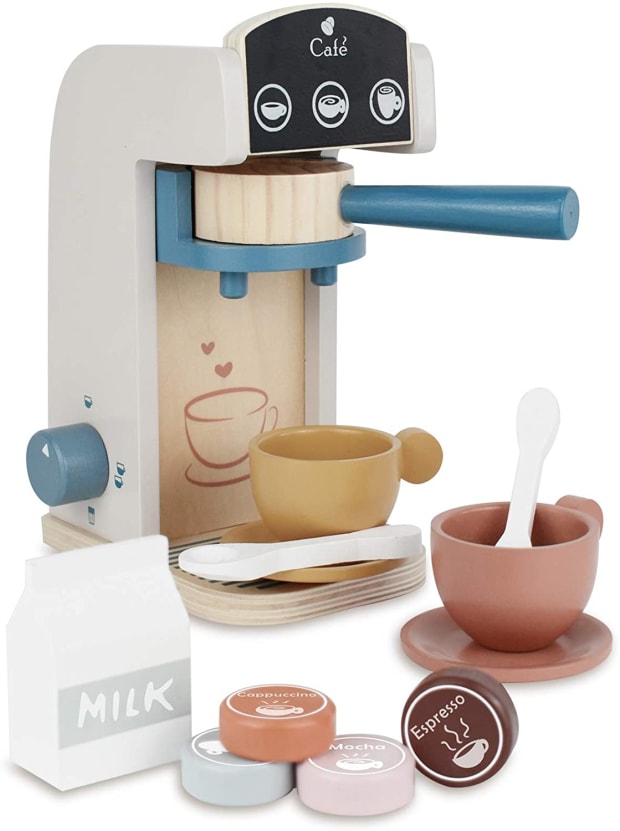
I'm now obsessed with the PairPear Coffee Maker Espresso Playset. If you love coffee, you've got to get this for your kiddo. This wooden set comes with 13 pieces and is the perfect way to get your kids started on making latte art. Thanks to it’s functional filter, coffee beans will drop into the cup!
Momtrends was not paid for this post. This post contains affiliate links.
]]>
https://productiveorganizing.com/blogs/news/revolutionize-your-home-organization-game-with-these-2-products2023-06-21T21:13:53-04:002023-06-21T21:13:53-04:00Revolutionize your Home Organization Game with These 2 Productsadmin
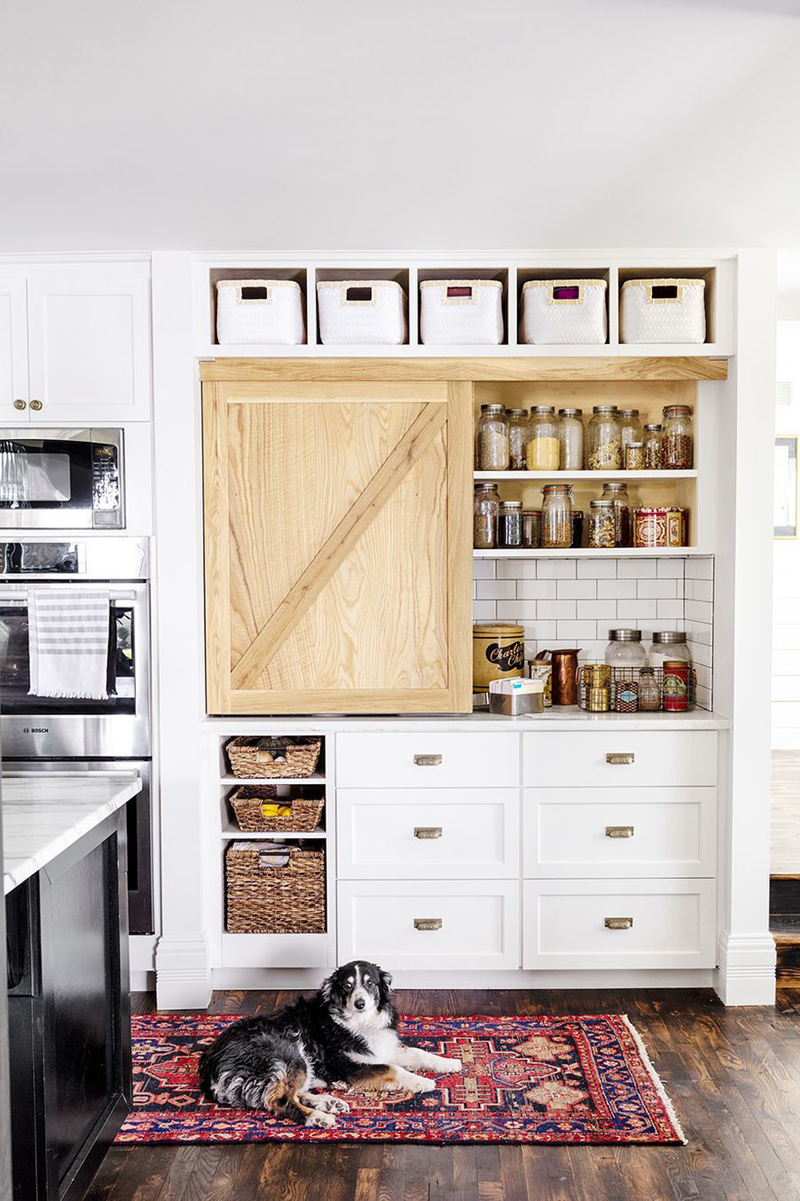
As a mother, you know all too well the challenges of maintaining an organized home amidst the chaos of daily life. From juggling household chores to keeping up with your little ones, it often feels like a never-ending battle against clutter. But fear not! We’re here to share some game-changing tips and innovative storage solutions that will transform your living space into an organized oasis. Say hello to magnetic spice racks and under-sink or counter slide-out organizers – the ultimate weapons in your quest for a tidier home.
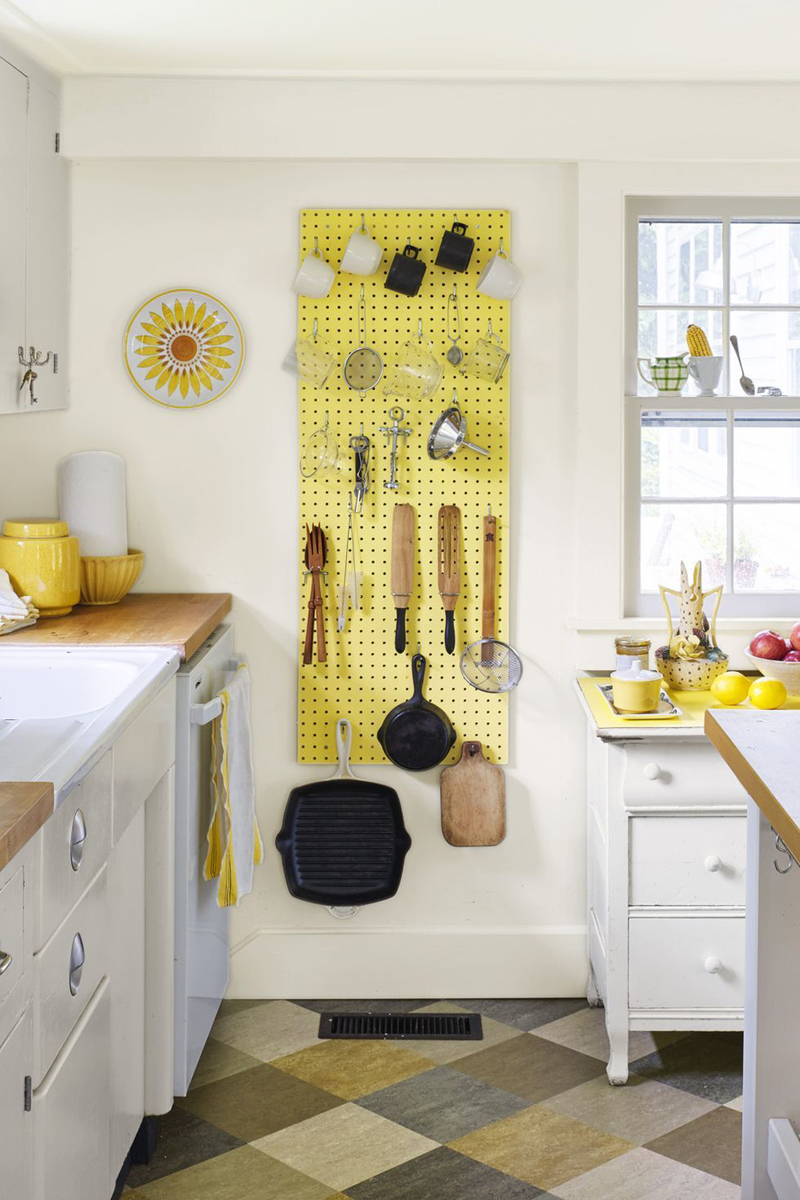
Magnetic Spice Rack for Refrigerator
Spices are the secret ingredients that add flavor and depth to your meals. However, the struggle of finding the right spice jar buried in a cluttered cabinet can be a frustrating ordeal. Enter the magnetic spice rack! These nifty little helpers are designed to stick right to the side of your fridge, offering easy access to your favorite spices. Imagine having all your seasonings beautifully displayed and within arm’s reach while cooking. With magnetic spice racks, you can effortlessly find what you need, saving time and energy in the kitchen.
2-Tier Multi-Purpose Bathroom Cabinet Under Sink Organizers
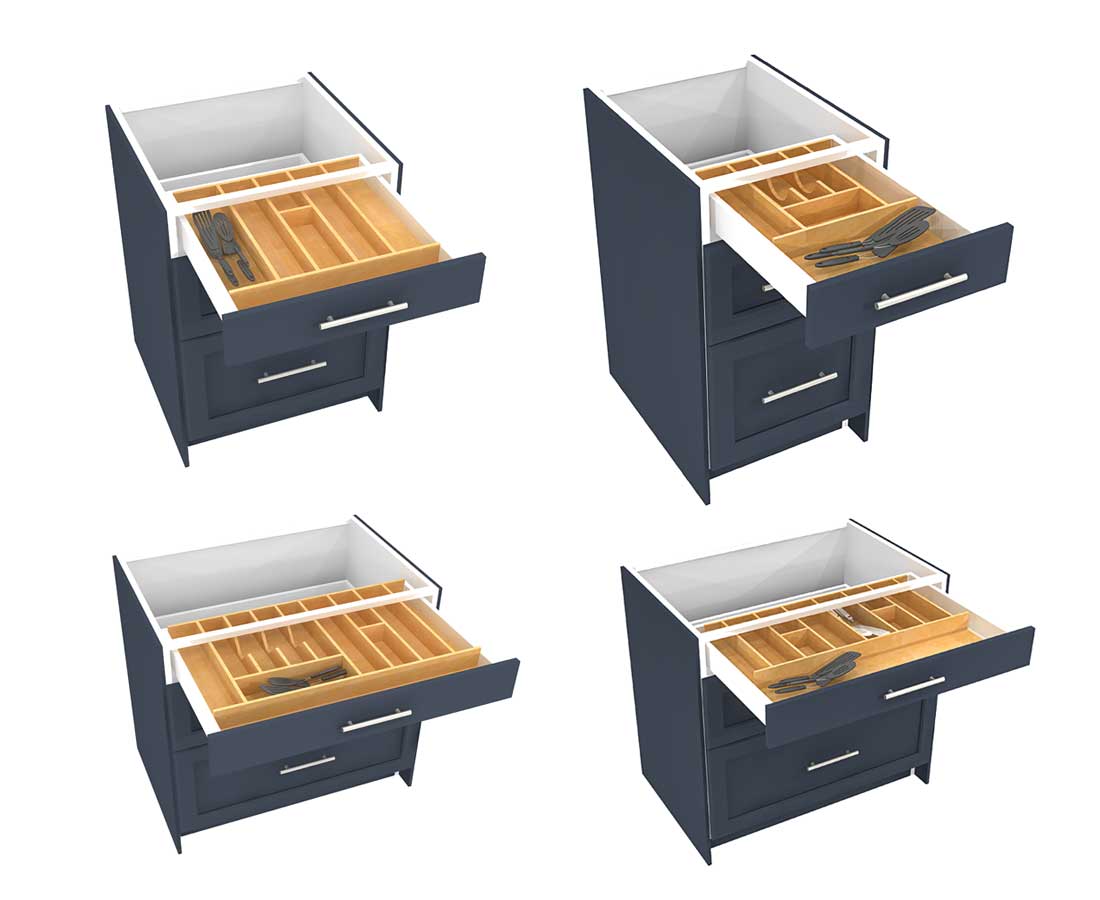
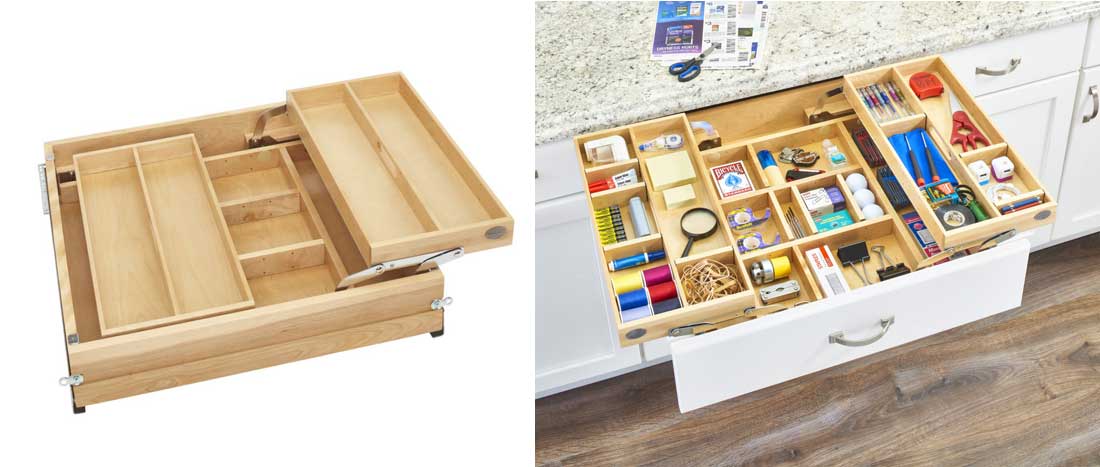
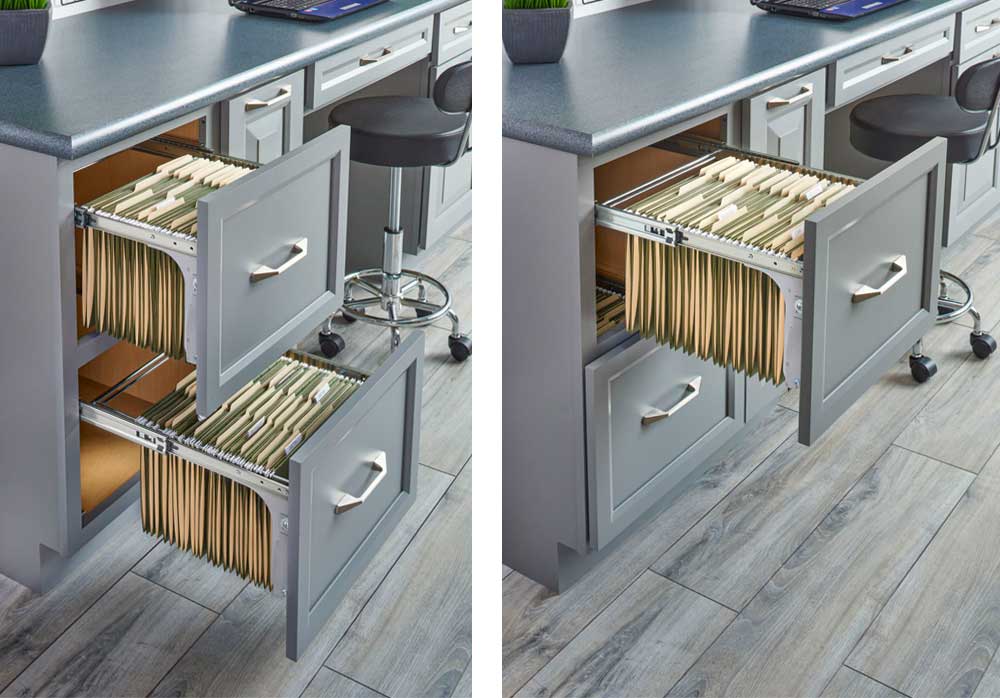
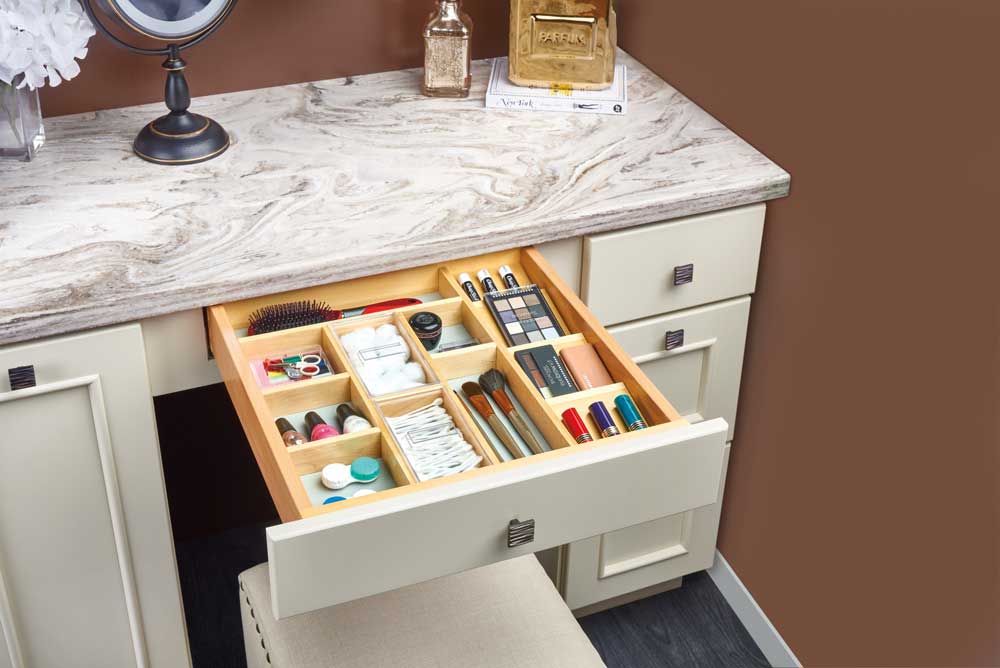
Slide-Out Organizers for Under-Sink or Countertop Bliss Let’s face it: the area under your sink or your countertops can quickly turn into a black hole of cleaning supplies, pots, and pans. But fear not! Slide-out organizers are here to rescue you from the chaos. Designed to fit snugly under your sink or inside cabinets, these organizers offer smart, space-saving solutions. With multiple shelves and compartments, you’ll finally have a designated spot for everything, from cleaning products to dishware. No more digging through cluttered cupboards or knocking over stacks of pots—simply slide and access what you need with ease.
Optimizing your home organization doesn’t just result in a neater living space; it also brings a range of additional benefits that will make your life as a mother more enjoyable. Here are a few advantages you can expect:
Increased Efficiency: With everything neatly organized and easily accessible, you’ll save time and effort in your daily routines. Imagine effortlessly finding the right spice or grabbing that cleaning spray without searching through endless clutter.
Stress Reduction: A cluttered environment can lead to stress and overwhelm. By implementing effective storage solutions, you’ll create a serene and calming atmosphere, promoting a more peaceful and enjoyable living space.
Streamlined Meal Preparation: With magnetic spice racks, meal prep becomes a breeze. No more rummaging through cabinets, wasting precious minutes searching for the right ingredient. Enjoy a seamless cooking experience with your spices in plain sight.
As a busy mother, optimizing your home organization is essential for maintaining a harmonious and stress-free living space. By incorporating home organization products like magnetic spice racks and slide-out organizers into your own kitchen, you’ll witness the transformative power of smart storage solutions. Say goodbye to cluttered cabinets and countertops and embrace the simplicity and efficiency that these innovative tools offer. Start enjoying the benefits of an organized home today, and make room for the memories that truly matter!
]]>
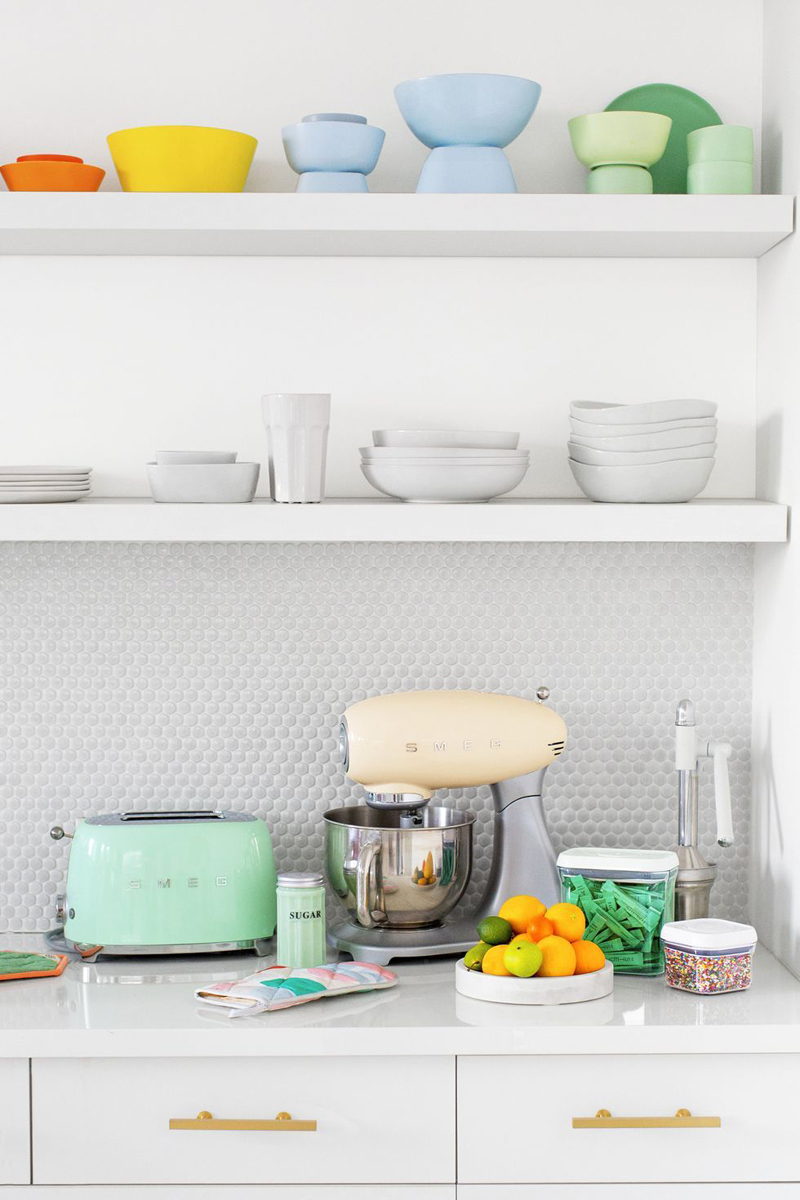
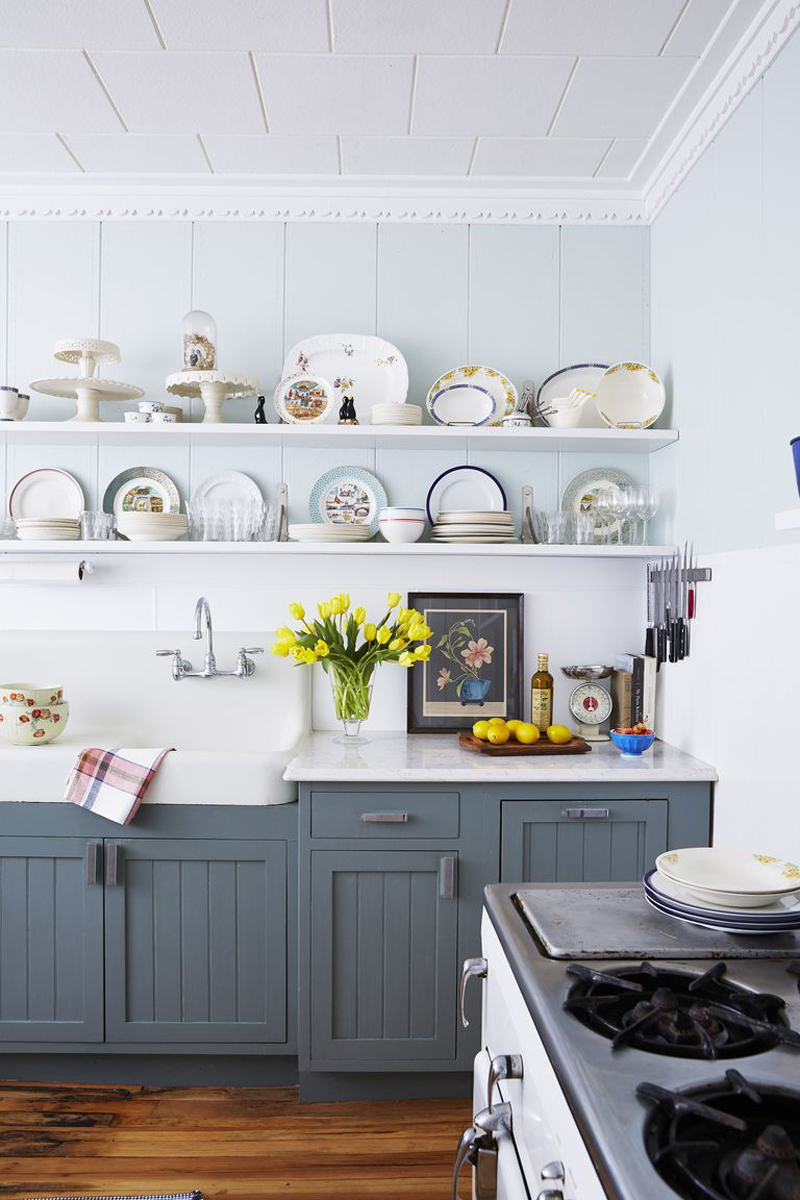
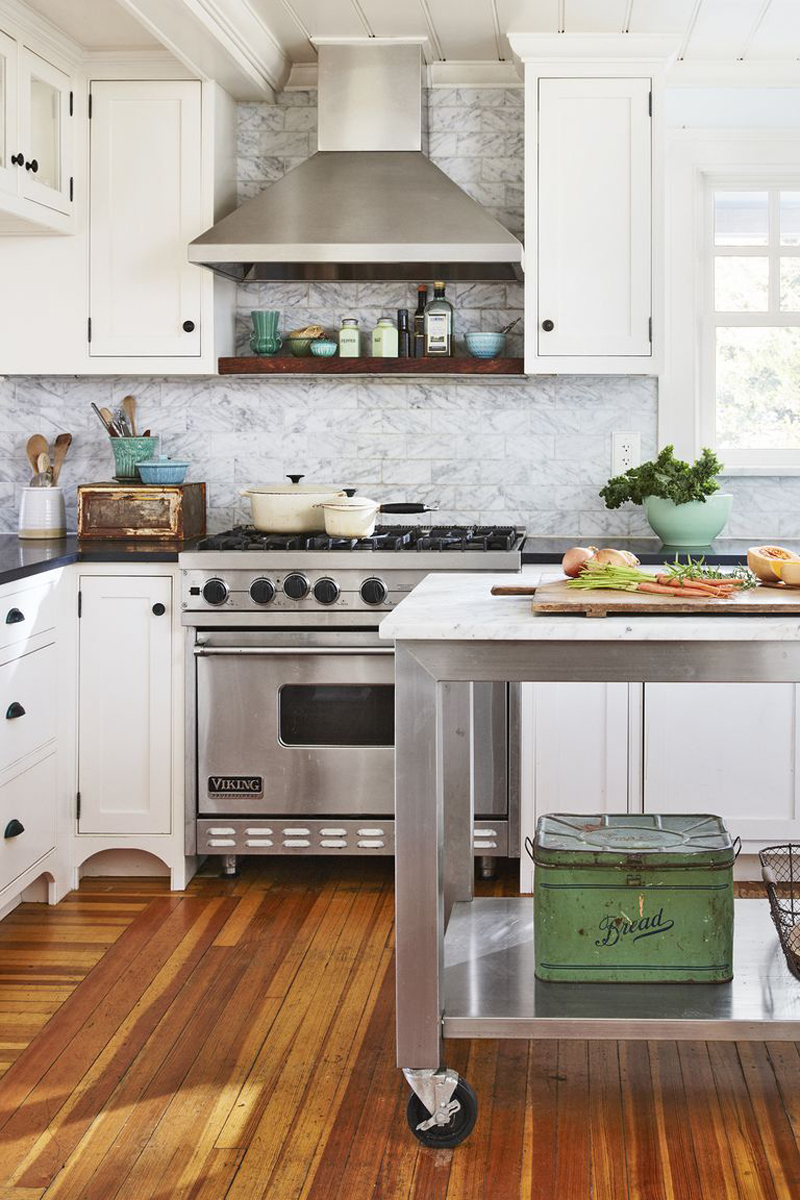
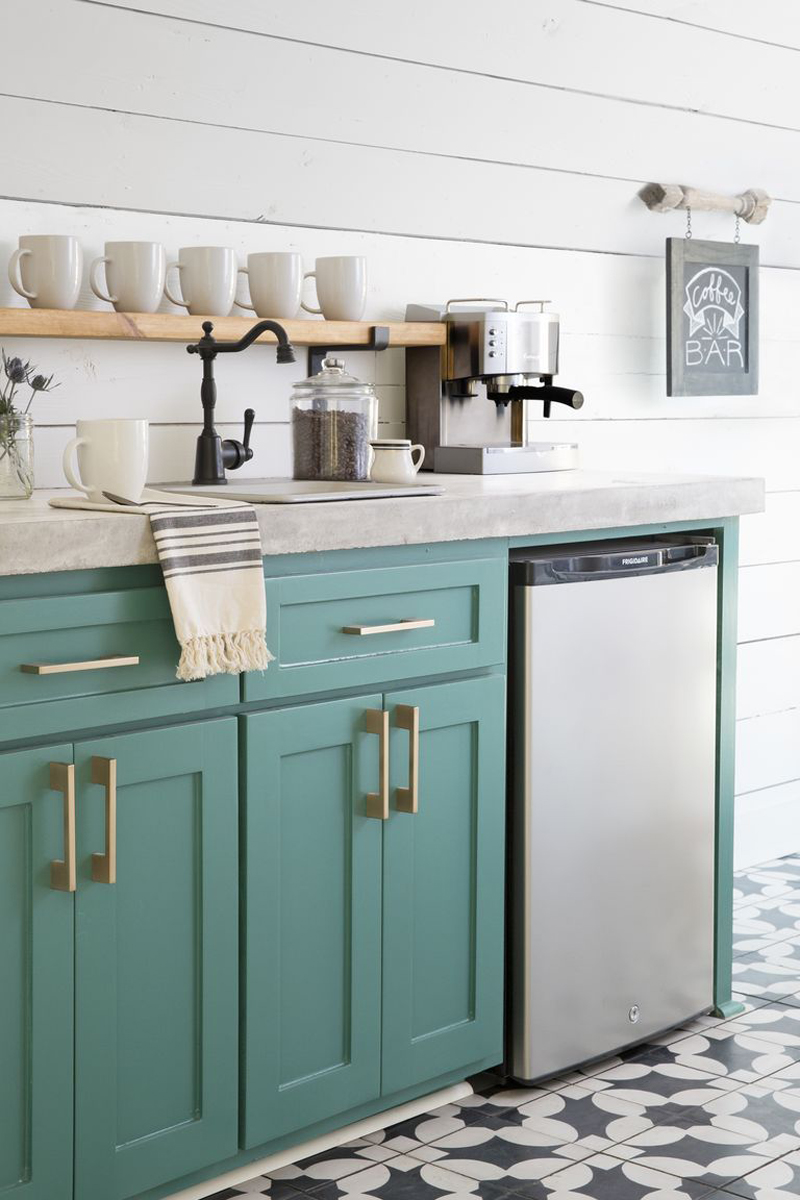
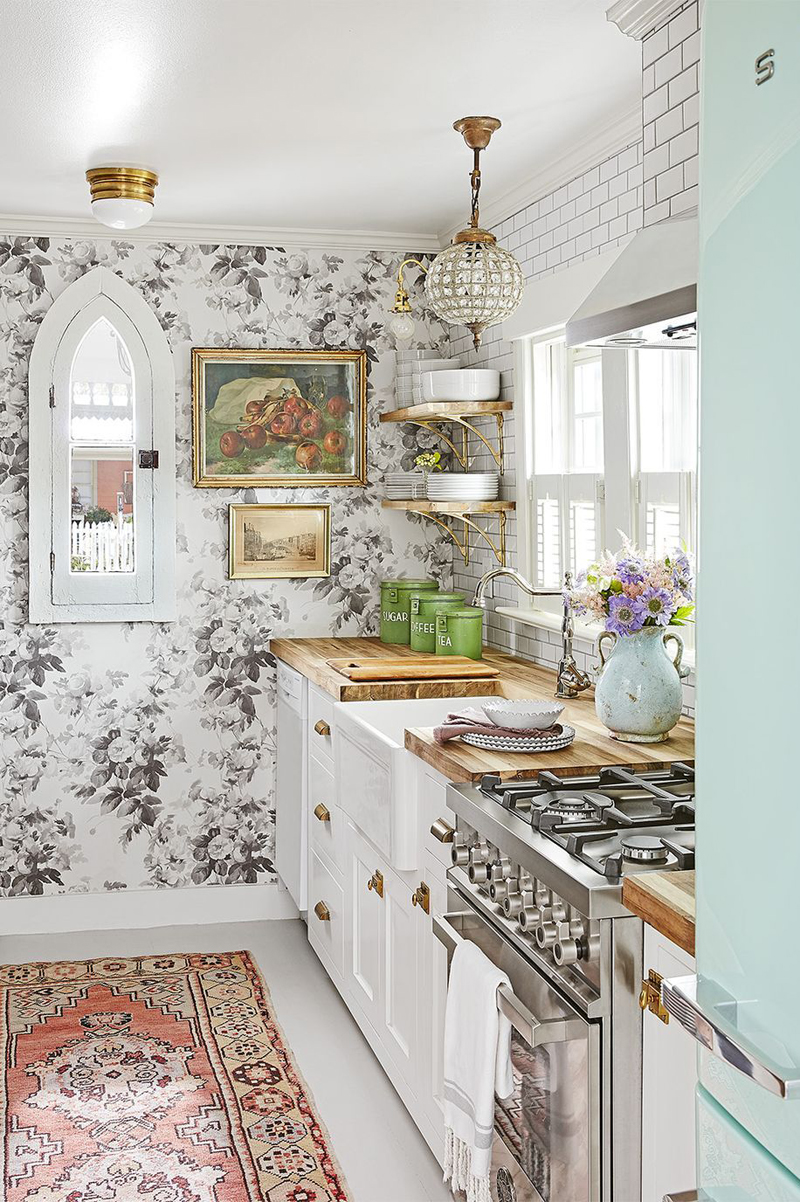
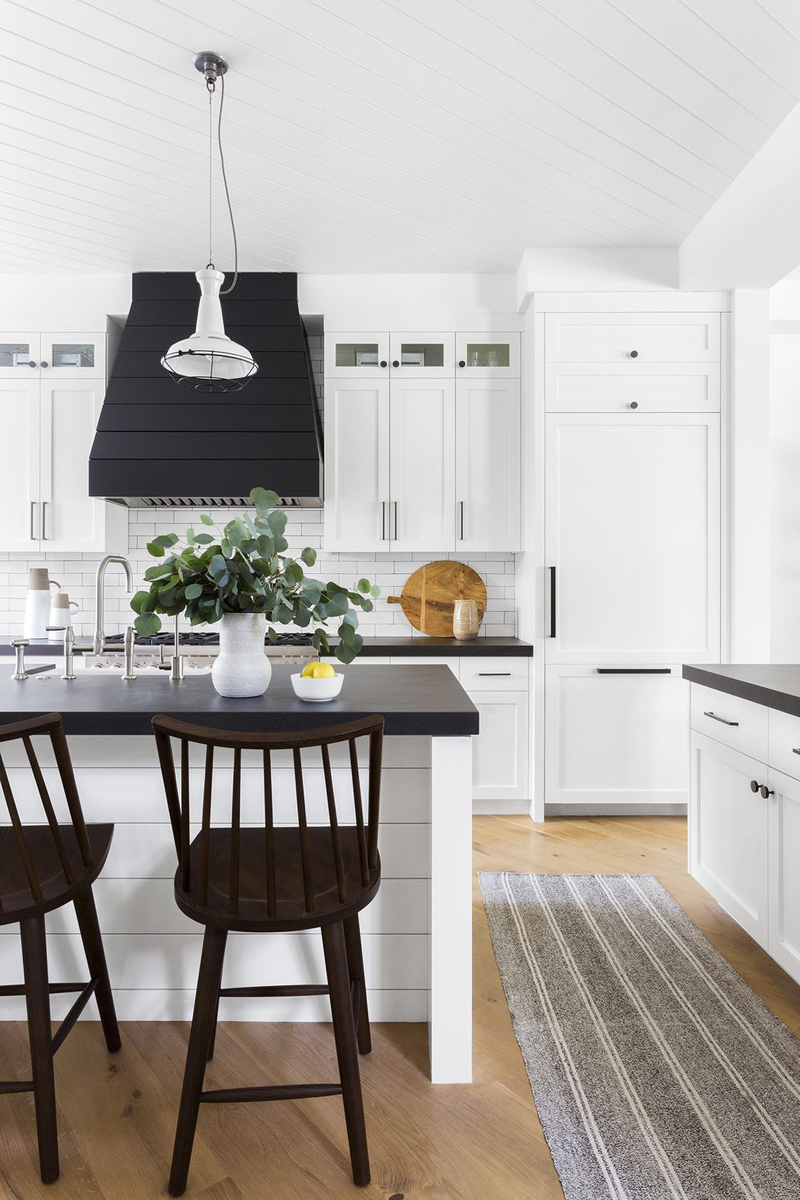
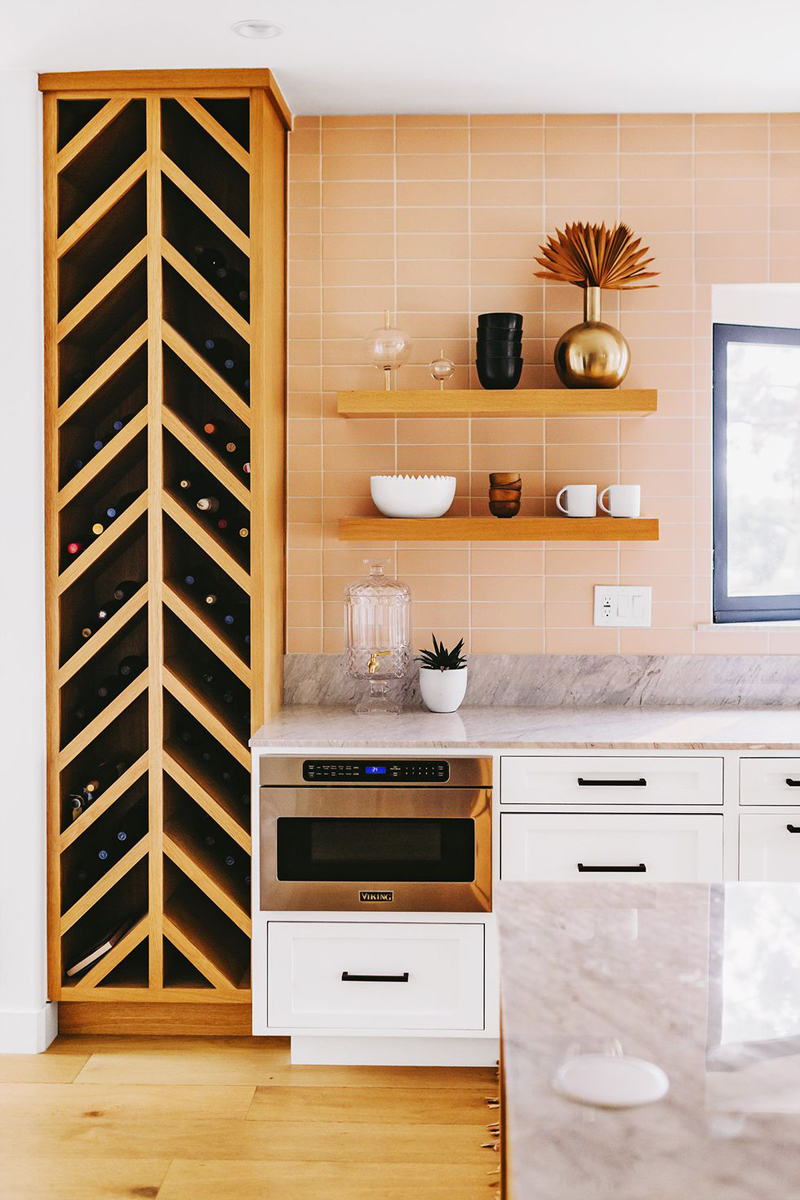
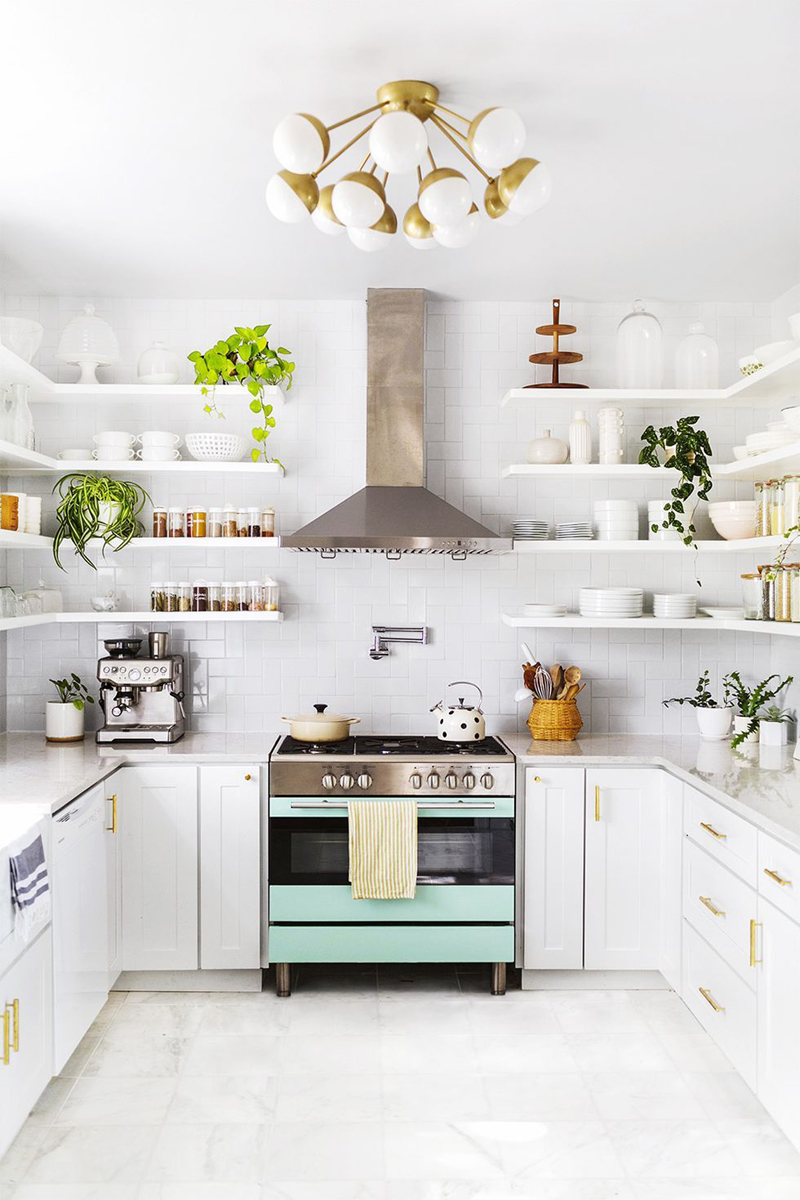
https://productiveorganizing.com/blogs/news/a-simple-trick-to-make-your-kitchen-more-beautiful2023-06-19T09:13:54-04:002023-06-19T09:13:54-04:00A Simple Trick to Make Your Kitchen More Beautifuladmin
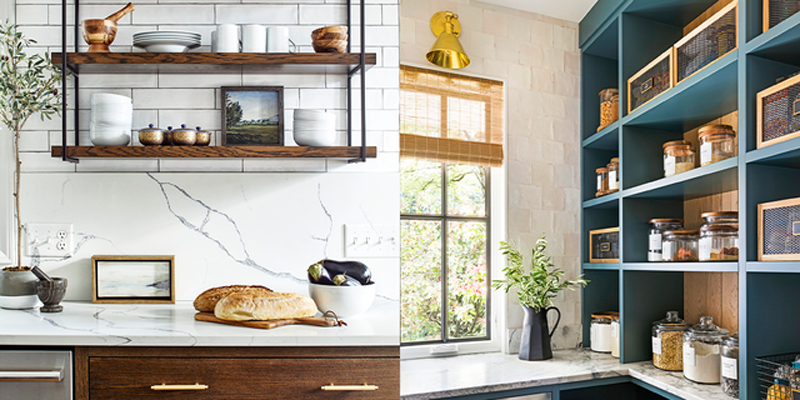
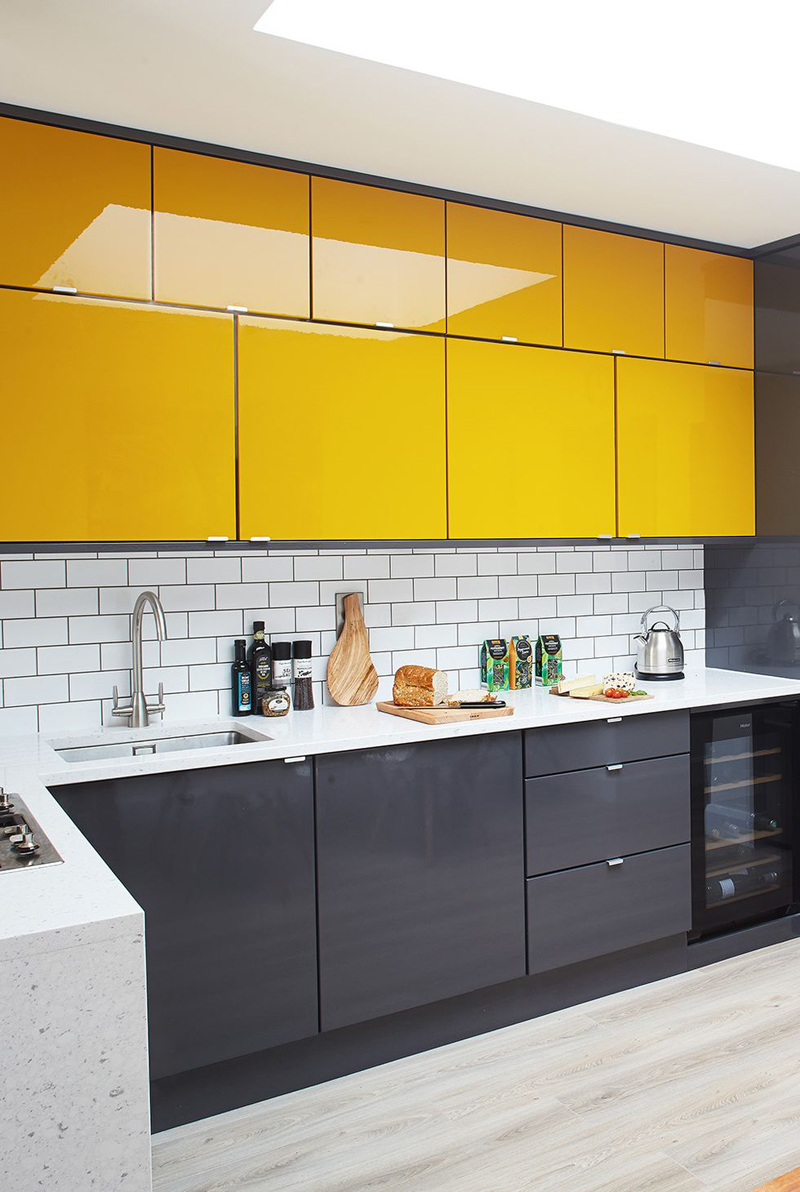
The kitchen is often considered the heart of the home, a place where meals are prepared, memories are made, and conversations are shared. It’s no wonder that homeowners seek to create a beautiful and inviting space in their kitchens. While a full kitchen renovation can be costly and time-consuming, there’s a simple trick that can instantly elevate the aesthetics of your kitchen without breaking the bank. In this article, we’ll explore this easy yet effective technique that can transform your kitchen into a stunning space you’ll love spending time in.
The Power of Backsplash:
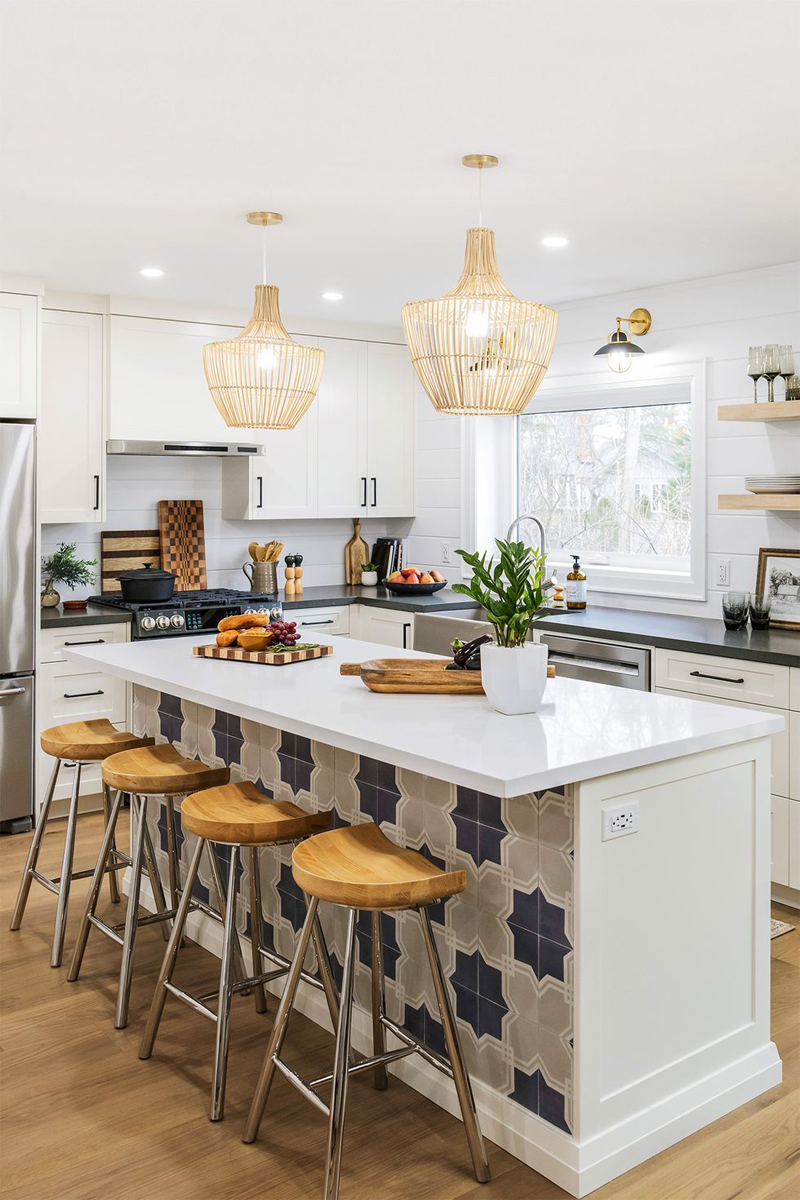
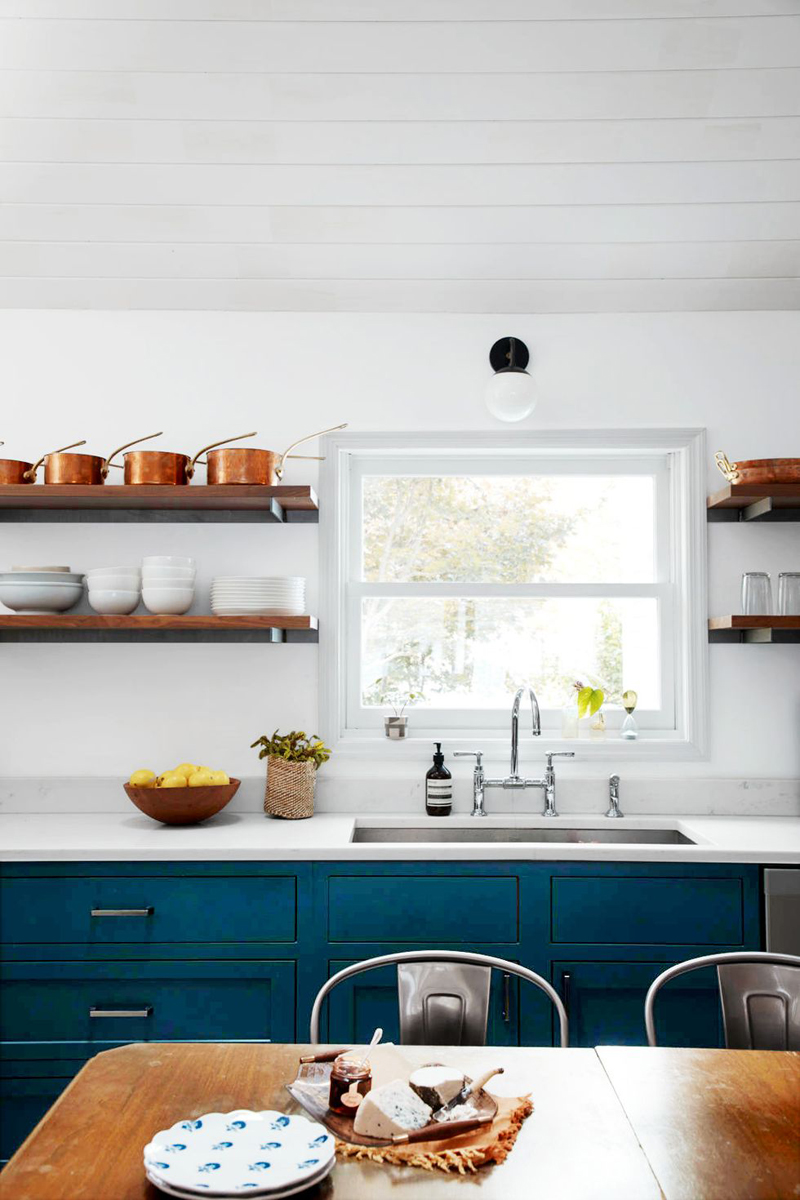
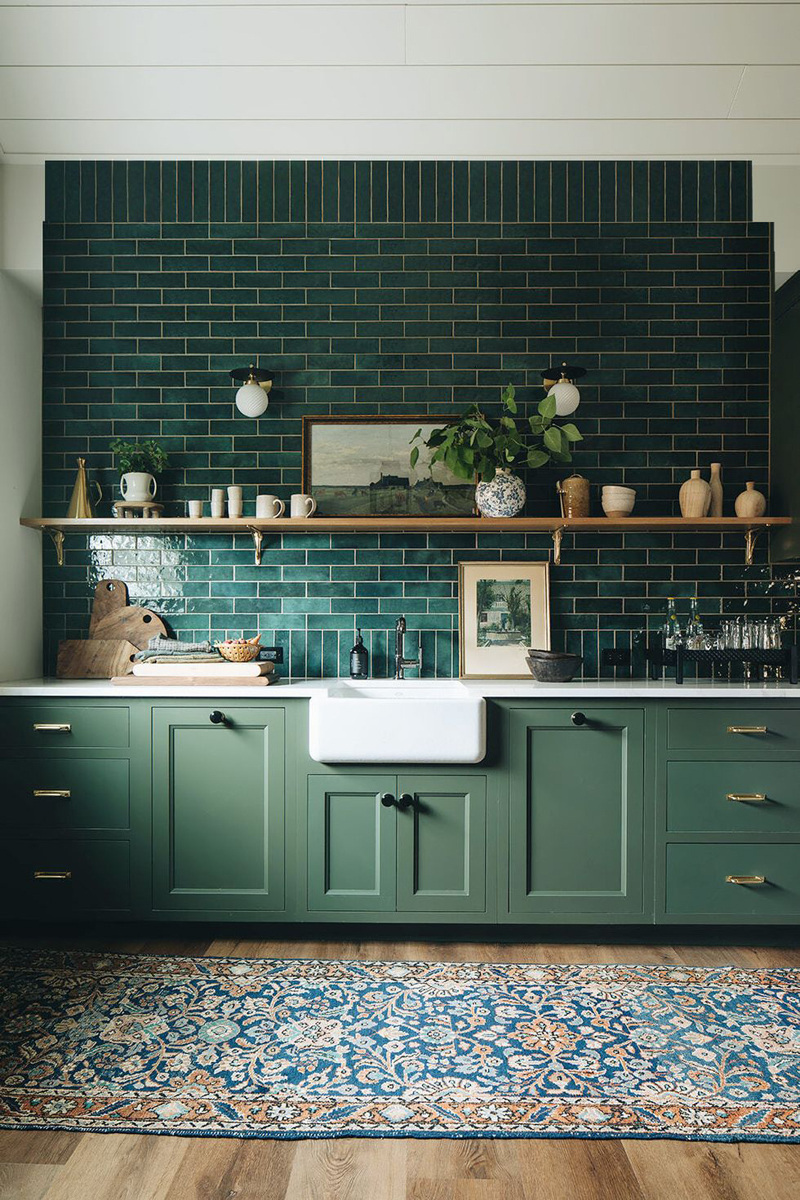
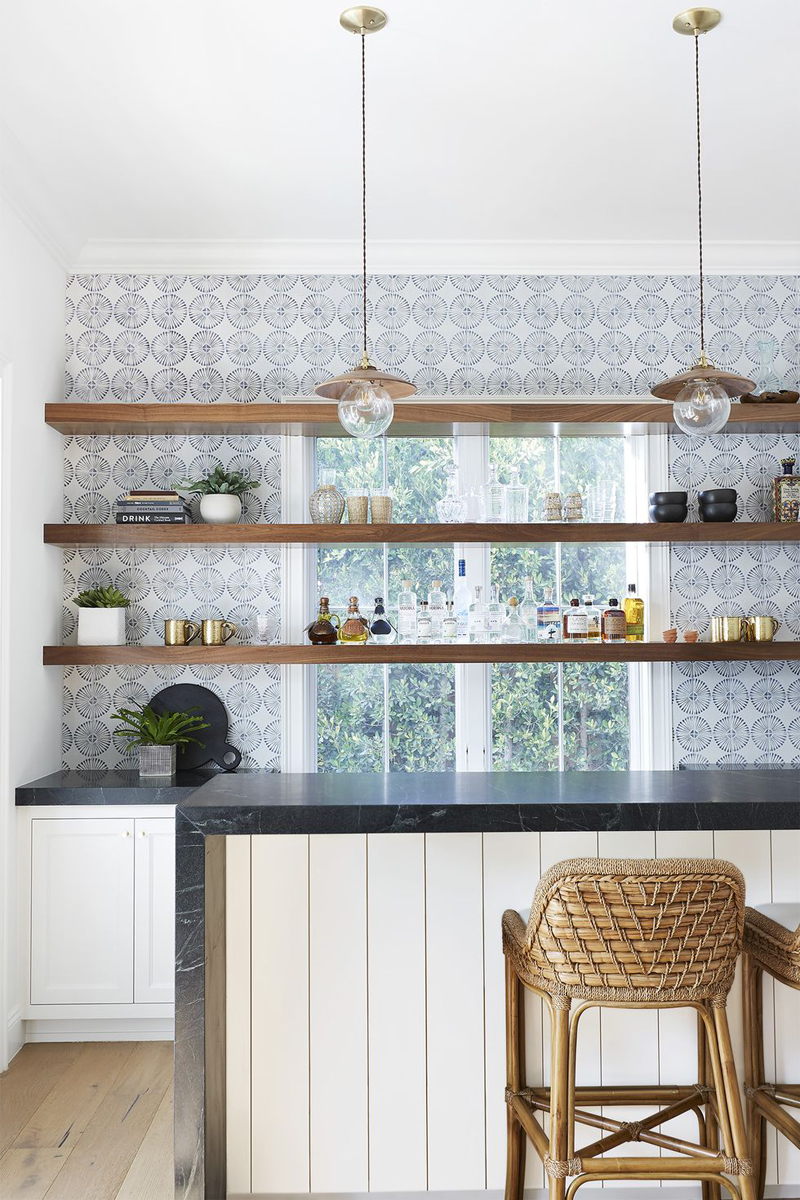
When it comes to enhancing the visual appeal of your kitchen, a backsplash can work wonders. This often-overlooked element serves both a practical purpose by protecting your walls from splashes and spills and an aesthetic purpose by adding a pop of color, texture, or pattern to the overall design. By choosing the right backsplash, you can effortlessly enhance the beauty of your kitchen and create a focal point that draws attention.
Choosing the Perfect Backsplash:
With a myriad of options available, selecting the perfect backsplash for your kitchen can be overwhelming. Here are a few factors to consider to make the decision-making process easier:
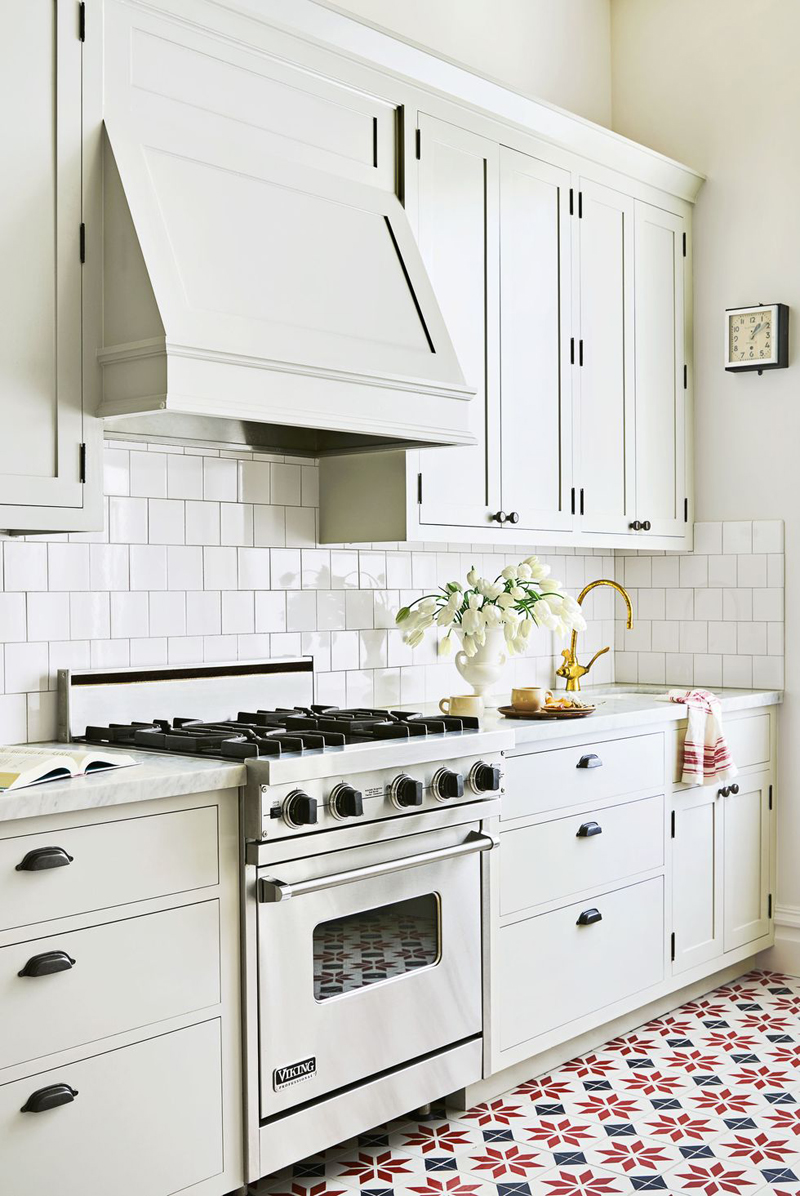
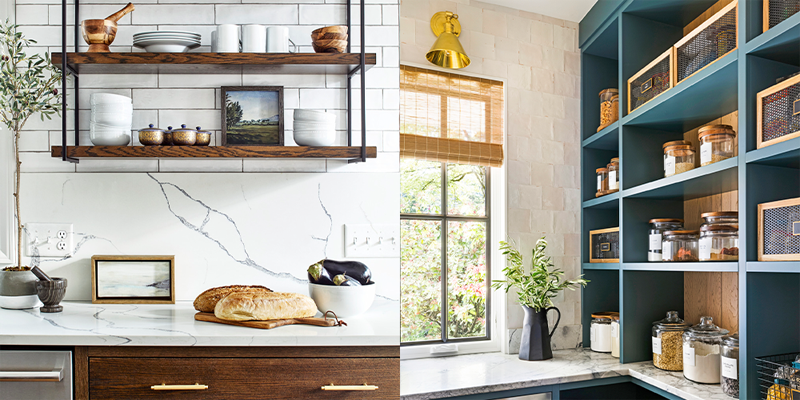
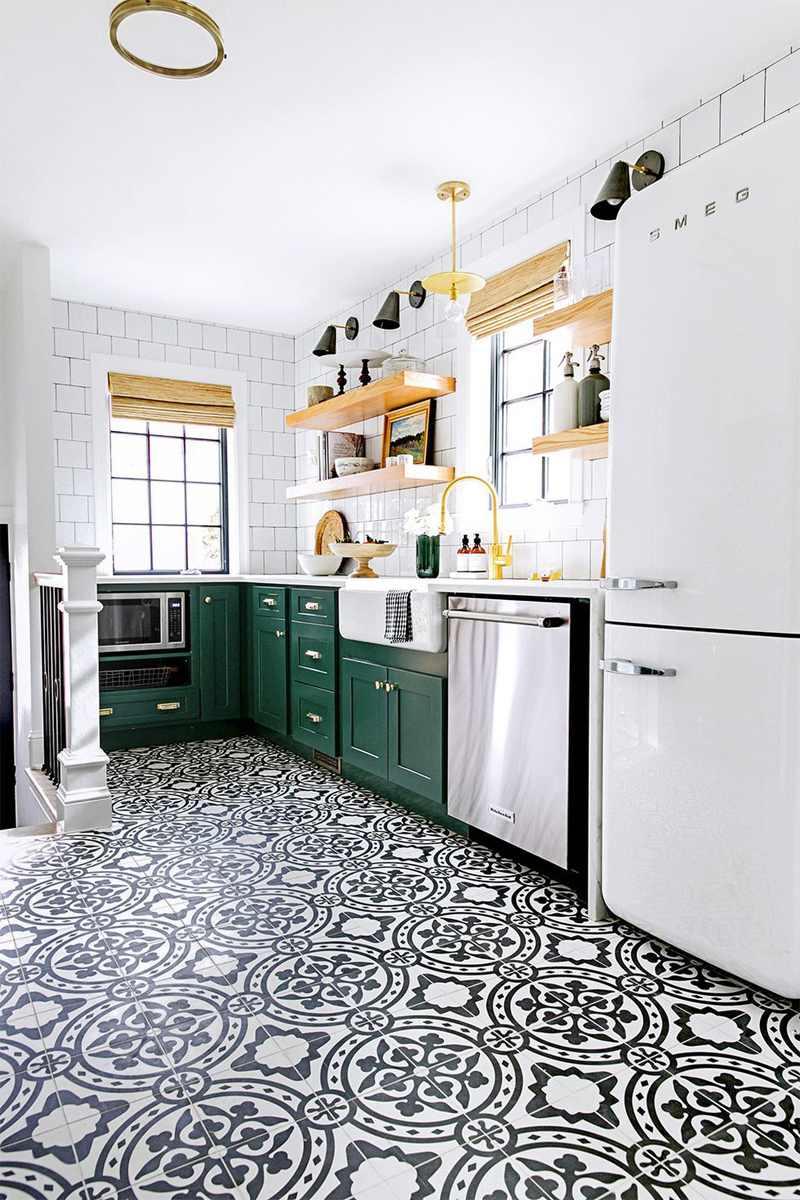
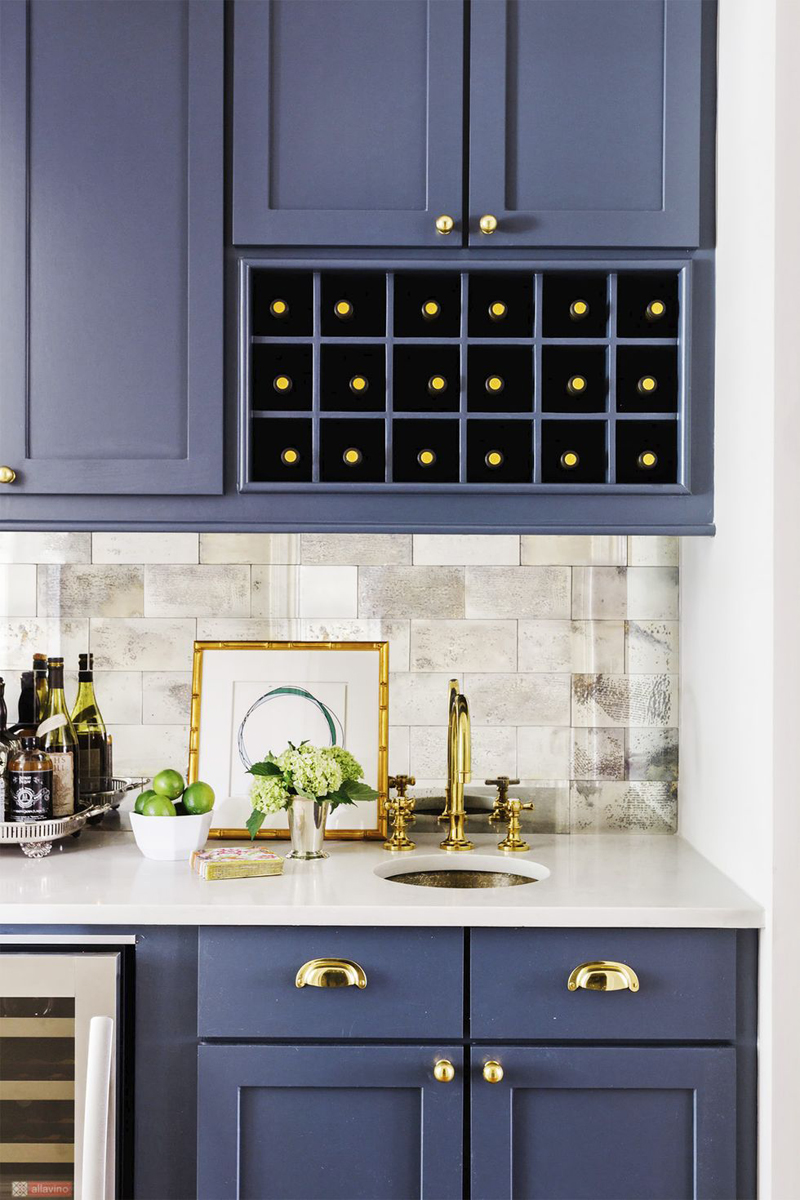
Material: Backsplashes come in various materials such as ceramic tiles, glass, stone, stainless steel, or even reclaimed wood. Consider the existing elements in your kitchen, such as countertops, cabinets, and flooring, to ensure the backsplash material complements the overall aesthetic.
Color Palette: Determine whether you want your backsplash to blend harmoniously with the existing color scheme or make a bold statement. Neutral tones create a timeless and sophisticated look, while vibrant colors or intricate patterns can add personality and visual interest.
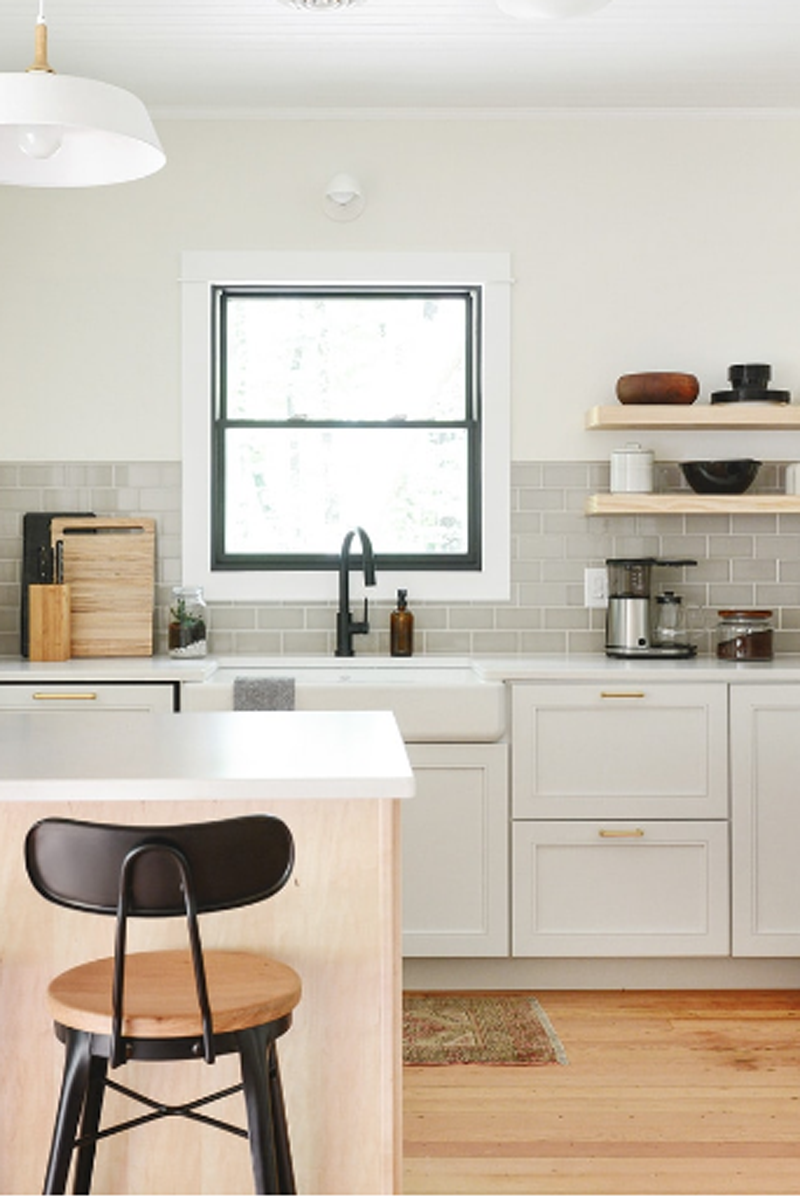
Style: Your backsplash should align with the style of your kitchen. For a sleek and modern look, consider subway tiles or metallic finishes. If you prefer a rustic or farmhouse-inspired design, opt for natural stone or textured tiles. Explore various styles and find one that resonates with your personal taste and the overall theme of your kitchen.
Once you’ve selected the perfect backsplash, it’s essential to ensure proper installation. Hiring a professional can guarantee a flawless and durable finish. Proper maintenance will also keep your backsplash looking beautiful for years to come. Regular cleaning with mild, non-abrasive cleaners will help preserve its shine and appearance.
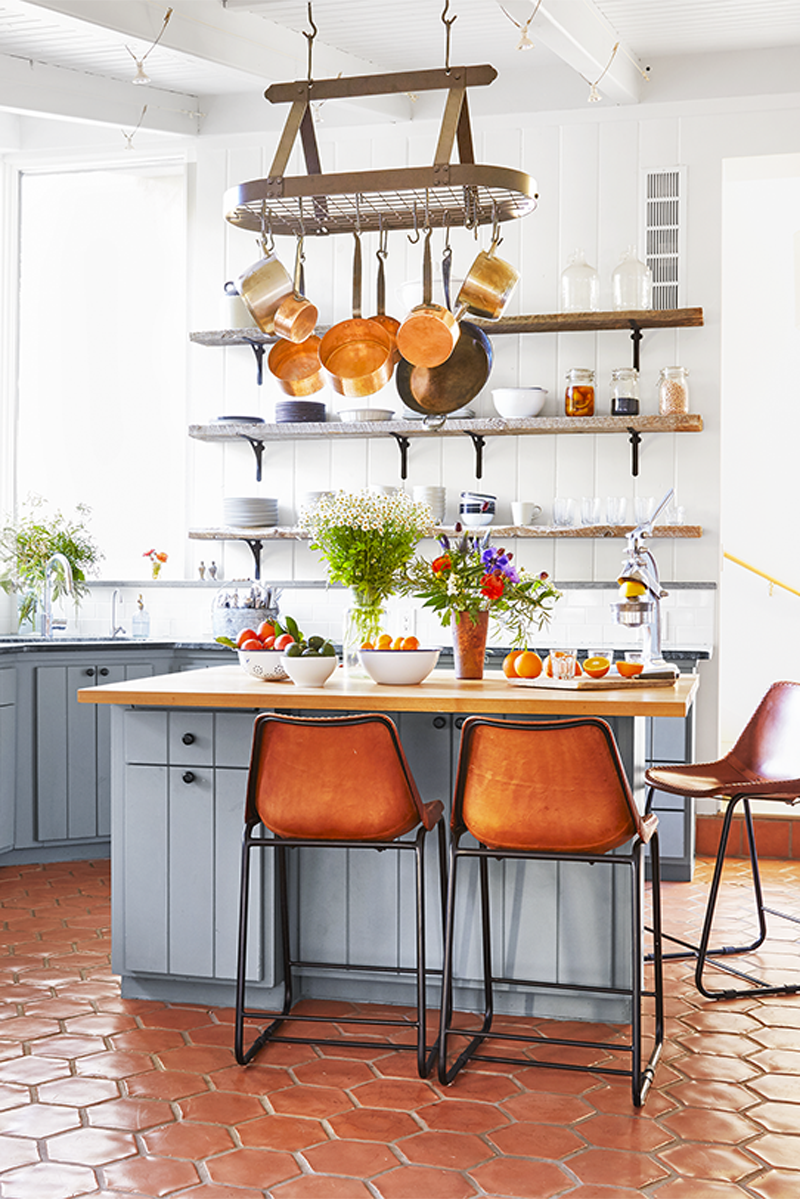
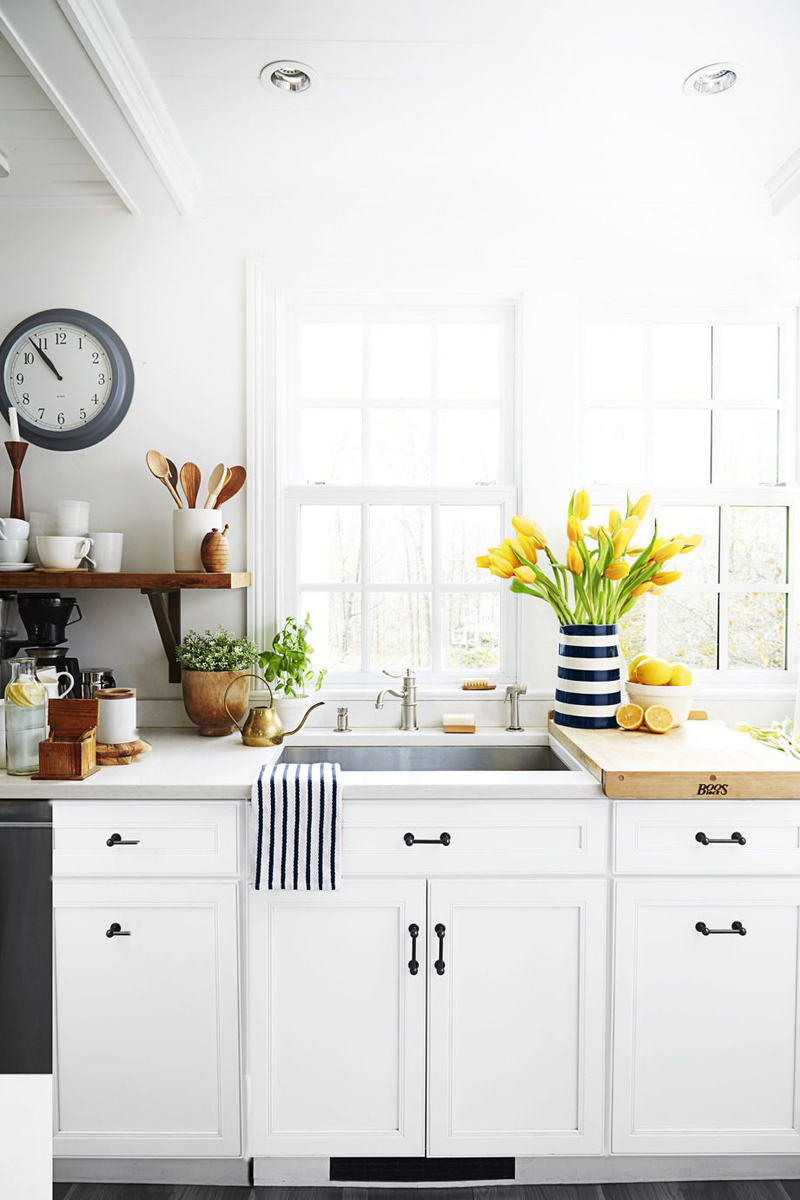
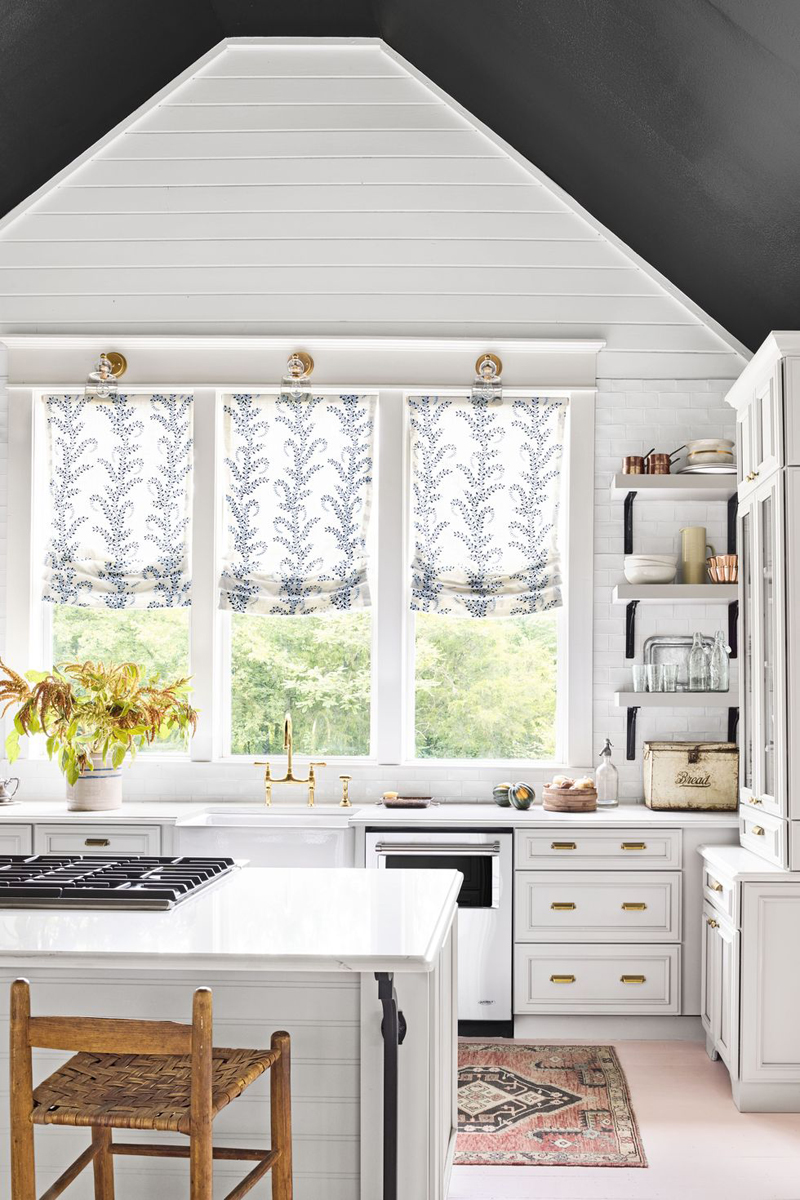
The Impact of a Beautiful Kitchen:
By incorporating a stunning backsplash into your kitchen design, you’ll instantly elevate its overall aesthetics. The right choice of color, material, and style can create a cohesive and visually pleasing space that reflects your personal style. Furthermore, a beautiful kitchen can enhance your culinary experiences, making cooking and meal preparation more enjoyable. It can also impress guests and add value to your home if you ever decide to sell.
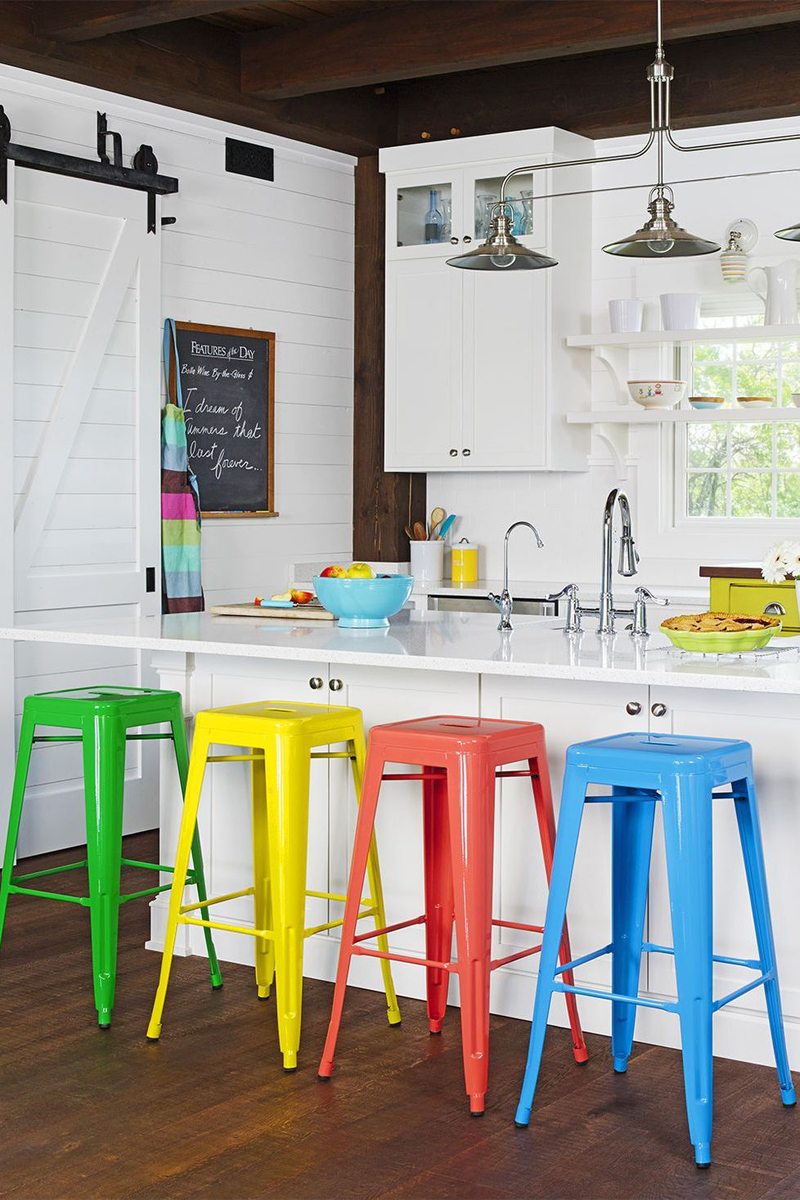
Transforming your kitchen into a beautiful space doesn’t have to be a daunting task. With a simple trick like adding a backsplash, you can effortlessly enhance its visual appeal and create a focal point that makes a lasting impression. Take the time to explore various options, considering factors such as material, color palette, and style. Remember, a well-designed kitchen is not only pleasing to the eye but also elevates the overall functionality and enjoyment of the space. So why wait? Start your journey toward a more beautiful kitchen today!
]]>
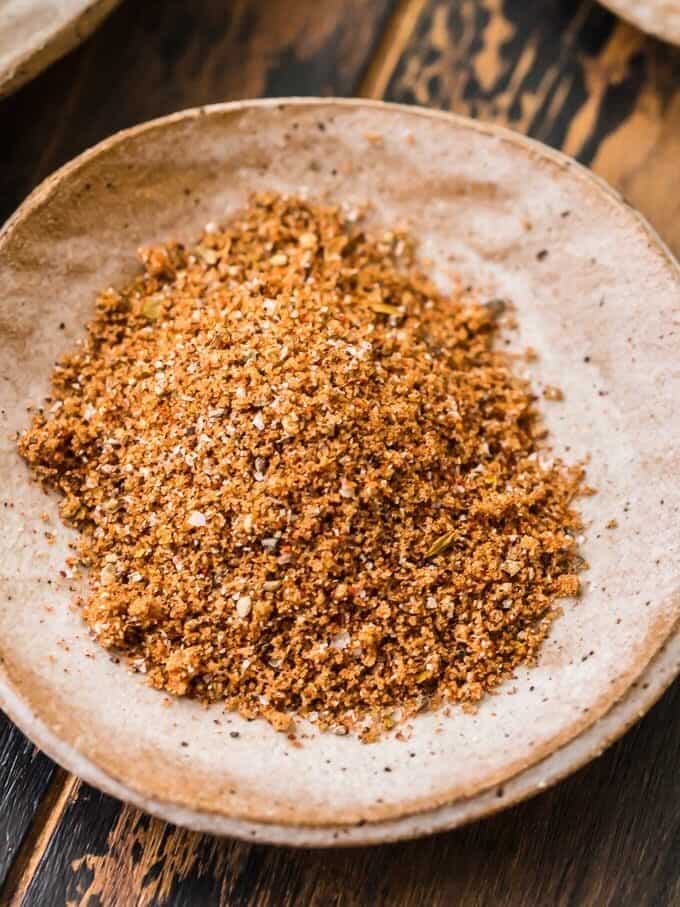
https://productiveorganizing.com/blogs/news/smoked-corn-on-the-cob2023-06-16T21:13:54-04:002023-06-16T21:13:54-04:00Smoked Corn on The CobadminThere is nothing better than elevating an average-Joe ingredient and transforming it into something remarkable. This smoked corn on the cob has it all: delicious spices, smoky flavors, and a tender texture.
Who doesn’t love corn on the cob? It’s versatile, easy to make, and it’s a crucial summertime ingredient (especially when it comes to barbecues). However, most people probably don’t realize the full potential of what can be done with corn. Sure, butter and salt is delicious — but it’s a little basic. This summer is the best time to transform your mundane ingredient with new flavors and kick your lunch or dinner up a notch with smoked corn on the cob.
This recipe doesn’t need many ingredients and it’s ready in under an hour, making it a great go-to any night of the week. And, once you know how to smoke corn on the cob and you taste the difference, you won’t want to eat corn any other way again.
Why You Will Love This Recipe //
The combination of the smoky flavor and the curry spice is seriously delicious.
This recipe is straightforward, easy to follow, and the results always impress.
Fun for the family to make and eat together!
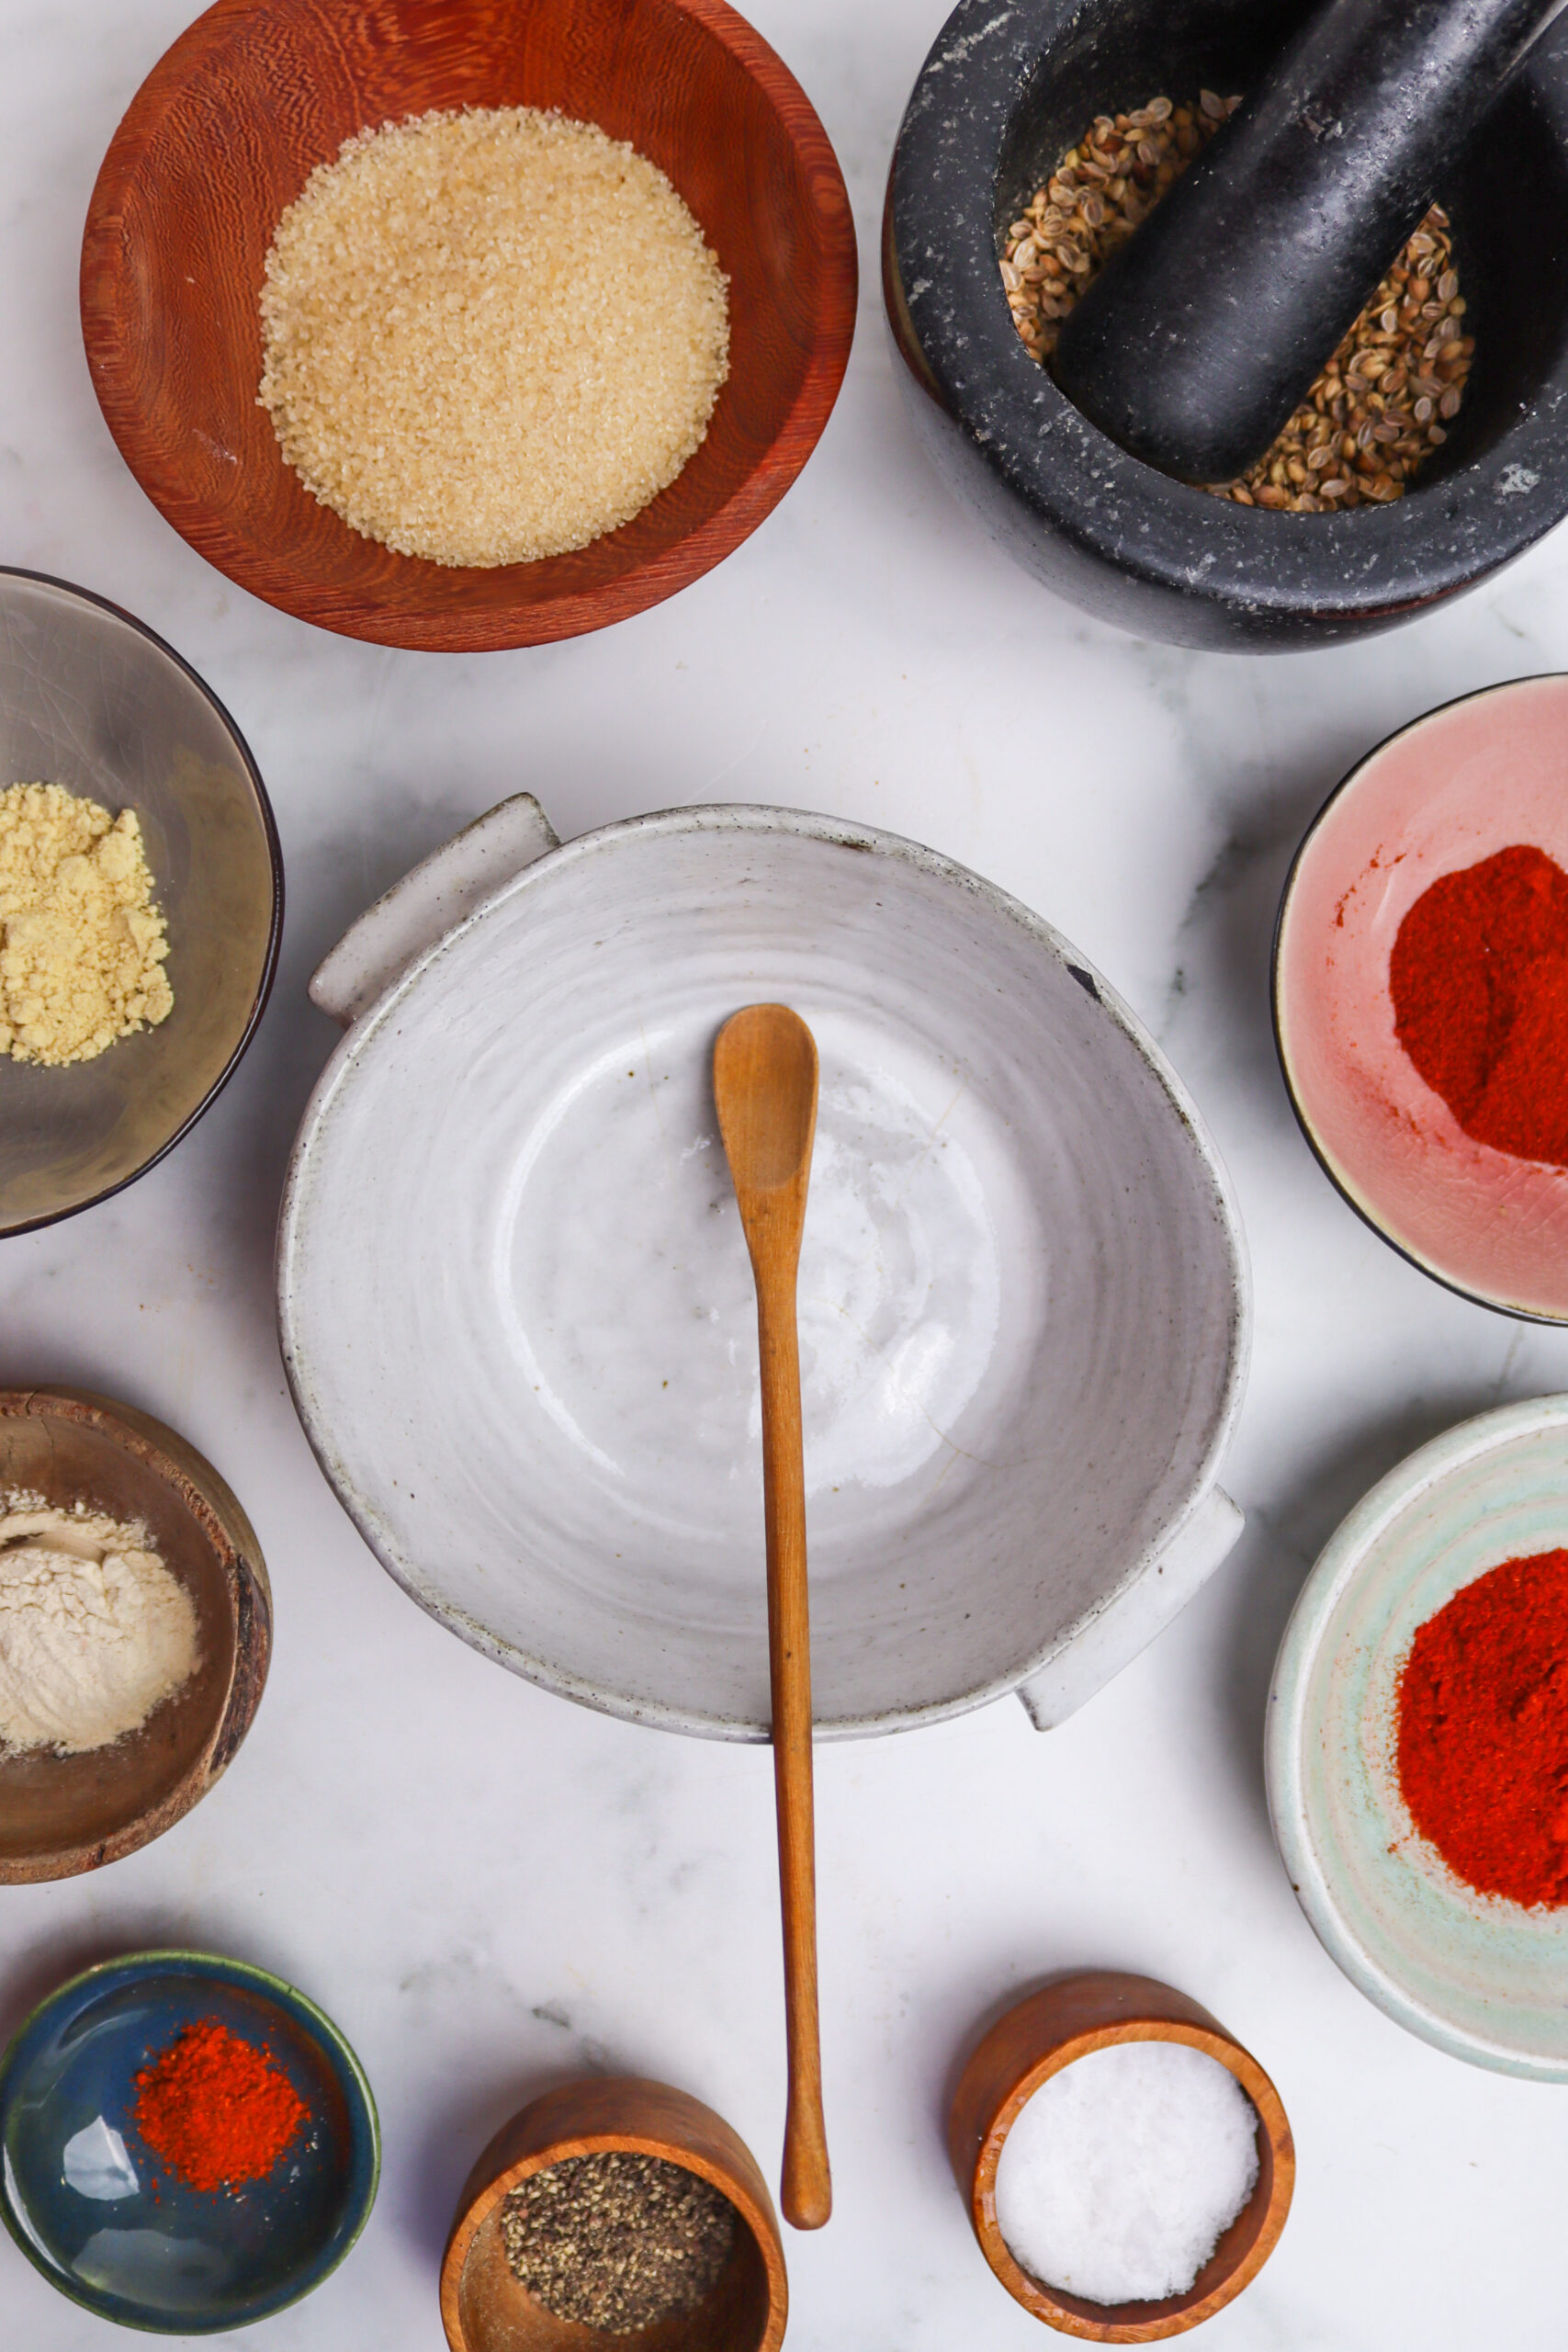
Ingredients //
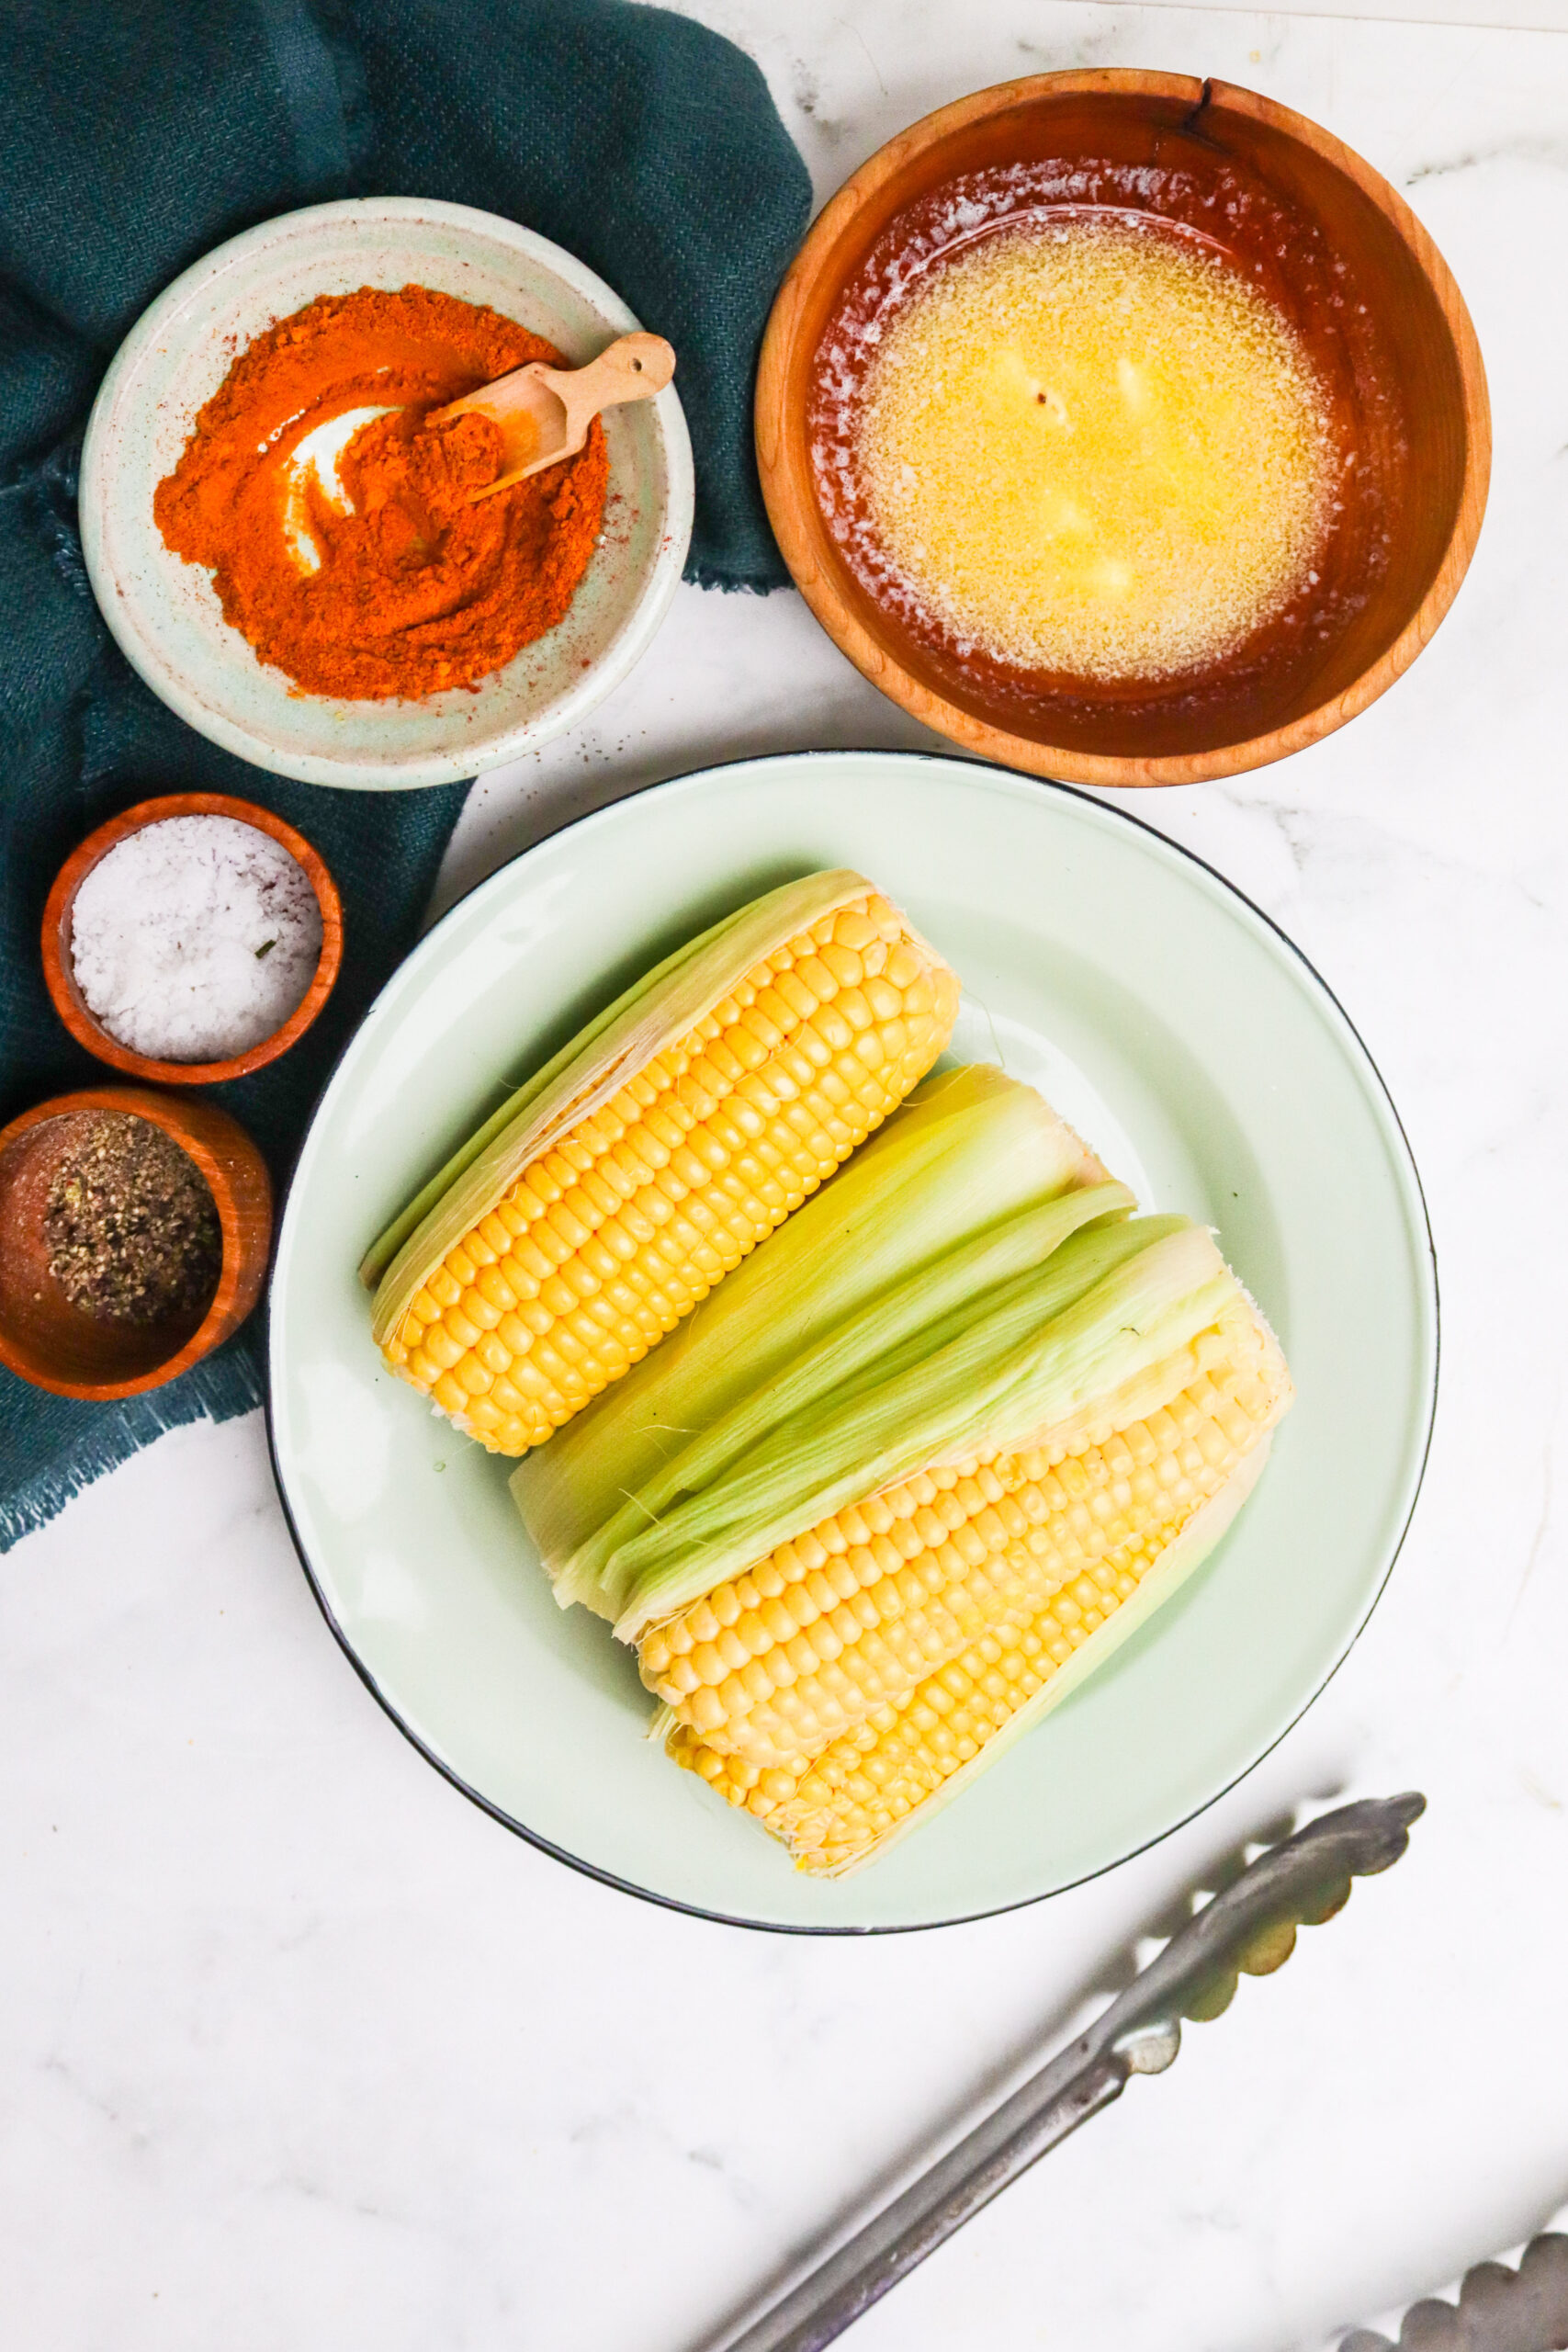
Grab some corn and raid your spice cabinet — this is all you need:
4 cobs of corn
½ cup butter, melted
1 tbsp curry spice
salt and pepper
How to Make Smoked Corn on the Cob // The Steps
Step 1: Begin by lighting the smoker and ensuring it reaches a temperature of 225°F
Step 2: Peel back and remove the husks and silk from each ear of corn.
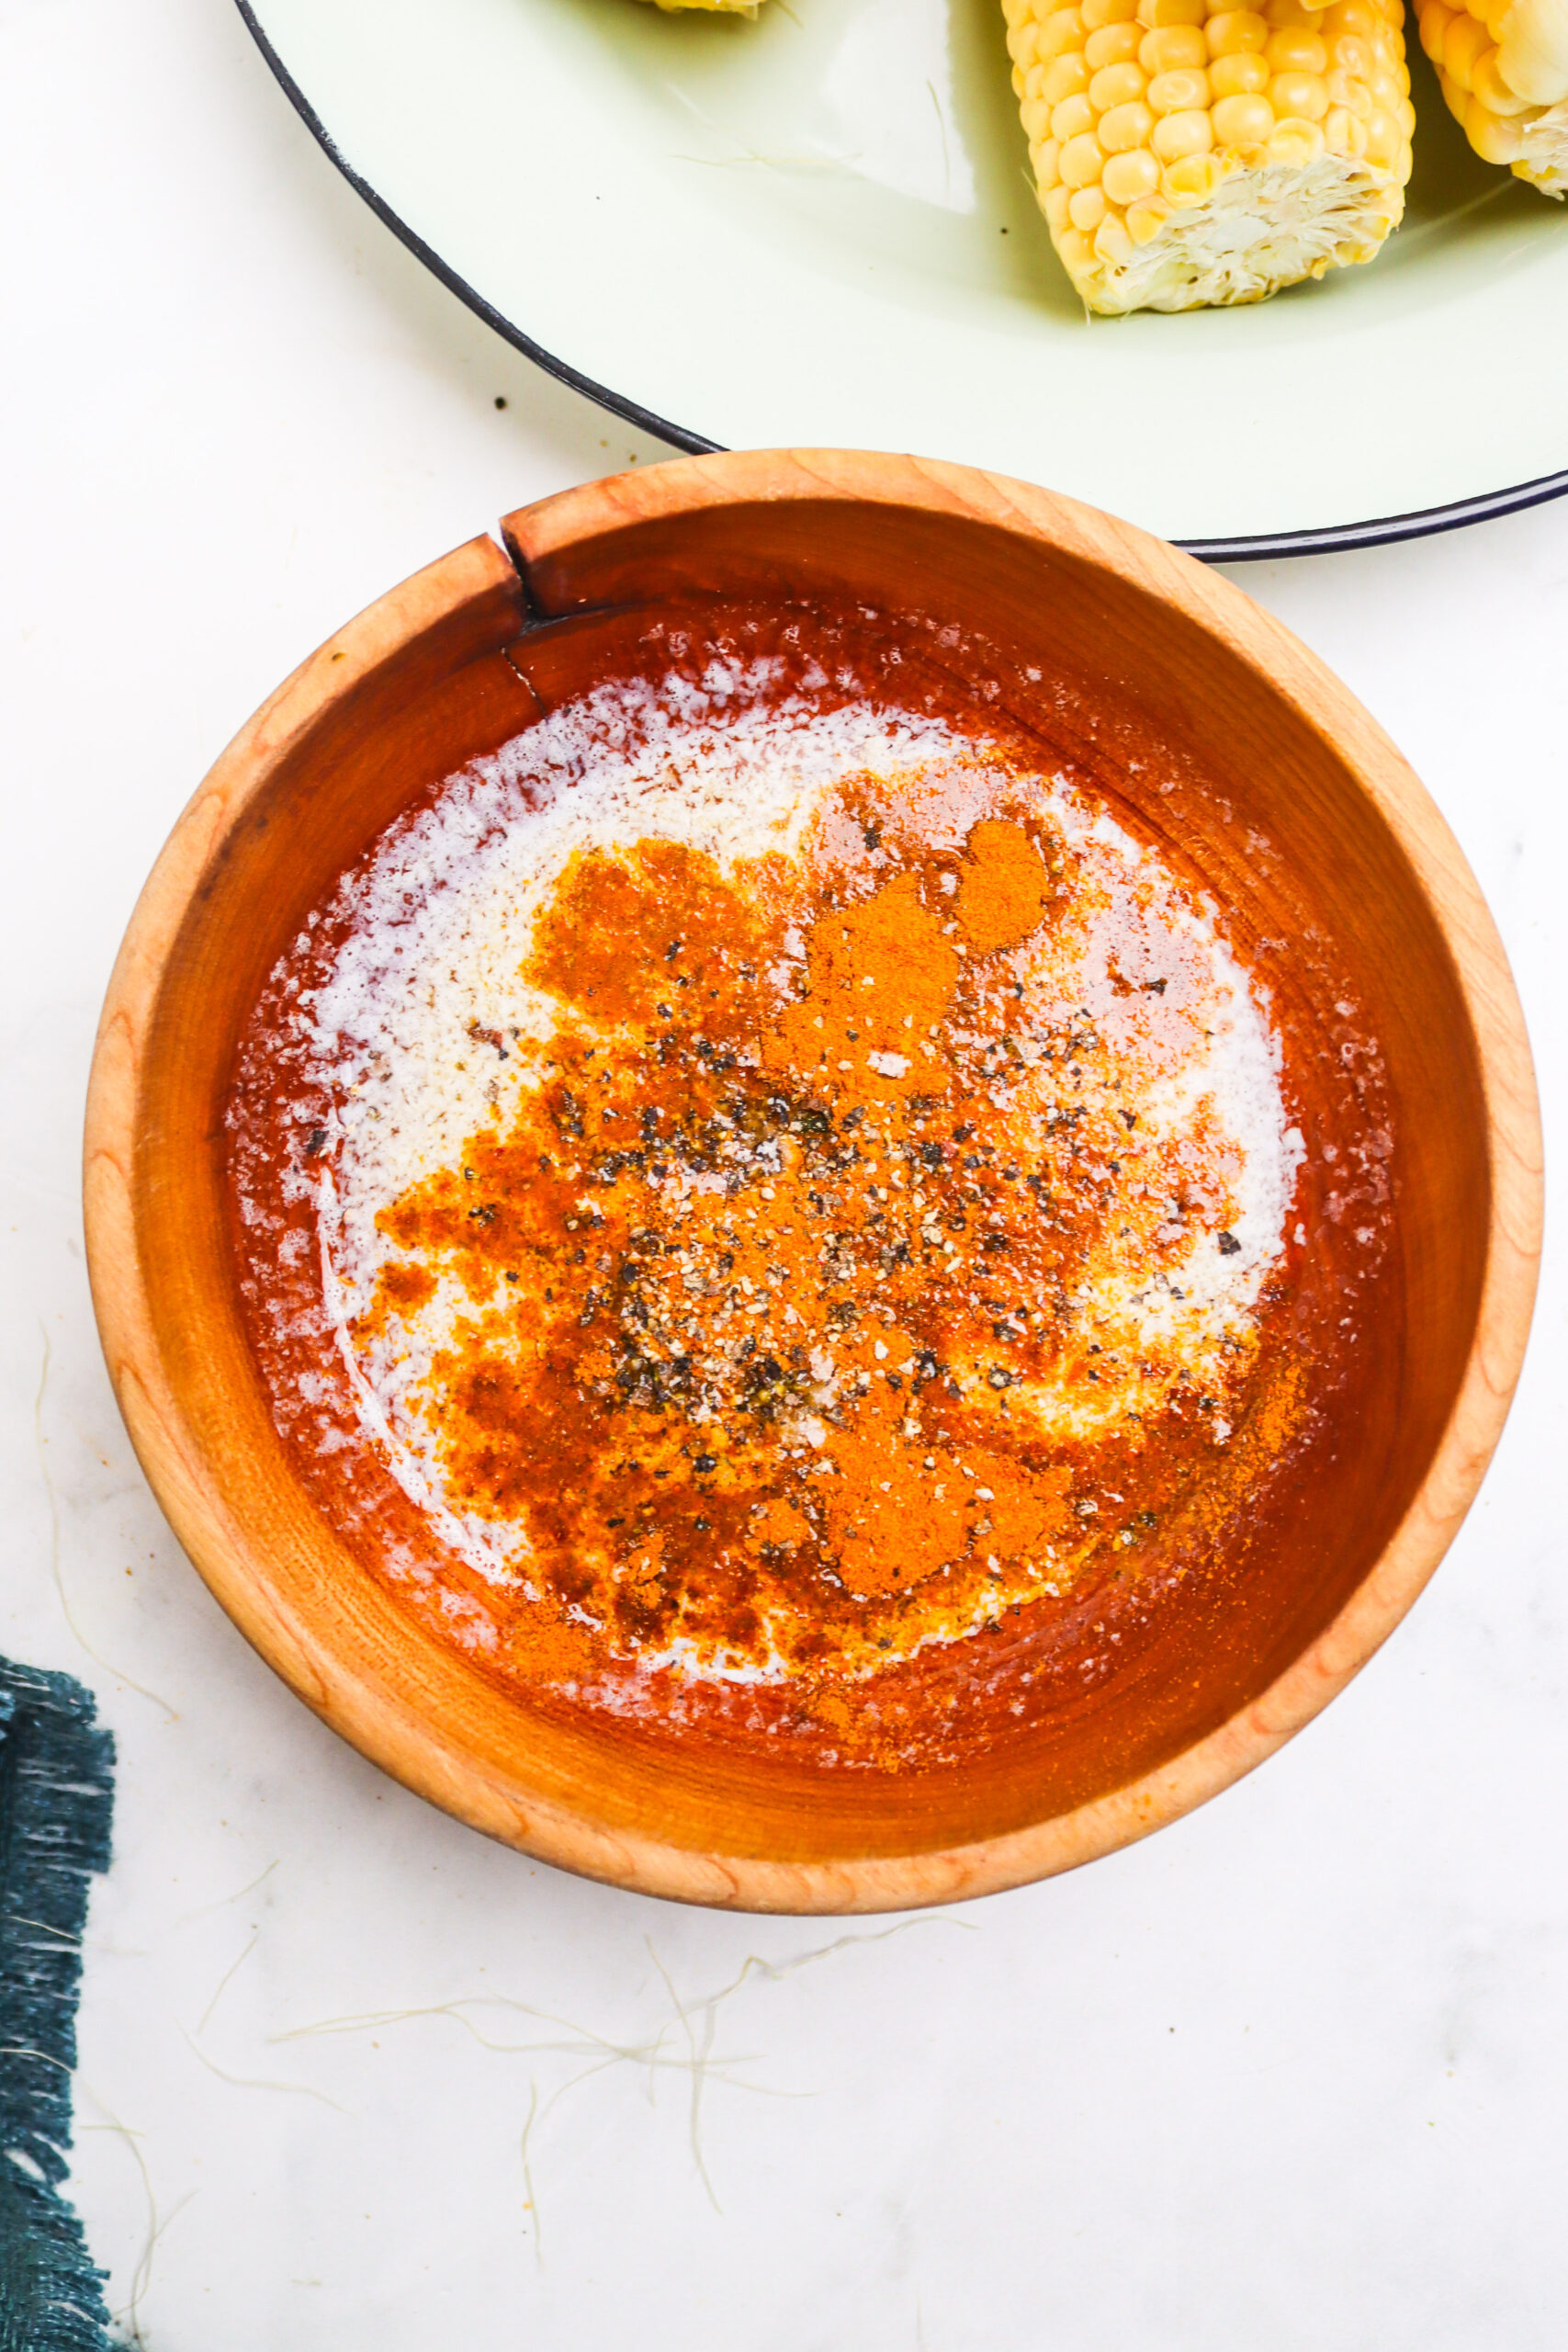
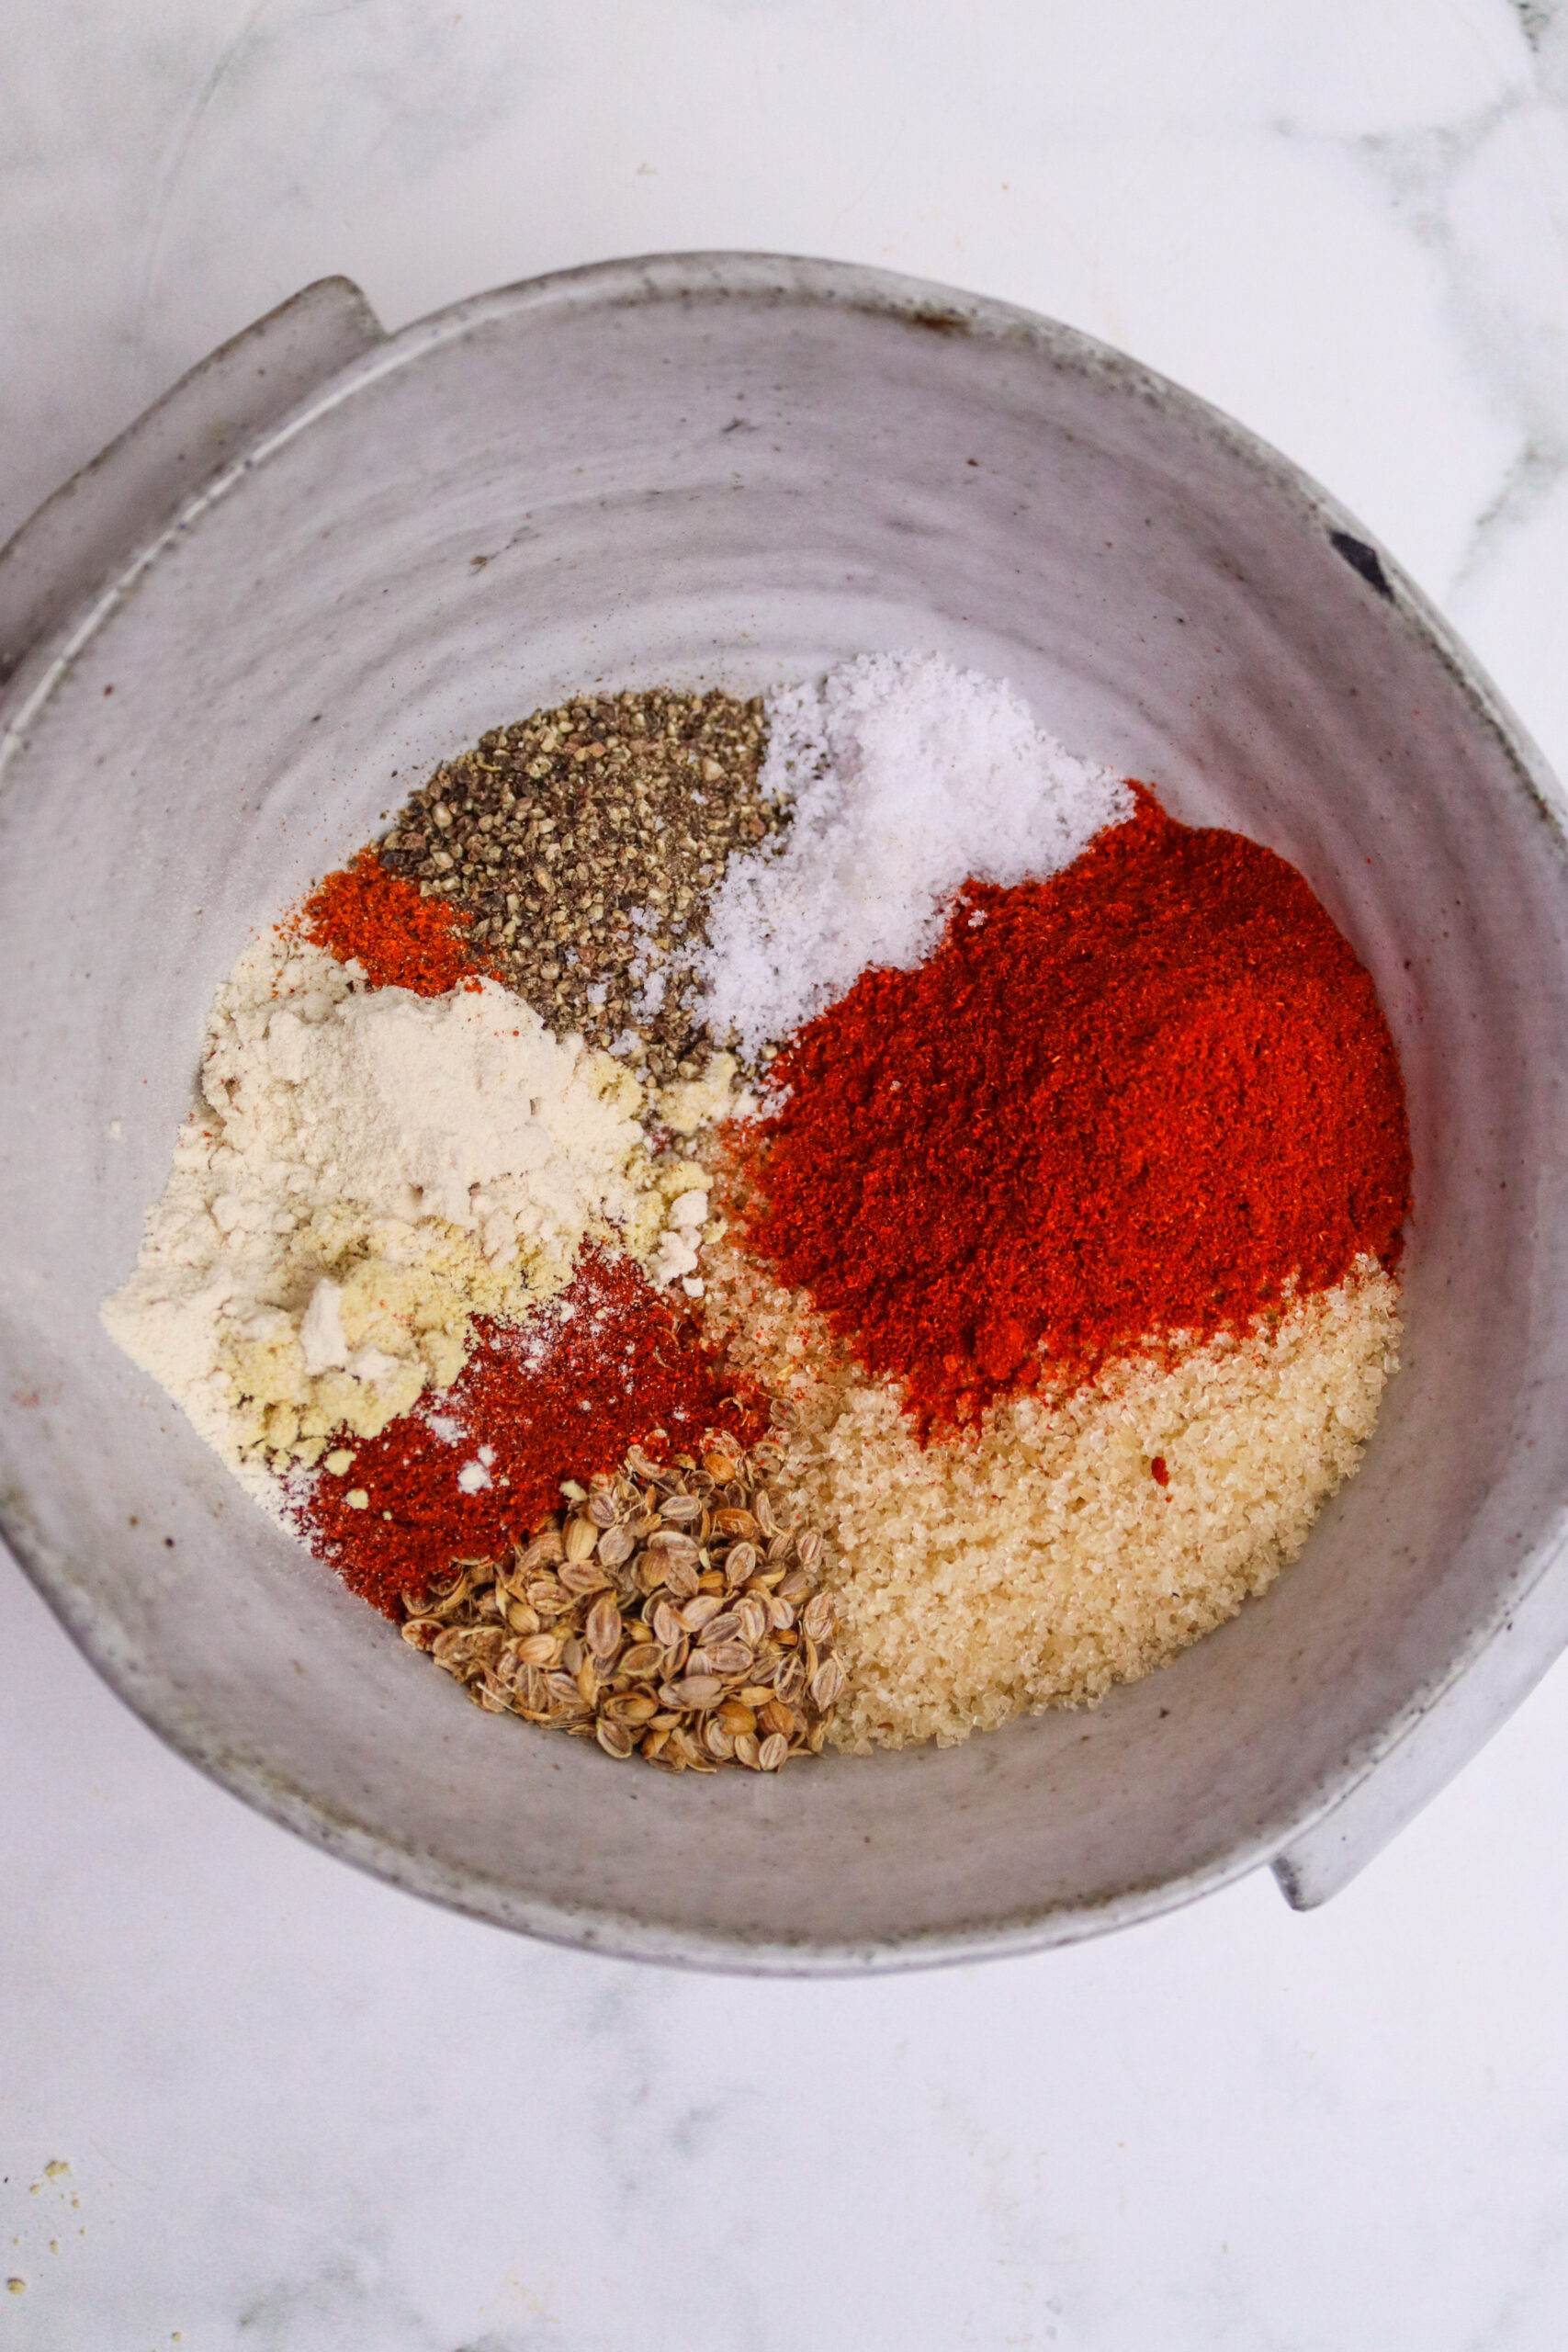
Step 3: In a mixing bowl, combine the melted butter with the curry spice, salt, and pepper, creating a flavorful mixture.
Step 4: Using a brush, generously coat the corn with the butter and spice mixture, ensuring all sides are thoroughly covered.
Step 5: Carefully place the corn onto the smoker’s rack, allowing space between each ear. Close the smoker and let the corn smoke for 25 minutes. Then, flip the corn over and smoke the other side for an additional 20 minutes.
Variations //
Smoking your corn already invites so much flavor, and the curry spice just kicks it up a notch. However, there are plenty of combinations of spices you can try out.
Smoky paprika: Replace the curry spice with smoked paprika, garlic powder, onion powder, and some salt and pepper for a unique, smoky flavor.
Chili lime: Chili powder, cumin, lime zest, and salt are mixed in with the butter for a spicy and tangy corn on the cob.
Cajun-style: For a tasty, spicy, Cajun-style kick, combine paprika, cayenne pepper, garlic powder, onion powder, dried thyme, dried oregano, salt, and black pepper with the melted butter and slather it on your corn.
Garlic herb: A simple and fragrant flavor combo; use your favorite dried herbs, like thyme, rosemary, and oregano, and a dash of garlic powder.
Mexican-style: Chili powder, cumin, paprika, and garlic powder make a delicious spice blend. After your corn is smoked, sprinkle over some cilantro, lime juice, and cotija cheese.
Serving Suggestions //
You can’t go wrong with this dish and what you serve it with. This smoked corn on the cob makes a delicious side dish that would pair amazingly with several recipes, so I’ve included some of my favorites below.
Chilean Sea Bass: Take dinner up a notch with this delicious Chilean sea bass recipe. Lemon, garlic, and parsley help make this delicate and buttery dish shine. The best accompaniment would be this smoked corn on the cob.
Easy Baked Sweet Potato: Have an in-season summer vegetable dinner! You don’t need meat to make a well-rounded meal, and there is no denying that the classic baked sweet potato is a winning dish for any day of the week.
Fried Cube Steak: Have a Southern feast with this cube steak and some delicious corn on the cob. Who doesn’t love a plate of breaded, juicy meat and equally juicy, flavorful vegetables?
Stove-Top Chicken Breast: This chicken is succulent, tender, and guaranteed to delight the senses with the herby garlic butter and crispy skin. Pairing it with smoked corn is a must.
FAQs //
Can I use something other than curry spice?
Yes, you can use any spices you like really. Cumin, coriander, and paprika work really well, as do garlic powder and onion powder.
Do I need to soak the corn before I smoke it?
No, because the husk is removed and we are smoking at such a low temperature, you don’t need to soak it.
Could I use olive oil instead of butter?
Yes, you can, but it definitely won’t taste as rich.
How to Store Smoked Corn on the Cob //
This dish is best eaten immediately, but you can definitely hang on to leftovers and eat them later on. Let your corn cool completely before storing it, as any extra condensation will ruin the texture. Wrap each ear of corn individually in foil or plastic wrap, and then place them in an airtight container. Your leftover smoked corn on the cob will be good to eat for 3 days.
When reheating, place them in the microwave, on the grill over medium heat, or in the oven wrapped in foil until warmed through. The key is to heat them as gently as possible to avoid overcooking and ruining the texture. This is also why I would avoid freezing your corn — the texture will never be the same once frozen.
Smoked Corn on The Cob
Yield: 4
Prep Time: 10 minutes
Cook Time: 45 minutes
Total Time: 55 minutes
There is nothing better than elevating an average-Joe ingredient and transforming it into something remarkable. This smoked corn on the cob has it all: delicious spices, smoky flavors, and a tender texture.
Ingredients
4 cobs of corn
½ cup butter, melted
1 tbsp curry spice
salt and pepper
Instructions
Begin by lighting the smoker and ensuring it reaches a temperature of 225°F
Peel back and remove the husks and silk from each ear of corn.
In a mixing bowl, combine the melted butter with the curry spice, salt, and pepper, creating a flavourful mixture
Using a brush, generously coat the corn with the butter and spice mixture, ensuring all sides are thoroughly covered.
Carefully place the corn onto the smoker’s rack, allowing space between each ear. Close the smoker and let the corn smoke for 25 minutes. Then, flip the corn over and smoke the other side for an additional 20 minutes.
Notes
You don't need to soak your corn on the cob before smoking, as the temperature used to smoke is so low.
]]>
https://productiveorganizing.com/blogs/news/baja-fish-tacos2023-06-13T21:13:53-04:002023-06-13T21:13:53-04:00Baja Fish Tacosadmin
Baja Fish Tacos are made with with crispy beer battered cod and topped with pico de gallo and the perfect cilantro ranch dressing. Every bite of the fried fish is bursting with flavor but is still light and fresh enough for a perfect summer meal!
Fresh and colorful fish tacos are the quick and easy, but insanely delicious recipe you have been looking for this summer! They are so easy to put together and make a great meal for any day of the week. The cod is perfectly flaky with a well-seasoned beer battered coating that has the perfect amount of crispiness.
Load your fish into homemade tortillas for a soft and delicious shell. Then top the pan-fried cod with freshly diced pico de gallo and homemade cilantro ranch dressing as your baja sauce. As a finishing touch, sprinkle cilantro all over for a vibrant citrusy spice and pop of color. These baja fish tacos are a dinner everyone will go crazy over!
Taco Ingredients
Don’t let this long list scare you because a big part of ingredient list is seasonings for the perfectly crispy crust on the cod. These are those staple spices you already have in your cabinet and get used often! The fresh cod will be the most important element of these fish tacos, so be sure to buy the freshest fish you can find. Even if that means swapping out cod for a different fresh catch of the day!
Fresh Cod: Use a mild white fish. Halibut, Mahi Mahi, or Tilapia are some other good examples if you can’t find fresh cod.
Salt and Pepper: Used to season the cod and also in the crispy beer batter.
Flour: Combine flour with seasonings and beer to make the perfect batter!
Chili Powder: Adds a kick of spice to the batter.
Paprika: Paprika has a very mild smoky flavor and adds great color to the cod.
Garlic Powder: Because let’s be real, you can’t go wrong with garlic.
Cumin: Adds earthy depth to the flavor of the batter.
Beer: Combine with dry ingredients to make a moist batter to dredge the fish in.
Cooking Oil: Heat to 350 degrees Fahrenheit before adding in your cod.
Toppings: I used pico de gallo and cilantro ranch dressing! Feel free to add your favorites.
This savory baja fish taco recipe is not too complicated to make. If you are not used to working with fish, no problem! This recipe is easy to follow. Start by slicing the fish and dredging it in the batter. Then, fry it in hot oil for a short 2-3 minutes per side. Once your fish is done, you are ready to put together the most amazing fish tacos you have ever had!
Prep Fish: Prepare the cod by cutting them in one-inch pieces about 3-4 inches long. Salt and pepper and then set aside.
Combine Dry Ingredients and Beer: In a medium sized bowl add the flour, chili powder paprika, garlic powder, cumin, salt and pepper. Add the beer and stir until combined.
Heat Oil: Preheat a medium-sized skillet over medium high heat, add oil until it is about ½ inch up the side. Heat until the thermometer reads 350 degrees.
Coat Cod: Working in batches, dredge each piece of cod into the batter.
Fry: Add cod to the preheated oil and cook until golden brown about 2-3 minutes each side. Remove and set aside on plate.
Assemble: Put together the tacos on a flour tortilla and top with fresh pico and cilantro ranch dressing.
Tips for Making the Best Fish Tacos
The original Baja Taco was made with a deep fried white fish, creamy white sauce, and shredded cabbage or slaw. It’s easy to see why it has remained so popular! Here are some pro tips to follow:
Add Slaw: Making a simple slaw to stuff in the taco will add the perfect additional crunch. You will want to mix finely shredded cabbage, chopped red onion, apple cider vinegar, oil and salt to make a great slaw that will go perfectly with the spices from the cod batter.
Drain the Fried Fish: When you remove your fish from the pan, lay them on a paper towel lined plate to soak up any excess oil from the fish.
Serve With: Lime wedges, avocado, slaw, Mexican rice, salsa, pico, cilantro ranch dressing, shredded cheese, or Mexican street corn.
Don’t Overcrowd the Pan: Cook the cod in batches so the oil keeps its heat and the fish cooks evenly.
Sift Flour: Before adding the flour into the batter mix, sift it to get the perfect consistency.
Dry Fish: Pat the fish dry before seasoning and dredging in batter.
No Beer Batter: If you don’t want to use beer in your batter you could swap it out for ginger ale or Sprite!
Corn Tortillas: Some people swear by using corn tortillas in this recipe. If you are a corn tortilla lover, try it out!
Making Ahead and Storing Leftovers
You are going to love these amazing fish tacos! Especially since the ingredients can be prepped and stored ahead of time! Your tacos will ready to build any night of the week! Be sure to store Baja taco toppings separately for the best results.
Storing in the Refrigerator: Allow the cod to cool completely and store within 2 hours of cooking. Then place it in a shallow airtight container. The fish will remain safe to eat when kept in the refrigerator up to 4 days.
Freezing: Transfer fried cod to a freezer bag and store for up to 3 months. Leave frozen cod in the refrigerator overnight to thaw, then use within 3 days.
More Tasty Taco Night Recipes
Honestly, is there anything better than tacos? I crave them all the time. To celebrate taco Tuesday, I’ve rounded up a few more recipes that I know your family will love! You’ve got to try them all!
Baja Fish Tacos are made with with crispy beer battered cod and topped with pico de gallo and the perfect cilantro ranch dressing. Every bite of the fried fish is bursting with flavor but is still light and fresh enough for a perfect summer meal!
Prepare the cod by cutting them in one inch pieces about 3-4 inches long. Salt and pepper and set aside.
In a medium sized bowl add the flour, chili powder paprika, garlic powder, cumin, salt and pepper. Add the beer and stir until combined.
Preheat a medium sized skillet over medium high heat, add oil until it is about ½ inch up the side. Heat until the thermometer reads 350 degrees.
Working in batches, dredge each piece of cod into the batter and add to the preheated oil. Fry until golden brown about 2-3 minutes each side. Remove and set aside on plate.
Assemble the tacos on a flour tortilla and top with fresh pico and cilantro ranch dressing.
Video
Notes
Originally posted on June 28, 2020Updated on June 13, 2023
]]>
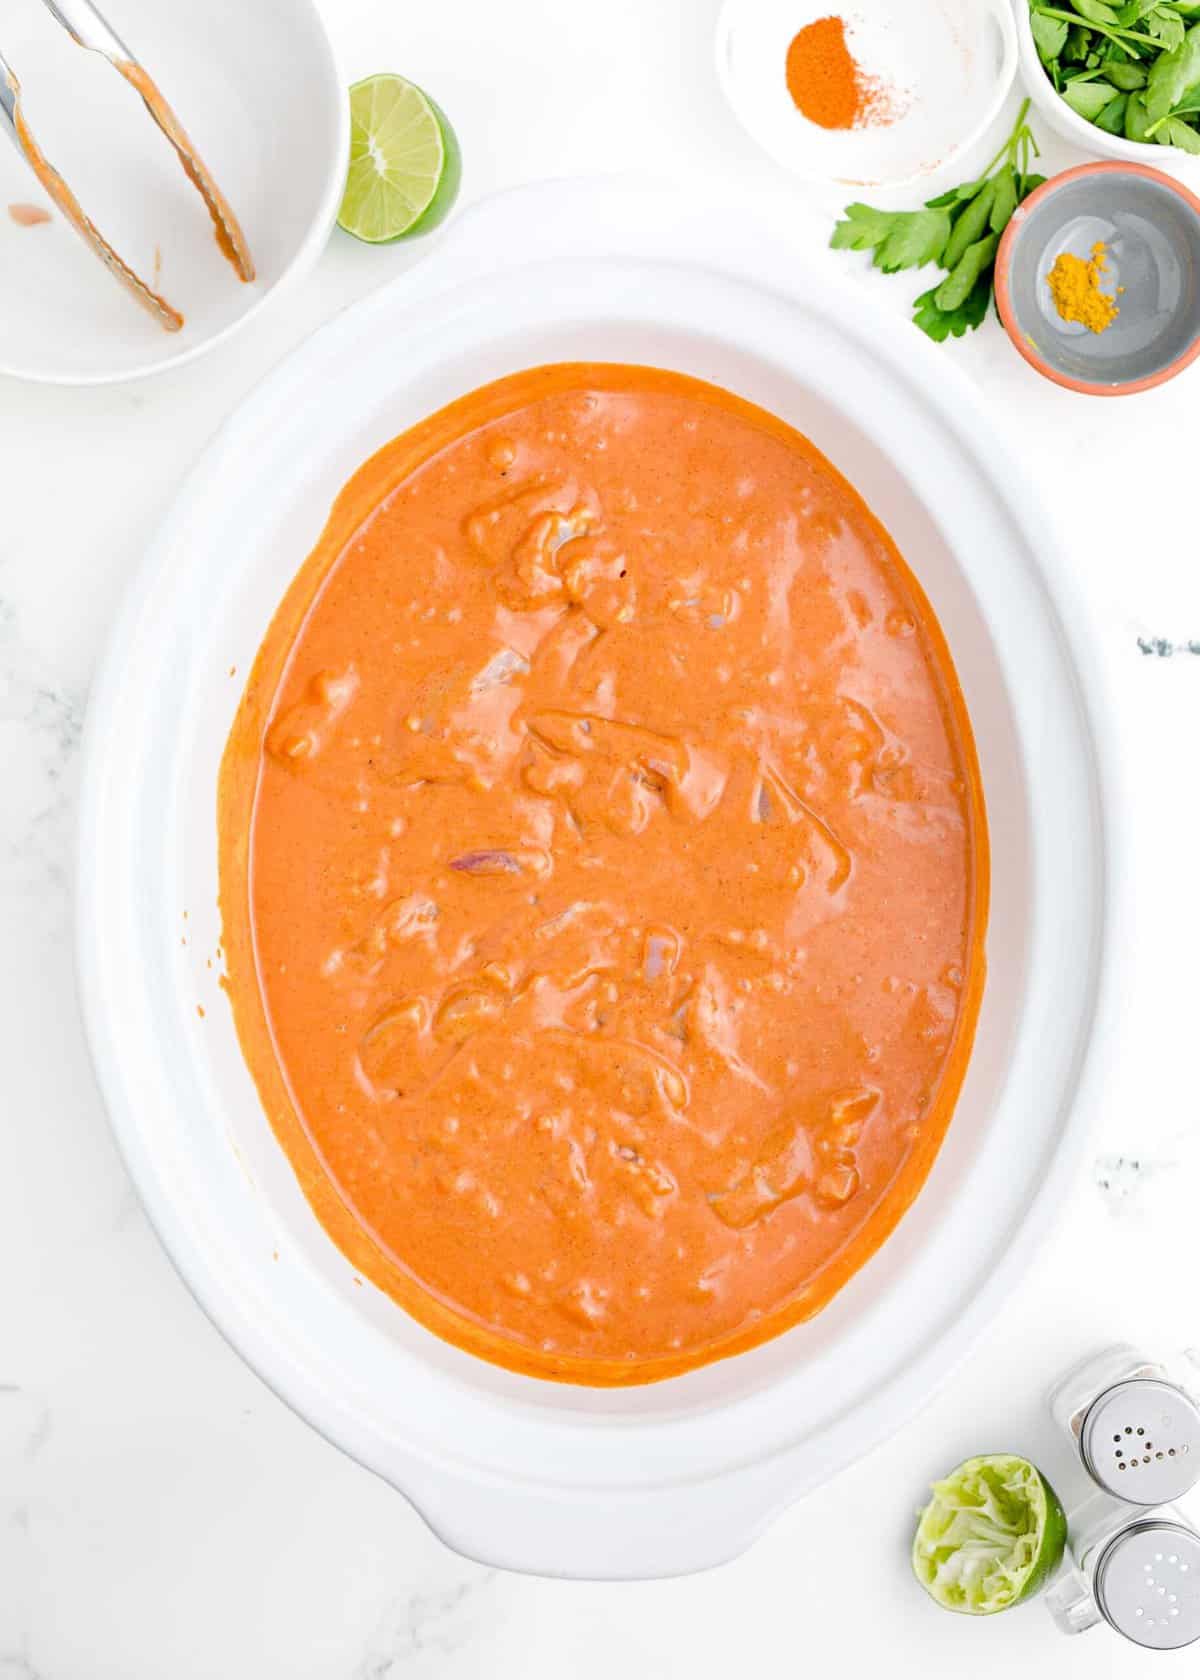
https://productiveorganizing.com/blogs/news/slow-cooker-butter-chicken2023-06-13T09:13:52-04:002023-06-13T09:13:52-04:00Slow Cooker Butter ChickenadminSlow Cooker Butter Chicken is incredibly easy to make and always yields the most flavorful, tender results! Bites of chicken thighs are served in a fragrant, savory, and creamy sauce. Be sure to serve it over some jasmine rice and use some naan to sop up all the saucy goodness so not a single drop goes to waste!
This dish is the epitome of comfort and flavor, and the best part is that it requires minimal effort on your part. Indian food can be really intimidating to make at home for those who love it and want to recreate it in their home kitchens. Aside from having the right spices in your spice cabinet, it’s really not as daunting as it may seem to be!
My version of slow cooker butter chicken is a mouthwatering and convenient twist on the classic Indian dish. This recipe takes the traditional flavors and rich creaminess and combines them with the ease and simplicity of slow cooking. It involves tender chicken pieces cooked in a flavorful tomato-based sauce, infused with aromatic spices and a velvety touch of butter. The slow cooker does all the work, allowing the flavors to meld together beautifully while you go about your day.
What exactly is butter chicken?
The popular Indian dish, butter chicken, also known as Murgh Makhani, is a rich, creamy, and incredibly flavorful dish originating in the city of Delhi in the mid-20th century. Legend has it that a chef named Kundan Lal Gujral, who ran a popular restaurant called Moti Mahal, accidentally discovered this creation. To avoid wasting the leftover tandoori chicken, he decided to simmer it in a tomato-based gravy and added a generous amount of butter and cream. Since then, butter chicken has gained immense popularity not only in India but also worldwide. Its harmonious blend of spices, creamy texture, and bold flavors have made it a staple in Indian cuisine, representing the perfect marriage of traditional flavors and modern innovation.
Why You’ll Love This
Effortless. You’ve never made butter chicken with this minimal amount of effort before. The steps here are short, simple, and pretty effortless. Sit back and relax while the Crockpot does all the work for you!
Oh so flavorful. This butter chicken recipe is traditional and made with downright delicious ingredients that always yield the most flavor-packed results. You’ll love the notes of onion, turmeric and more that are present in every creamy bite.
Better than take-out. Put the phone down…you won’t be needing Uber Eats tonight. This homemade butter chicken is so much better (and more affordable) than so many local restaurants!
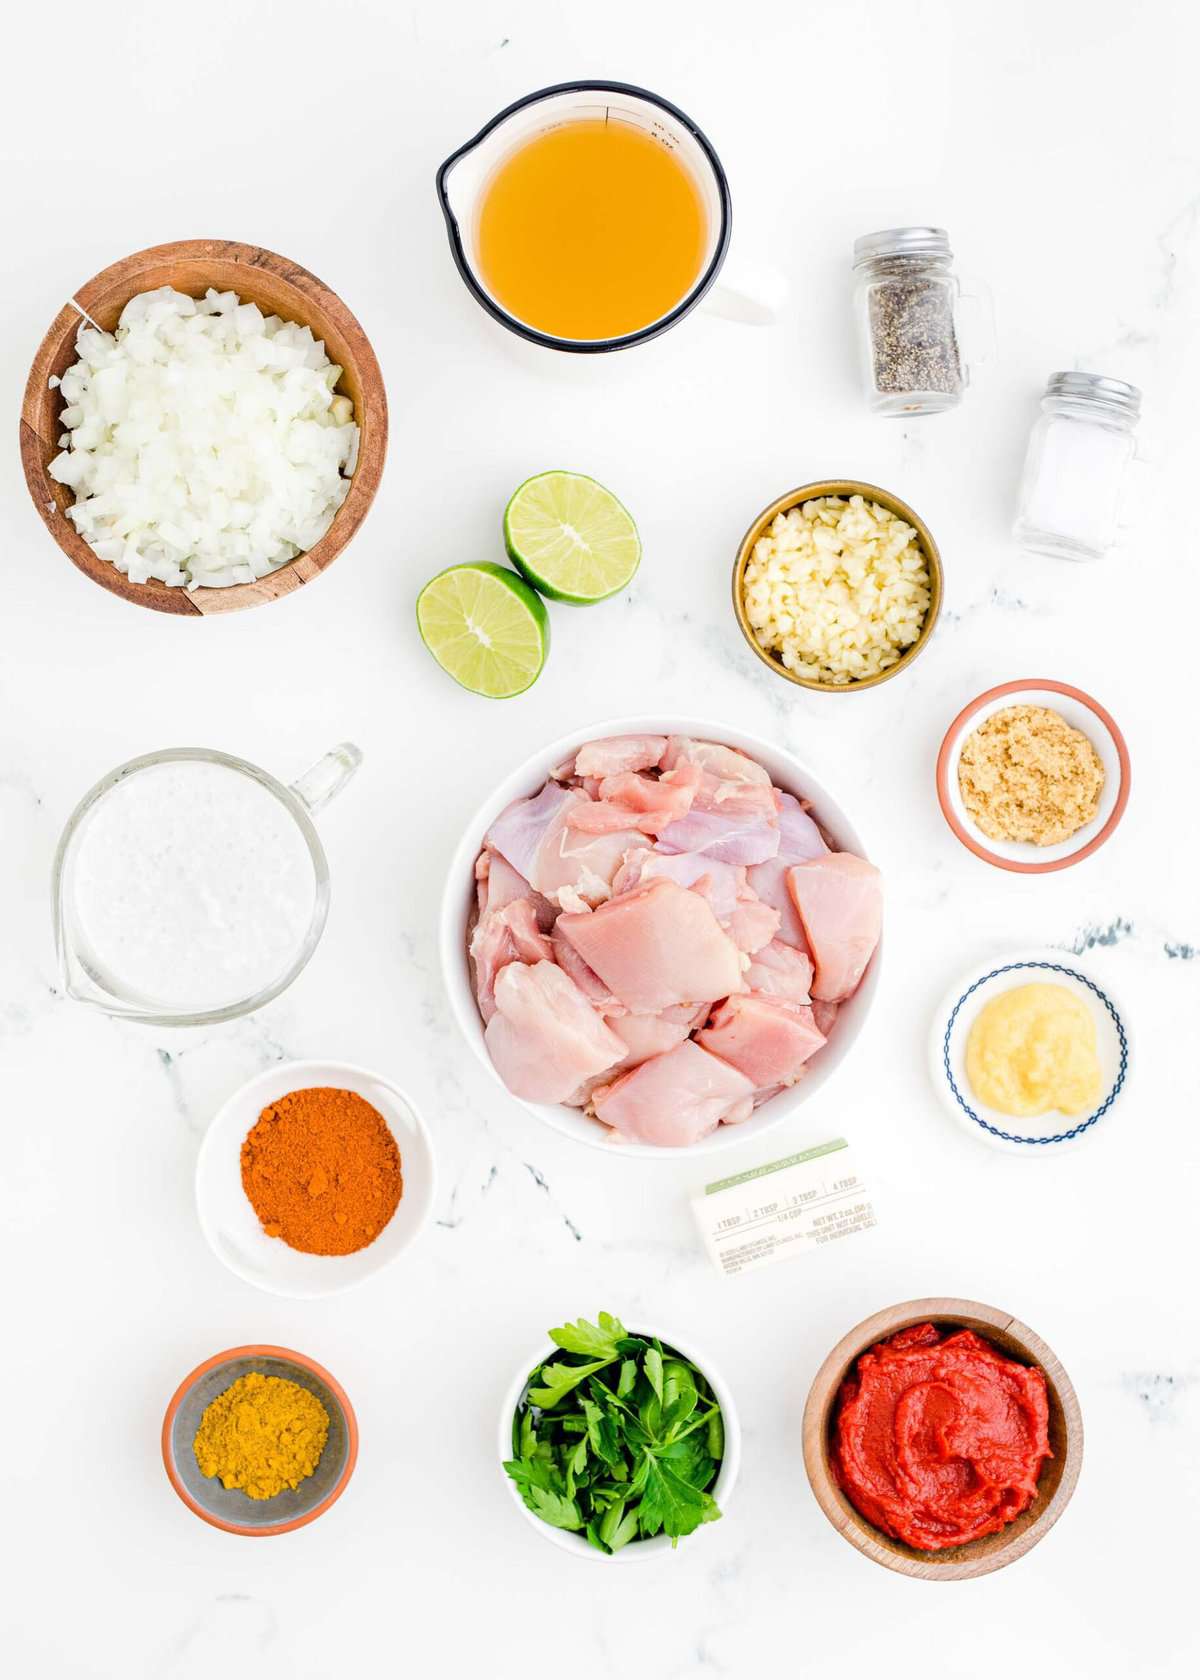
Ingredients You’ll Need
Here is a list of ingredients you will need to make slow cooker butter chicken. Make sure to scroll down to view the full recipe for exact measurements.
Butter
Yellow onion
Garlic
Ginger
Tomato paste
Garam masala
Brown sugar
Salt
Black pepper
Turmeric
Coconut milk
Chicken stock
Lime juice
Chicken thighs
Garnishes – Fresh cilantro or parsley
How To Make Slow Cooker Butter Chicken
If you’re ready to indulge in a soul-warming meal without spending hours in the kitchen, grab your slow cooker, and let’s get cooking together! Be sure to scroll to the bottom of this post for the full recipe.
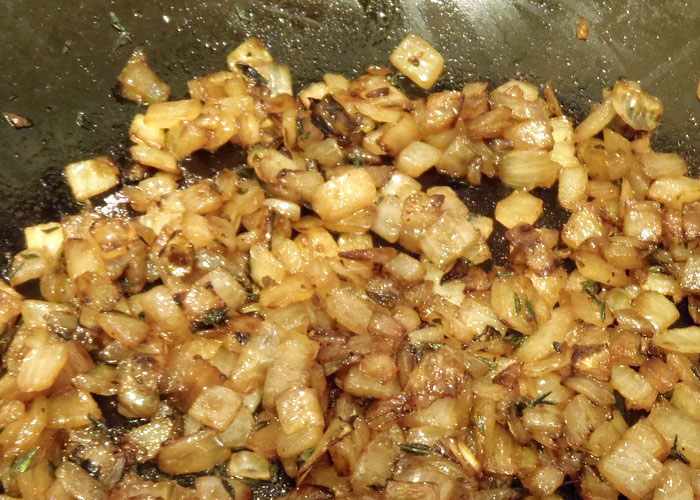
Sauté the onions. Sauté the onions in butter over medium heat in a skillet. Stir in the garlic and ginger and cook until aromatic (about 2 minutes).
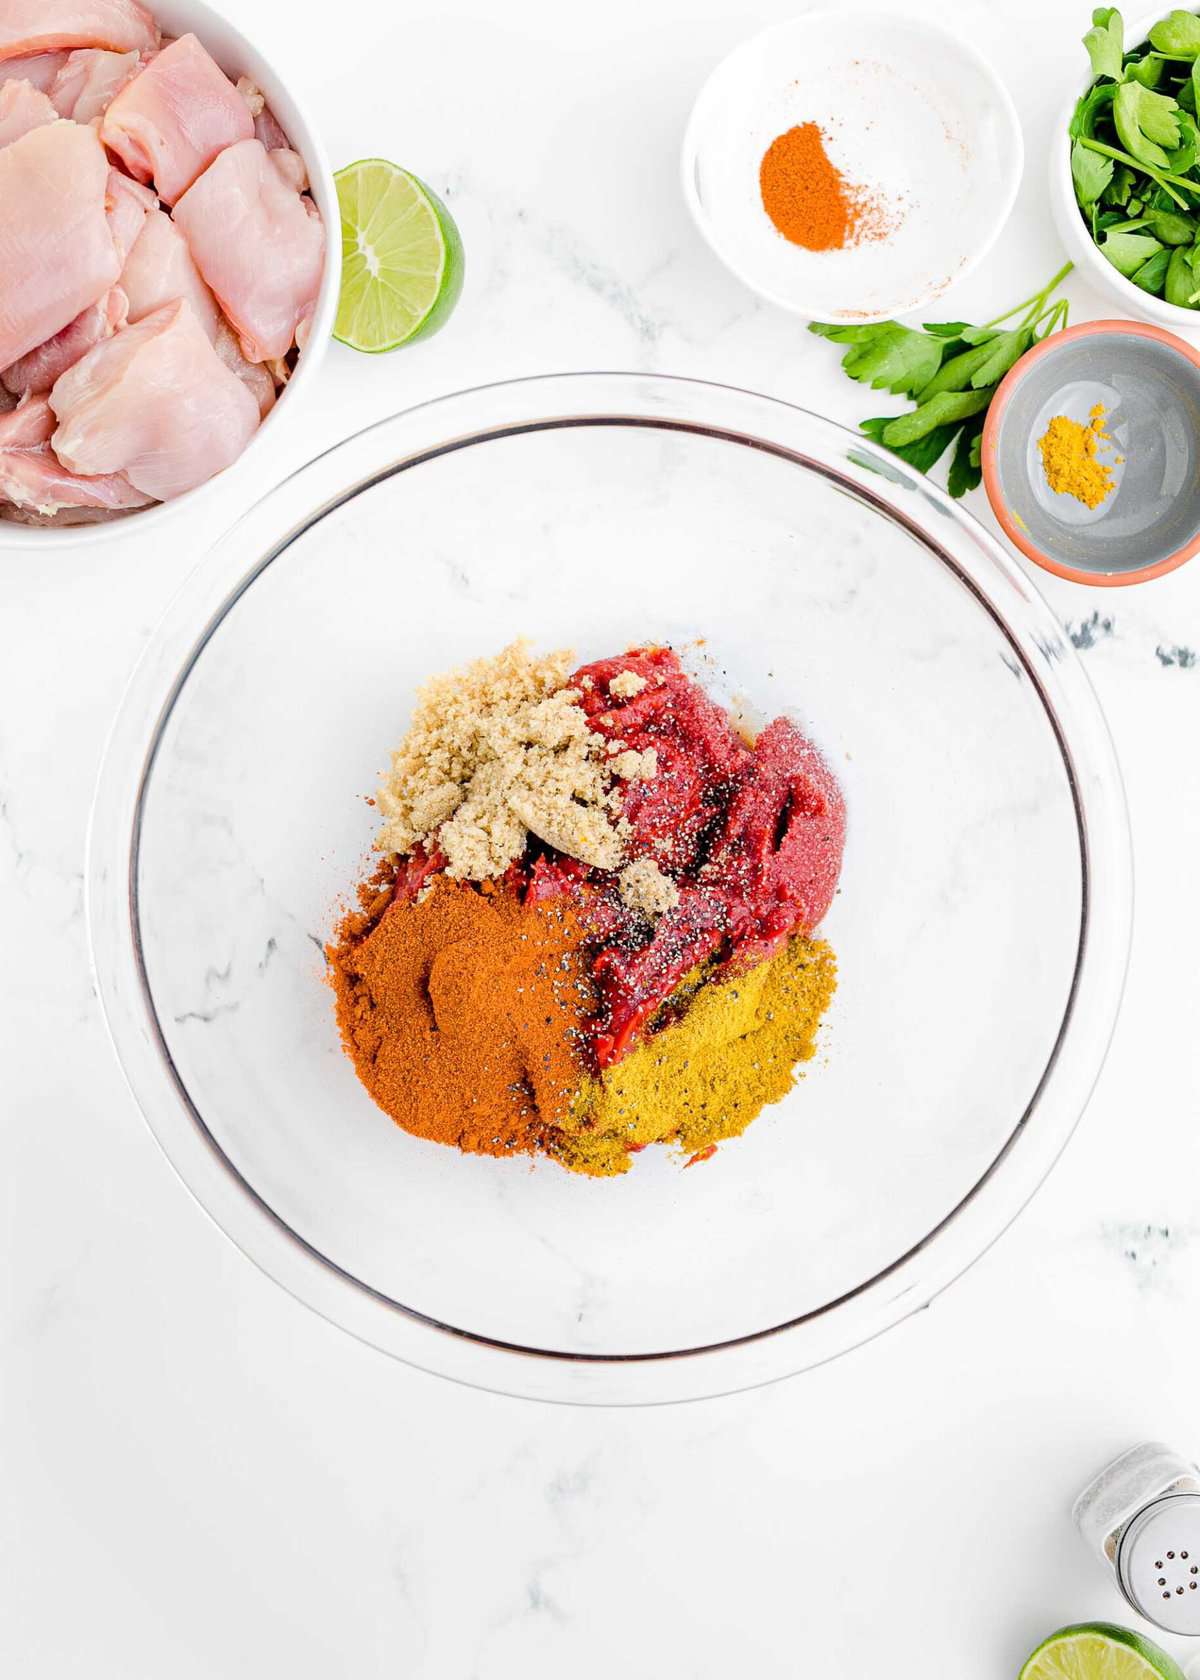
Make the sauce. Stir together the tomato paste, garam masala, brown sugar, salt, pepper, and turmeric in a mixing bowl. Whisk in the coconut milk, chicken stock, and lime juice until smooth. Pour this into to the slow cooker.
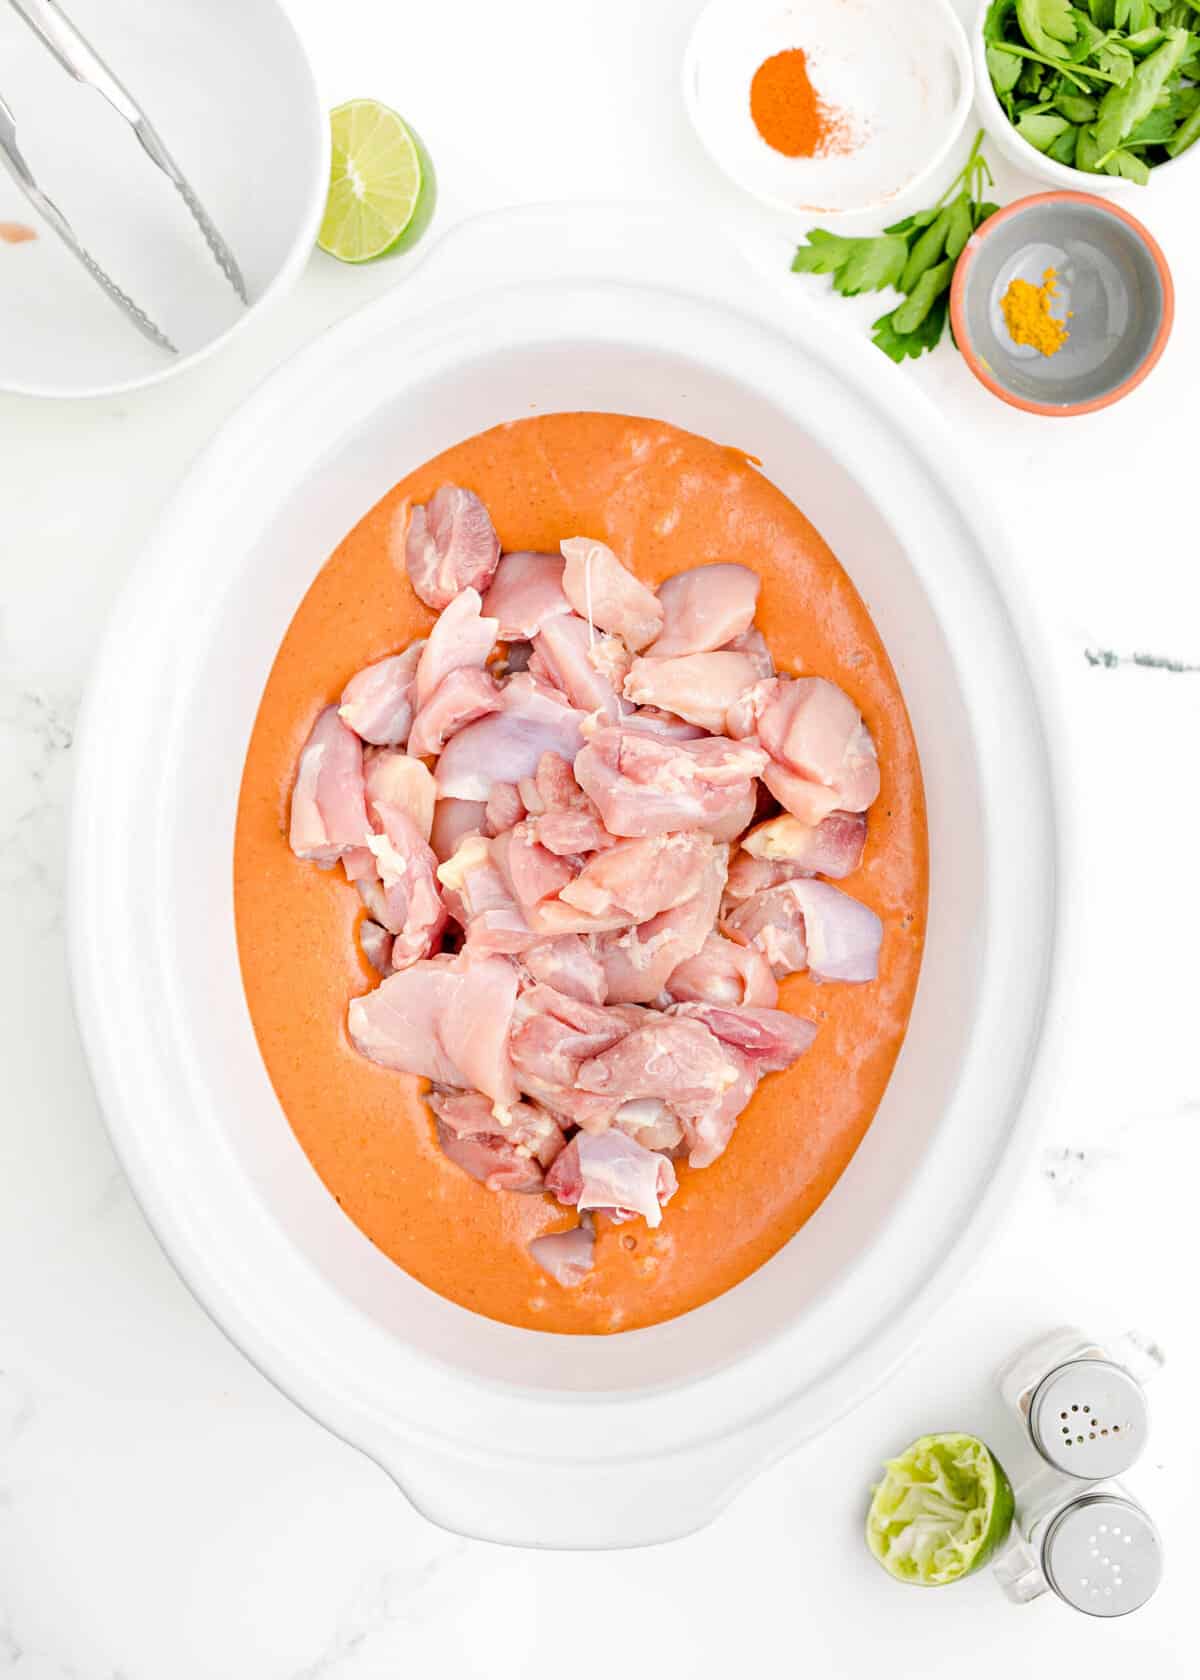
Cook. Add the chicken to the Crockpot and stir to fully cover it in the sauce. Cook on low for 5 hours or high for 3 hours.
Recipe Tips, Substitutions, and Variations
I’ve got a whole list for you to help make this as successful as can be!
Use chicken breasts. I prefer using chicken thighs because they usually turn out to be more tender, especially with the longer, slower cook time. However, you can easily swap them out for an equal amount of boneless skinless chicken breasts! For the best results, chop the chicken into bite size pieces before tossing it into the Crockpot.
Sneak in some veggies. This is far from traditional, but you can toss some cauliflower into the Crockpot if you want to sneak some veggies into your butter chicken! I recommend tossing in the cauliflower when there’s only one hour of cook time left. Try to do this quickly so you don’t let too much heat escape the slow cooker.
Turn up the heat. Oh yes! If you’re craving some spice, feel free to sprinkle in as much cayenne pepper as your heart desires. Just note that a little cayenne goes a pretty long way, so be cautious about how much you choose to stir into the mix.
Thicken the sauce. If you want to thicken the sauce, in the last 30 minutes of cook time, add a cornstarch slurry to the slow cooker and mix it in.
No peeking! Unless you’re tossing in some last minute cauliflower, you don’t want to open that lid for any reason. When you open the lid to your Crockpot, you release steam, which means the temperature decreases and you may have to wait longer for your food to cook.
Measure with care. This homemade butter chicken sauce is designed to be… Well, perfect! I don’t recommend adding more or less of any ingredients, as that may ruin the consistency or flavor of the sauce.
Use fresh lime juice. This is so important! Bottled lime juice won’t give you the same zesty flavor that freshly squeezed lime juice will. Plus, if you have any leftover juice, you can use it to squeeze on top of your plated butter chicken just before serving to add a touch of fresh flavor.
Storage and Reheating Instructions
I love having leftover butter chicken! It reheats like a dream in the microwave – just zap it in 30 second intervals until warmed all the way through. To keep it fresh for about 4 days, wait for it to fully cool to room temperature before transferring it to an airtight container and keep it in the fridge.
What to Serve with Slow Cooker Butter Chicken
I love serving my butter chicken over biryani. However, I’ve been obsessed with making jasmine rice in the Instant Pot first. It’s SO quick and easy. Although, butter chicken cannot be without Homemade Naan. It’s just simply a must!
If you’re looking for other authentic Indian dishes, I’ve got you. My Indian friend helped develop the following recipes so you know you’ve got genuine, authentic Indian dishes that you can easily make at home and serve with this butter chicken!
Place the butter into a medium skillet, on medium heat. Add the onions and sauté until softened and translucent. Add the garlic and ginger, cooking for another 2 minutes. Place this into the slow cooker.
In a separate medium sized bowl, stir together the tomato paste, garam masala, brown sugar, salt, pepper, and turmeric. Stir in the coconut milk, chicken stock, and lime juice. Whisk this until there are no lumps. Add this mixture to the slow cooker.
Add the chicken and stir everything together.
Cook this on low for 5 hours or high for 3 hours.
Serve with jasmine rice or similar.
Notes
If you want to thicken the sauce, in the last 30 minutes of cook time, add a cornstarch slurry to the slow cooker and mix in.
]]>
https://productiveorganizing.com/blogs/news/50-best-father-s-day-gifts-for-every-type-of-dad2023-06-09T21:13:50-04:002023-06-09T21:13:51-04:0050+ best Father’s Day gifts for every type of dadadmin
Dads are so unassuming – they do so much for others and expect so little in return. Whether they are fathers, grandfathers, uncles, big brothers, godfathers, or other father figures, Father’s Day is the one day of the year when we can show our gratitude and celebrate them. So why not choose a Father’s Day gift they might actually like and decide to use? We’ve rounded up – and categorized – an assortment of gift ideas that are sure to be appreciated and bring a smile this Father’s Day.
All of these products have been hand-selected by Team 6sqft. We may receive a commission for purchases made through these affiliate links. All prices reflect those at the time of publishing.
Dad works hard every day (even on his off days) but you can help him sleep well with this comfortable mattress. It includes five pounds of ultra-premium memory foam and high-density foam layers, so it can relieve pressure points while also providing stable support for Dad’s lower back – whether he sleeps on his back, stomach, or side. In addition, the gel-infused foam is breathable to keep him cool while he sleeps. The mattress is available in firm and relaxed firm versions. Loom & Leaf Mattress (Queen) $2,395/Sale $2,070, Saatva
This bedding bundle, woven from 100 percent organic cotton with a 300-thread count, will envelop Dad in luxurious comfort. The breathable sateen set is free from harmful chemicals and pesticides, and it gets softer with each wash. The bundle includes a duvet cover, two shams, a fitted sheet, a flat sheet, and 2 pillowcases. Color choices include Nightfall, Charcoal, Light Blue, Sage, Clay, Cream, White, and Windowpane. Luxury Organic Sateen Bedding Bundle, $169 (Queen) at Quince
If Dad prefers Bamboo sheets, these are made of 100 percent Viscose from Bamboo (and Oprah called them the softest sheets ever). The breathable and moisture-wicking fabric feels cooler than cotton sheets, to help Dad sleep comfortably. The sheets are available in both regular and deep pocket sizes and in light grey, white, driftwood, charcoal, and oat. Bamboo Sheet Set(Queen), Cozy Earth, $389/Sale $311
Dad will feel like he’s at a resort hotel while sleeping underneath this hotel-quality down feather comforter. The baffle-box construction is designed to have an even thickness throughout, so the comforter is free from lumps and cold spots. The breathable material is soft and fluffy, as well as leak-proof, and can be used in any season. California Design Den European Down All-Season Comforter, $299.99, Amazon
Dads who have problems falling asleep may find relief with this weighted blanket. It’s a cooling weighted blanket – made of 100 percent premium cooling lyocell – so he can sleep comfortably even during the hottest nights. The blanket is breathable and moisture-wicking, in addition to being silky-soft. It contains glass beads to promote relaxation for a stress-free and deeper level of sleep. Color choices are plentiful and include classic grey, cerulean blue, forest green, and cocoa. Gravity Cooling Weighted Blanket, $200 (15lbs) at Gravity
Most Dads keep an eagle eye on the thermostat to avoid paying higher energy bills, but with this tower fan, they can remain cool without adjusting the AC. The fan has a brushless motor and is powerful, yet lightweight and silent. Dad can use it in a stationary position, but the tower also oscillates 120 degrees, and in auto mode, it’s smart enough to adjust the fan speed based on the ambient temperature. There are four modes and 12 speeds on the fan. Dreo Pilot Max Tower Fan, $129.99, Amazon
Good luck dragging Dad to a spa, but these towels are made of 40 percent Viscose from Bamboo and 60 percent cotton, so they provide a spa experience every time he steps out of the shower. The ultra-absorbent set includes two bath towels, two hand towels, and four washcloths, and is available in light grey, charcoal, white, and crème. Classic Bath Bundle, $165, Cozy Earth
Help Dad soothe those aching muscles with this premium percussion massage gun. It can relieve pain and stiffness while reducing tension and helping him sleep better. The massage gun has four attachments: a dampener for tender areas or to use close to bones, a standard ball that can be used anywhere, a thumb for lower back use and trigger point therapy, and a micro-point that’s designed to help improve circulation. The cordless massage gun(which uses fast USB-C charging) has an ergonomic grip and is easy to use on his back, neck, hip, hands, feet, or anywhere else. It has a customizable speed range and easy one-button controls. And, the massage gun can be used with the Therabody Smart App for preset routines and other helpful content. Theragun Prime Percussion Massage Gun, $349/Sale $279 at Amazon
Another gift idea to help Dad relax is this pillow with Celliant fiber technology, which can promote longer, deeper sleep and help his body recover quickly from everyday physical stress. The pillow is reversible: one side has softly tufted-down alternative fiber pockets, and the other side is made of temperature-neutral memory foam. Recovery SoftCell Select Pillow, $190, PureCare
If Dad likes to experiment with coffee, he’ll love these Hawaii coffee varieties. The storybook gift box includes 4 ounces of Maui Mokka: medium dark with natural chocolate flavors along with roasted walnuts, cinnamon, nutmeg, and rose; 4 ounces of Kona Peaberry: medium light with honeysuckle, caramel, black cherry, and plum flavors; and 4 ounces of Kona Laurina, which is naturally low in caffeine and has a dense fruity flavor). The box also includes five single-serve Hawaii packets, a classic Espresso Bites bar, and a lip balm made of 100 percent Hawaii coffee and organic oils. Coffee Roasters Storybook Collection, $125 at Big Island Coffee Roasters
With this one countertop appliance, Dad can make Belgian waffles, pancakes and sausage links, eggs, roast beef and Swiss cheese paninis, grilled lobster tails, garlic and rosemary strip steaks, hamburgers, grilled veggies, and more. The grill-griddle-waffle maker has swappable, cast aluminum nonstick plates and a double cooking surface (it can open flat or the top cover can lock in four different height positions for variable contact with your food). Dad can use various configurations (like grill on one side, griddle on the other side) and the dual zone heating provides independent temperature controls for each side of the plate. The appliance has a maximum temperature of 500 degrees Fahrenheit and is available in three colors (black, blue haze, and cloud cream). The plates are also dishwasher safe. Elite Multi Grill, Griddle, and Waffle Maker, $429 at GreenPan
Dad will enjoy making his own espresso beverages with this fancy, yet simple-to-operate espresso machine. It has a built-in grinder with eight grind settings, so he can make freshly-ground coffee for a single or double espresso. The active temperature control ensures that the right temperature is used for different types of coffee beans. There’s also a professional steam wand so Dad can create latte art and a separate water spout when he wants a cup of hot water for hot chocolate or tea.| De’Longhi La Specialista Arte Espresso Machine, $699.95, Amazon
Gift Dad the essentials with this set of two skillets from Viking. Each one has a 3-ply stainless steel core that provides even heating to avoid hot spots. Also, the raised pattern is designed to ensure metal utensils don’t damage the nonstick surface. The set includes a 9.5-inch skillet and an 11-inch skillet, both of which are oven safe to 500 degrees Fahrenheit, with ergonomic handles that stay cool. The skillets are also dishwasher safe. Viking Hybrid Plus NonStick 2-piece Skillet Set, $199 at Sur la table
A high-quality wok is so versatile that Dad can use one for pretty much anything, from stir-frying to steaming to searing and beyond. The HexClad uses hybrid technology that combines stainless steel with ceramic nonstick and the laser-etched hexagonal design provides a great surface that results in even heat distribution. It can be used on electric, gas, ceramic, or induction stove tops, and is oven safe up to 500 degrees Fahrenheit (and also metal-utensil resistant). The lid is oven safe to 400 degrees Fahrenheit. The wok is also dishwasher safe and available in a 12-inch and a 10-inch version. HexClad 14-inch Hybrid Stainless Steel Wok, $179 at Amazon
For Dads who love fried foods but need to eat healthier, this 5.3-quart air fryer uses 360-degree TurboAir technology to cook food more efficiently, so it is crisp and juicy. The air fryer also uses 90 percent less fat than traditional frying methods. There are 13 cooking functions, including fries, chicken, steak, shrimp, pizza, and onion rings. The air fryer can also bake cakes, make toast, and preheat food. Proscenic T22 Air Fryer, $139, Amazon
Dad will love this black, 24-piece flatware set, which is perfect for formal dining or eating leftovers. The 18/10 stainless steel and shiny PVD color finish resist corrosion, oxidation, and scratches. The modern flatware set includes six of each: knives, forks, spoons, and teaspoons. In addition to black, other color choices include silver, gold, and rose gold. Kilne 24-Piece Flatware Set, $275, Kilne
Another gift sure to bring a smile to Dad’s face is this set of four serrated steak knives. The high-carbon German steel knives have a full tang construction and a five-inch razor-sharp blade edge that is easy to grip, and comfortable to cut with. Cutluxe 4-Piece Serrated Steak Knife Set, $69.99, Amazon
Dad can make his favorite concoctions with this professional 1800-watt blender, which can blend, juice, grind, mix, and more. With a metal drive, stainless steel blades, and a 64-ounce BPA-free shatterproof jar, he won’t be replacing this countertop appliance any time soon. It’s convenient to use and has four program settings: ice crush, puree, smoothie, and clean, for making everything from soup and chili to dressings and sauces to smoothies and other beverages. And the LED timer shows the time remaining to remove any guesswork. Hamilton Beach Professional 1800 Watt Blender, $249 at Hamilton Beach Collection
Dads love to save money, and this carpet cleaner lets them avoid calling in the pros to handle this chore. The 1300W motor and 130AW of suction power, along with the ability to maintain a water temperature of 104 degrees, all combine to pull all of the dirt out of his carpeting. There’s also a dry-only mode that produces a 167-degree breeze to dry wash carpets quickly, leaving no water behind. Attachments include an extra hose and stain remover tool for upholstery, car interiors, and carpeted stairs. Tineco Carpet One Smart Carpet Cleaner, $499/ Sale $399 at Amazon
New dads (or babysitting granddads) can relax knowing they can monitor the baby from other rooms – or even away from home – via smartphone. This baby monitor has a camera with audio, so it can be used for viewing, hearing, and talking to babies, infants, and toddlers. The camera provides a 360-degree view (and even has night vision), and the gooseneck provides flexible positioning. The smart monitor also has eight soothing mood light colors that can be intensified or dimmed – and can also serve as sleep training to help babies develop better sleep patterns. In addition, the monitor can play hi-fi lullabies and natural sounds to provide an environment that’s conducive to sleep. CHILLAX BabyMod Pro Baby Monitor, $299 at Amazon
The problem with most video doorbell cameras is that Dad can either see the top image or the bottom image. However, this dual camera provides both a top video image and a separate bottom video image, so he can see the top of the delivery driver’s head as well as the package on the ground. The camera also sends alerts before someone even rings the doorbell, and is compatible with Amazon Alexa and Google Assistant. It’s battery-powered and can work with Dad’s existing chime. Anker Eufy Security Video Doorbell Dual Camera, $259.99, Amazon
When Dad wants to see what’s happening anywhere on his property, this waterproof stick-up battery camera is ideal for inside the home, in the garage, or even in the backyard. It has a live view to let him view images anytime on his smartphone, tablet, or Echo device. The camera can be set on a flat surface, or it can be mounted on a wall or from the ceiling. There’s also a two-way talk option. Ring Stick Up Battery Cam, $99.99 Amazon
Air purifiers don’t have to be big, bulky, or white. Dad will appreciate this stylish, dark grey air purifier that doesn’t take up much room. In just 10 minutes, it can clean up to 180 square feet, removing dust, smoke, cooking odors, pollen, and other allergens from the air so he can breathe better. The fan is quiet, and can also be controlled remotely via the Smartmi Link app. Plus, it’s compatible with Alexa, Google, and Apple HomeKit, and includes a stylish leather carrying strap. Smartmi P1 Air Purifier, $159 at Amazon
Power out? No problem with this nifty little portable power station, which can charge Dad’s smartphone 28 times, his laptop five times, and his tablet 14 times. It can also power a light for 25 hours, or an electric fan for 7 hours (and there is also a convenient LED light on the panel, itself). He can also use it when out and about since it can charge his camera 19 times, and his drone 5 times. The device can recharge via solar panels (sold separately), but it can also be recharged via a wall outlet or even the car charger. 70mai Portable Power Station Hiker 400, $399 at Amazon
If Dad needs to power several devices and appliances during a power outage or when traveling in his RV, this portable power station has a 2160Wh capacity, allowing him to function normally for a long time. The generator provides 260 phone charges and 16 laptop charges. Since it’s battery-powered, the generator can be recharged using solar panels (sold separately), via a wall outlet, or using a car charger cable. Jackery Explorer Portable Power Station, $2,299, Amazon
Dad can keep 15 tools in his pocket with this Leatherman Curl Multitool. Instead of having to lug around a heavy toolkit, this has everything he needs. It includes pliers, wire cutters, wire strippers, knife, spring-action scissors, ruler, awl, can and bottle openers, files, bit driver, and screwdrivers. Leatherman Curl Multitool, $89.95, Amazon
The only thing better than a tool kit is a translucent one that lets Dad see what’s inside. This one also has a modular tool tray for organization and a convenient handle. The kit includes a drill/driver, 20V max Lithium-Ion battery that holds a charge for 18 months, charger, needle nose plier, tape measure, slip joint plier, hammer, utility knife, level, 32 fastening bits, 12 hex keys, 10 drill bits, and a picture hanging hardware kit. Black & Decker 20V Max Drill with Home Tool Kit, $108/Sale $89 at Amazon
Big and bulky vacuums can’t compete with this compact hand-held car vacuum cleaner that uses a USB-rechargeable battery. The high-speed handheld vacuum, which includes a multi-surface tool, and two-in-one brush nozzle, and a crevice nozzle, can clean the seats and carpet in his vehicles, and he can also use it to clean around the house since it can reach between seat cushions and pick up debris on the floor and in other spaces. The vacuum has an eco-mode and a turbo mode and can be stored and charged on the slim base. Brigii High-Speed Handheld Vacuum, $99/Sale $79 at Amazon $79
In any season, Dad’s home can be dry and stuffy inside. This smart humidifier can cover up to 600 square feet, providing a mist that brings comfort and relief. It can mist up to 100 hours on one refill, and since the device is tall, it can mist higher. The top fill design is easy to use, and the lid can be removed with just one hand. It comes with a filter that softens hard water and reduces limescale, which results in less mineral buildup so it won’t have to be cleaned as often. The humidifier can be controlled via remote, app, or voice. Levoit OasisMist 1000S Smart Humidifier, $149 at Amazon
When Dad is fixing stuff around the house, it can be difficult to hold a light and the item in question at the same time. However, this LED Headlamp allows him to be hand-free so he can focus on the task at hand. The straps are adjustable so he can achieve a comfortable fit. And in addition to a large convex lens with a zoom mode, there are also side lights for additional light. The waterproof headlamp uses Type-C charging and has a power display to let him know how much power is remaining. (It can be used for 8 to 10 hours on a single charge). Plus, there’s a power bank function to supply power to other mobile devices. Exqulife LED Headlamp, $35 at Amazon
Dad can transport his laptop and other essentials safely (and stylishly) in this portfolio with foam-padded pockets designed to keep tech gadgets protected. The fabric is waterproof and the lining is made from recycled materials to provide eco-friendly protection, while the vegan leather trim adds a fashionable touch. The portfolio has several internal pockets and a separate pocket that can hold a 16-inch laptop. The portfolio is available in black or navy blue. Portfolio, $95 at Mujjo
There’s nothing like jerky chair movements to interrupt Dad’s workflow. However, this glass chair mat makes it easy to roll or glide on either carpet, hardwood, or tile. Since it’s made of tempered glass instead of plastic or vinyl, it’s designed to be durable (supporting up to 1,000 pounds). And the chair mat also ensures Dad’s chair doesn’t scratch or scuff up the floor. Tempered Glass Chair Mat, $189, Quartet
Dads who work from home need an ergonomic office chair and this one, which is designed for big and tall people, supports up to 330 pounds. The seat is 3.35 inches thick and the back of the chair has an S-shape that mimics the human spine. The chair can be tilted from 90 degrees for working, to 116 degrees for reading, to 126 degrees for relaxing. In addition, the lumbar support and armrest are both adjustable, and the headrest can also be adjusted up and down 3.54 inches and rotated 45 degrees. Sihoo M18 Ergonomic Office Chair, $199/Sale $169 at Amazon
Corral all of Dad’s cords with the 10-in-1 Anker 647 Charging Station, which neatly provides plenty of ports for charging numerous devices. The charger has two retractable USB-C cables, one USB-C port, one USB-A port, and six AC outlets, so it can reduce desktop or tabletop clutter. It also charges quickly–in fact, it can charge a MacBook Air in under 90 minutes. Anker 647 Charging Station, $99 at Amazon
If Dad has a MacBook and he’s using an external computer monitor, this vertical laptop holder can help him keep his laptop safely out of the way – and help him reclaim valuable desk space. The laptop holder is also a docking station and has two Thunderbolt 3 ports. In addition, there are intake and exhaust vents to keep the laptop cool while in the holder. Brydge Vertical Laptop Stand/ Docking Station, $169.99, Amazon
When Dad is traveling, it’s impractical to pack and carry an external monitor. However, this 15.6-inch portable monitor is slim and lighter than an iPad, weighing 1.7 pounds, so it fits easily in a briefcase or suitcase. The 1080p monitor has a speaker, 3.5mm audio jack, and HDMI port, and it’s ideal for use with desktops, laptops, gaming consoles, and smartphones. KYY 15.6-inch Portable Monitor, $161.49, Amazon
You can help Dad protect his new desk – or breathe new life into his old desk – with this extra-large leather desk pad, which is 49 inches by 26.5 inches. The full-grain leather feels and looks buttery soft, and has a natural cork backing. It’s available in either black or tan leather and also in smaller sizes (small, medium, medium-plus, and large). Another great desk accessory gift idea is a set of black or tan leather coasters, which can keep either hot or cold beverages from leaving water rings on Dad’s desk. Leather Desk Pad- XL, $400, Grovemade
Upgrade Dad’s TV without breaking the bank. This thin profile 43-inch TV has 4K Ultra HD, Dolby Digital Plus, and includes an Alexa Voice TV Remote, so he can tune into his favorite TV show using voice commands. The TV has 3 HDMI 2.0 ports, and an HDMI 2.1 with an eARC port, as well as USB, ethernet, and Digital Optical Audio Ports. It’s also available in larger sizes: 50-inch, 55-inch, 65-inch, and 75-inch models. Fire 43″ Omni Series 4K UHD Smart TV, $399/Sale $339, Amazon
However, Dad’s home entertainment options shouldn’t be limited to TVs. With this portable projector, he can view TV shows and movies on a blank wall, or even project videos and other images on the side of his garage. It projects 500-ANSI lumens at 720p and provides cinematic sound. The projector works with laptops, gaming consoles – pretty much anything that uses an HDMI or USB 2.0 cable, so he can stream Netflix, YouTube, and other apps. Anker Nebula Mars II Pro Projector, $549.99, Amazon
Splurge on your Dad with this pay of premium headphones. Made of real leather and microfiber, the high-fidelity headphones are designed to be comfortable for long periods of item. That’s important because he’ll never want to take these off. Focal is known for headphones that range from $1,000 to $5,000, and these were created with that same technology for an enjoyable listening experience. The headphones also have active noise canceling to block out background noise and provide clear telephone conversations. Battery life is over 30 hours, and just a 15-minute charge provides 5 hours of listening time. The headphones can also be used with Amazon Alexa and Google Assistant. Focal Bathys Headphones, $799 at Amazon
When Dad wants to get around without taking the car or using public transportation, this electric cruiser bike is a great alternative. It has 26-inch puncture-resistant tires, a 350W direct drive geared motor, and can get up to 19 mph. The large battery, which has a USB charging port, is safe and easy to remove. Dad can travel up to 25 miles on one charge using pure electricity and 40 miles using pedal assist. The dual shock absorber provides a comfortable ride on any terrain, and the dual lights provide safety, while the integrated rear rack can store cargo. The bike supports 264 pounds and is available in black or white. Heybike Cityscape Electric Cruiser Bike, $649, Amazon
Whether it’s providing under cabinet lighting in the garage or adding some flair to his big screen TV, this light strip is an easy and fun way to decorate around the house. With 5.56 feet of strip light, Dad is only limited by his imagination. The lights can also be controlled by Apple and Google hubs (like Apple Home Pod, Nest Hub, and Google Home Mini. Govee LED Strip Light M1 Matter, $59 at Amazon
If your Dad grew up listening to the Rolling Stones and Jimmy Hendrix, he’ll definitely know the Marshall brand. These headphones can take him back to the good old days, with a signature sound that’s beyond impressive. Active noise canceling ensures background noise doesn’t interfere with his listening experience. The headphones provide up to 30 hours of wireless playtime with ANC and are compatible with Google Assistant. The collapsible design makes it easy to transport the headphones in the travel kit – which also includes a 3.5 mm headphone jack and a USB charging cable. Marshall Monitor II ANC Headphones, $284 at Amazon
If Dad is more of an earbuds guy, these wireless earbuds provide a crisp clear sound full of bass. He can use one earbud or both, and the earbuds can also connect two Bluetooth devices at the same time. The hybrid ear tip design ensures the earbuds fit securely and comfortably, and the control on the earbuds is easy to operate. There’s an option to block outside noise or let it through, depending on the situation. The earbuds have a 20-hour battery life and a 10-minute charge provides 90 minutes of listening time. Audio-Technica ATH-CKS50TW Earbuds, $149 at Amazon
This rugged speaker lets Dad listen to his favorite tunes or talk show wherever he goes. It’s portable and designed for outdoor use – in fact, it has a shockproof body and an IPX6 waterproof rating, along with a carrying strap that includes a bottle opener. Four speakers provide clear and vibrant sounds, and there’s also a built-in microphone for conference calls. There are also two passive subwoofers and a built-in power bank. The speaker has a 20-hour battery life and Dad can continue listening while charging it. Treblab HD Max Bluetooth Speaker, $118 at Amazon
Dad can drink his favorite beverages in style with this two-piece set of 14-ounce double-wall beer glasses. The glasses keep hot drinks hot (but cool to the touch) and keep cold drinks cold, without creating condensation. The glasses are made of borosilicate glass and are safe to use in the microwave and freezer, and put in the dishwasher. The double espresso cup set is another option if he prefers handles. Zwilling Double-Wall Beer Glasses, $36.93, Amazon
Dad will never get lost with this cool mirror compass. It has a globally balanced needle with jewel bearing, and sighting tools for more accurate direction taking. The adjustable declination correction also contributes so the accuracy of the compass, which has a liquid-filled capsule, sighting hole and notch, clinometer, metric UTM scales, an inch ruler, baseplate with a magnifying lens, and luminescent marking to low light conditions. It also has a detachable snap-lock lanyard with a wristlock. Suunto MC-2 G Mirror Compass, $77/Sale $72 at Amazon
Beer and snacks take on a new meeting with this bundle. It includes a Japan-made frosted beer glass, and otsumami (Japanese snacks served with beer). The snacks bundle includes smoked crackers and peanuts that are salty with a lemon flavor, Garipote spice chips (think: garlic French fries), a mix of spicy shrimp curry flavored rice crackers and peanuts, and well as several other flavorful snacks in a natural canvas tote bag. Another option is the Diamonji Ame Honpo Handmade Candy Gift Box, which includes 12 bags. The six flavors are Sakura (Cherry Blossom), Ramune, Kaki (Persimmon), Yuzu Sake, Mikan (Mandarin Orange, and Kyoyuzen Candy Mix. The Beer Glass and Otsumami Snacks Bundle, $59 at Bokksu
If you’re looking for a more affordable headphone choice, Edifier has you covered. The high-quality sound is certainly impressive and the headphones provide ambient sound awareness for the kind of noise that you need to hear, like sirens or passing cars. With a 49-hour battery life with noise cancellation off, and 33 hours with noise cancellation on, Dad can listen for a long time without worrying about recharging. In addition, the Edifier App provides customization features. Edifier W820NB Plus Headphones, $79 at Amazon
It’s a lantern. It’s a Bluetooth speaker. Dad will love this 100 percent waterproof EcoLantern that has both an emergency mode (bright flashing white and red light) and a multi-colored party light mode (actually 2 modes: synced music and relaxing color fade). The lantern has a 4400mAH power bank to charge a smartphone, action camera, or tablet. And since it’s a speaker, it can also play up to 20 hours of music and connect directly to Siri or OK Google. EcoXGear 100% Waterproof Lantern/Speaker, $99 at Amazon
Dad can fight foot pain with these sneakers, which have lightweight EVA foam to provide a shock-absorbing cushion in every step he takes. The soles of the shoes also flex dynamically to hug and protect his heels, while the insole includes contoured dual-density foam for arch support. Color choices include mountain Ssge/white-smoke gray, indigo-white-basalt, jet black-white-fire red, jet black-citron, storm gray-black, and java brown-spice brown. The tennis shoes are available in medium and wide options and in sizes ranging from 6.5 to 14. Atom Sneakers, $160 at KURU
Even though Father’s Day is in June, it’s a perfect occasion to gift him items for cooler seasons. This stadium jacket is ideal for casual events. The unlined jacket is made of 100 percent nylon with a PU coating. In addition to a chest pocket with a snap button, there are also hand pockets on either side. The navy blue stadium jacket uses branded snap buttons and is available in sizes ranging from S to XXL. Stadium Jacket, $220 at Adsum
Denim is probably one of Dad’s favorite materials, and this denim blue shirt is made with organic cotton and washed in an enzyme that makes it soft and comfortable to wear. The shirt is actually biodegradable/compostable and includes natural dyes made from plants and minerals, so they’re non-toxic and non-allergenic. And the buttons are made with corozo, a Brazilian nut! The shirt, which is designed to look nice untucked, is available in sizes XS through XX. In addition to denim blue, it’s available in ivory and wave. Porto Shirt, $155 at Alex Crane
This midweight tech jacket can be worn alone in warmer months, or layered when the temperature drops. It has a naturally water-repellent fabric that’s treated with DWR (durable water repellent) for an advanced level of protection from the rain. The dual zipper hand and flap pockets keep Dad’s phone, gloves, keys, and other items secure. The chest phone pocket, which also zips close, has a membrane fabric that provides water protection and an opening for the internal headphone jack. The jacket is made of 85 percent nylon and 15 percent spandex. It comes in sizes ranging from SX to XXL, and is available in Viking Red, Light Grey, Iron, and Black. Midweight Tech Jacket, $188 at Ten Thousand
What Dad wouldn’t like a trench coat? Admittedly, long versions can be cumbersome, but this short trench coat is the perfect size. The all-season, waterproof-and-windproof trench coat is made from Italian cloth, and the cotton blend is also breathable. It has binded seams, and a large interior pocket that’s big enough to hold a 13” MacBook. Sizes range from XS to XXL, and color choices for the exterior and interior include Tan/Navy, Midnight/Olive, Brown Watcher Check, Charcoal/Grey, Navy/Grey, Dark Green/Stone, Black/Blue, Tan/Navy, and Forest/Cinnamon Waterproof Sherlock Trent Coat, $247 at Percival
If Dad is a photographer – or just likes various compartments to separate and transport his gear – this backpack has lined fuzzy fleece compartments for an expandable water bottle/tripod pocket, hidden passport pocket, laptop/tablet sleeve, and secure front pocket. The interior has removable cubes to protect camera equipment and other valuables. The weather-resistant bag also has an adjustable and removable chest strap, key clip, magnetic tote handles, and luggage handle-passthrough. And the expandable rolltop can be unrolled to provide extra space when he needs it. Color choices include black, Wasatch Green, Aegean Blue, Yuma Tan, Sedona Orange, and multicam Black. WANDRD PRVKE 21L Travel Backpack, $219 at Amazon
Sports-and-fitness dads will love this smartwatch that’s designed for adventures and has 97 sport modes (like running, cycling, climbing, fitness, and swimming). GPS capabilities include a single band GNSS, and it can connect up to 32 satellites at one time, and five satellite systems. The navigation feature includes a route plan with heat maps and a breadcrumb trail in real-time. Battery life is 40 hours in GPS mode and 300 hours in tour mode. The military-grade watch is designed to be durable, yet it’s ultra-thin and dressy enough to wear to work or around town. The smartwatch can also track Dad’s sleep cycle, stress phase, and recovery phase. Color choices include All Black, Ocean Blue, Forest Green, and Pearl Gold. Suunto 9 Peak Pro GPS Smartwatch, $399 at Amazon
Dad will look casually cool with this tailed 3-roll-2-button blazer, made of 97 percent cotton and 3 percent spandex. The cotton twill jacket has three patch pockets, two internal welt pockets, and a notched lapel. Garment washed with enzymes, it has a soft feel and can be machine washed in cold water. The mid-rise pants are straight through the thighs and taper below the knees. They have a waist button closure, two single-welt back pockets, and a single-welt coin pocket.
Jacket sizes range from XS to XXL, and sizes for pants range from 28 to 38. Color choices are mariner navy, khaki, canteen, and light sage. Carry-On Jacket and Pants, starting at $138 at Buck Mason
This lightweight Daybreaker 2 Backpack with a minimalist design has an easy clean shell made of Cordura ripstop nylon that is strong, abrasion-resistant, and colorfast. It has a full-length zipper, internal bottle pocket, and internal and back cushions, along with shoulder pads and an air channel for a comfortable experience. The stretch divider can house a 15.7-inch laptop (although it’s unpadded so Dad would need to keep the laptop in a sleeve). Color choices are Black and Olive Green. Another alternative is the Daily Plus Backpack, which has a laptop sleeve that fits most 16” laptops, and a tablet sleeve that can fit up to an 11” tablet. It also has a hidden bottle pocket. Both models are available in black and olive green, and the Daily Plus also comes in navy blue. Daybreaker 2 Backpack, $128 at Able Carry
A long sleeve stylish Henley can always find a home in Dad’s closet. This one is made with custom-developed 1 x 1 slub rib cotton and has flatlock seams, semi-raglan sleeves, and a self-fabric rib collar and cuffs. The athletic trim fit of the Henley pairs well with the Midweight Terry Slim Sweatpants. Both items are available in sizes ranging from XS to XXL, and color choices include navy, heather grey, black, white, and British racing green. However, for the pants, there are also additional color choices, such as desert rose, fir, crimson, heather stone, and deep teal. 1×1 Slub Henley $100 at Reigning Champ
Dad’s a busy guy, and this smartwatch is designed to keep up with him. It has 100 sports modes, including running, walking, indoor walking, treadmill elliptical, outdoor cycling, rowing machine, and pool swimming. The watch is water-resistant, heat and cold-resistant, humidity and salt spray-resistant, and ice and freezing rain-resistant. It includes a blood oxygen monitor, and sleep quality monitor, and supports other functions such as an alarm, calendar, calorie tracker, email, music player, phone, and text messaging. Battery life is 20 days – 25 in saver mode. Amazfit T-Rex Ultra Smartwatch, $399 at Amazon
Dad can look stylish while dodging raindrops with this lightweight rain jacket, which goes easily from the office to the gym. It’s made of 65 percent polyester and 35 percent cotton and has an adjustable shaped hood and hem and a 10K waterproof rating. The jacket has a fully seam-sealed interior and six bonded pockets. The interior pockets can hold devices and gear, keeping them safe from the elements. The rain jacket is available in sizes S through XXL and in two colors: total eclipse blue and thunder heather. Stormchaser Rain Jacket, $198 at Mack Weldon
For relaxing in the yard or running around town, Dad will look good in this stylish T-shirt and shorts set. This deep blue T-shirt, made of sustainably-grown linen and washed with biodegradable softeners, is heat-regulating, breathable, and antimicrobial. And since it’s preshrunk, it won’t shrink in the washing machine. Sizes range from XS to XX, and there are 13 solid and striped color choices including Dusk, Caulk, Rust, and Gold. The Bo Shorts in Overdye Dusk with drawstring, match perfectly and are available in 25 colors to mix and match. The shorts are available in sizes ranging from XS to XXX. Sun Tee, $65 and Bo Shorts, $78 at Alex Crane
These water-friendly slides can be worn literally everywhere. They’re made of a flexible TPU (thermoplastic polyurethane), which is both waterproof and oil-resistant, and a sugarcane sole. The lightweight, durable shoes also have a textured footbed, arch support, heel cupping, and comfortable double straps. Sizes range from 6 to 13, and color choices include Black, Brown/Tan, Blanc de Blanc, Aurora, Navy Sunset, and several other options. Oasis Double Up Men’s Slides, $55 at Reef
Editor’s note: The original version of this article as published on June 6, 2022 and has since been updated.
]]>
https://productiveorganizing.com/blogs/news/everything-bagel-seasoning2023-06-09T09:13:54-04:002023-06-09T09:13:54-04:00Everything Bagel Seasoningadmin
This 5-ingredient everything bagel seasoning takes less than 5 minutes to make. It tastes just like the store-bought stuff and stays fresh for months in your spice cabinet!
Everything bagel seasoning saw its rise in popularity a few years ago when it quickly became a staple in many homes (mine included!). If you've never tried it, it's a simple seasoning made from seeds, dehydrated vegetables, and salt--essentially everything you'd see on an everything bagel, minus the bagel! It's a low-calorie flavor booster that tastes great on pretty much anything.
]]>
https://productiveorganizing.com/blogs/news/i-m-a-chef-taking-our-place-s-always-pan-2-0-for-a-many-dish-test-drive-and-sear-iously-this-skillet-does-it-all2023-06-06T21:13:52-04:002023-06-06T21:13:52-04:00I’m a Chef Taking Our Place’s Always Pan 2.0 for a Many-Dish Test Drive. And Sear-iously: This Skillet Does It Alladmin
I’ll admit: I’m a sucker for good marketing and even more for top-notch design. And it’s safe to say that Our Place slays in both of those categories.
For the last few years, I’ve been eyeing chefs and influencers across social media sporting their latest Our Place cookware beauty. (The cooking and kitchen brand has amassed a whopping half a million followers on Instagram alone.) Needless to say, my curiosity about the brand has been piqued for some time now. Yet something always lingered in the back of my mind: Is it really worth the hype… or not? Fortunately, as fate would have it—and a few Slack messages from the commerce team later—I had the chance to test Our Place’s brand-new Always Pan 2.0. And I can fully confirm that it’s, indeed, so worth it.
What’s new (and so great) about the Always Pan 2.0
The Always Pan 2.0—which retails for $150 and is the second iteration of the fan-favorite pan—is said to be a “10-in-1 best-selling cookware system that does it all.” In other words, the pan can braise, sear, steam, strain, saute, fry, boil, bake, serve, and store food. (Obviously, not all at once. But, hey, it’s still impressive. Especially given that the previous model was an 8-in-1 type of deal.)
The highly versatile pan can conjure up deliciously fried eggs or perfectly-seared steaks. Plus, it’s a great excuse for decluttering your cookware cabinet that’s (likely) overflowing with stacks of worn-out pots and pans. And if you’re in the mood to dress up your pan even further, you can accessorize it with additional Our Place products like their Fry Deck, Spruce Steamer, or Egg Poacher for even more cooking possibilities.
Photo: Maki Yazawa
Now let’s get into the nitty-gritty specs. The ceramic non-stick pan is made without PTFEs, PFOAs, and other PFAS, and free of potentially toxic materials like lead and cadmium, which are long-lasting chemicals that break down very slowly over time and can easily be ingested in the foods we eat. What’s more, to help ensure food doesn’t stick to the surface (the ultimate ugh), the pan features their patented Thermakind technology that has a 50 percent longer-lasting ceramic nonstick coating than their previous model—a much sought-after upgrade by users of the original Always Pan. Another new feature? It’s oven-safe up to 450°F. (Hello, extra browned-and-melty cheese atop on your next eggplant parm.)
Of course, if all of this isn’t convincing enough, to sweeten the deal, the company offers free shipping, a 100-day satisfaction-guaranteed trial period, and free returns.
Photo: Our Place
How to keep your pan in tip-top shape
Of course, like any type of cookware, your Always Pan 2.0 is bound to get some wear and tear over time. So, to maintain the pan in tip-top shape, Our Place offers a few recommendations.
While the pan is technically dishwasher-safe, the manufacturers recommend handwashing it once it’s fully cooled instead. They also suggest avoiding scours and abrasive cleaning agents, applying low-medium heat, and avoiding metal utensils to preserve the nonstick coating. Additionally, using cooking oils with high smoking points is discouraged. Adhering to these suggestions can ultimately help prolong the lifespan of your pan, so you can always (pun intended) keep using it.
I tried the Always Pan 2.0, and here’s my honest review
Yep, I was beyond giddy when the cardboard box that I thought was a pair of boots for my coastal cowgirl summer turned out to be the new Always Pan 2.0. Inside the box comes the pan, its lid, a nesting steamer basket, a wooden spoon (that’s designed to fit perfectly into the grooves of the pan), and an owner’s manual.
Photo: Maki Yazawa
Although there are eight beautiful colors—Steam, Blue Salt, Char, Sage, Spice, Lavender, Azul, and Rosa—to pick from (arguably the toughest decision/commitment), I went with the Blue Salt option, which was much darker IRL than pictured on the website. On the outside, the pan (and lid) has greyish undertones and is somewhere between navy and light blue (skewing more to the dark side) and a matte, ultra-sleek finish that screams luxury. On the inside, it’s a soft grey that’s giving… dolphin?
Now the fun part: Testing it out. I decided to keep things simple. And a fried egg is as simple as it gets. As per the recommendations in the booklet, I heated the pan with a spritz of my favorite high-smoking point cooking oil—Pure Avocado Oil Spray by Chosen Foods. (It’s non-aerosol, BTW.) Then, I cracked in a large egg and let it fry away.
First, let me say I was shocked at how evenly the egg cooked throughout. The pan had no hot spots, which is usually the case on my gas stove burner, which tends to get hotter on the edges where the flame has the most direct contact with my pans. The Always Pan 2.0 did a supremely fine job at dispersing the heat evenly.
Photo: Maki Yazawa
What was even more impressive was the effectiveness of the nonstick coating on the pan. Those that make fried eggs know all too well that the type of pan used is absolutely critical. One wrong choice can cost you hours of scrubbing egg remnants glued onto the surface of your pan. But this wasn’t the case at all with the Always Pan 2.0, which allowed the fried egg to slip and slide across the pan with ease and grace. I was even able to flip the egg with one easy flick of the wrist—a daunting task I usually avoid at all costs. (And for those doubting me, the yolk did, in fact, come out unscathed.)
TL;DR?
What I love most about this pan, aside from obvious aesthetic reasons—really, it’s even prettier in person—is that it’s not heavy. (Unlike my Le Creuset cookware, which I love and adore but can barely lift after a long day.) The Always Pan 2.0 is compact, durable, very non-stick (like next level), and… it’s just so darn pretty to look at.
Fortunately, I can confirm that the Always Pan 2.0 is so worth the hype. And although the price point is on the higher end, you really do get what you’re paying for. This is why I’ll be buying one for my sister, who’s been wanting one for months, ASAP.
]]>
https://productiveorganizing.com/blogs/news/how-to-make-onion-powder2023-06-03T09:13:50-04:002023-06-03T09:13:51-04:00How to Make Onion PowderadminLearnhow to make onion powder to preserve this delicious pantry staple! Homemade onion powder is an incredible zero-waste addition to your spice cabinet.
As an Amazon Associate, I earn from qualifying purchases.
Homemade onion powder is pure magic that can be added to lots of dishes as a delicious flavor booster.
Made with dried/dehydrated onions, this is an additive-free, zero-waste kitchen hack from which dreams are made. It’s so simple to do yourself, and it tastes so much better than storebought options.
]]>
https://productiveorganizing.com/blogs/news/28-medicinal-herbs-you-need-to-have-in-your-garden2023-05-31T21:13:52-04:002023-05-31T21:13:52-04:0028 Medicinal Herbs You Need to Have in Your Gardenadmin
Herbs are the building blocks for tasty, delicious meals. Without them, food would be bland and unexciting. But have you considered all of the amazing health benefits you can get from consuming them? For centuries, people have turned to medicinal herbs to cure their ailments. Even though we may have chemical alternatives today, many of the most common garden greens have tried-and-true medical benefits.
From plants that cure headaches to ones that can calm nerves, herbs are a ready-made medicine cabinet that you can grow in the smallest space – even if you don’t have an outdoor garden. Check out our list of the most powerful herbs that will help keep you and your family healthy.
1. Oregano (Origanum vulgare)
Culinary Use: Part of the mint family, this medicinal herb is available in multiple varieties. The tasty plant is used frequently in Italian and Greek dishes. It’s the classic addition to pasta or pizza sauce.
Medicinal Use: Oregano has antiseptic properties, and you can also use it to treat a number of stomach issues. Additionally, it’s an anti-inflammatory.
Little known fact: The name is derived from the Greek terms for mountain and joy, an apt description if we’ve ever heard one.
2. Chamomile (Matricaria chamomilla)
Culinary Use: This cheerful little herb is used most commonly for brewing herbal tea, but it also makes a sweet, floral addition to desserts and salads.
Medicinal Use: Like oregano, chamomile has anti-inflammatory properties. You can also take it in pill form or use it directly on the skin to treat a variety of ailments from eczema to stomach issues.
Little known fact: Using chamomile topically may induce skin reactions in some. We recommend doing a skin test before applying it to your skin.
3. Peppermint (Mentha × piperita)
Culinary Use: Delicious in sweet and savory dishes, peppermint is a versatile medicinal herb in the mint family. It’s also easy to grow, and it packs a punch of flavor. Peppermint makes a delightful tea.
Medicinal Use: If you have a sore tummy, peppermint is your plant. I personally find peppermint essential oil to be helpful when I have a cold or a mild headache. There’s evidence that peppermint is just as effective as over the counter pain relief medication for treating certain types of headache pain.
Little known fact: Peppermint is a hybrid cross between watermint and spearmint.
With your seeds kit, you’ll also receive a FREE Medicinal Guide that shows you how to turn these 10 plants into tinctures, ointments, salves, poultices, decoctions, infusions, essential oils —all in minute detail so you can follow our guide even if you’ve never made an herbal medicine in your life.
4. Bay Laurel (Laurus nobilis)
Culinary Use: A favorite herb for French cooking, bay leaf lends plenty of flavor to a variety of dishes. You may see this in dry leaf form, but it’s also marvelous fresh.
Medicinal Use: The bay laurel a useful and versatile medicinal herb for treating many ailments from joint pain to skin issues thanks to its anti-bacterial and anti-fungal properties.
Little known fact: Bay has sedative properties, and if you’re heading into surgery, steer clear of it.
5. Rosemary (Rosmarinus officinalis)
Culinary Use: Rosemary’s strong aroma and flavor make it a great accompaniment to meat dishes. It pairs well with pork, chicken, lamb or steak.
Medicinal Use: As an anti-microbial and anti-inflammatory medicinal herb it’s particularly useful when you apply it directly to the skin.
Little known fact: Some research suggests that rosemary may prevent neurological conditions affecting memory such as Alzheimer’s. Too bad I won’t reap the benefits, because it’s my least favorite herb!
6. Garlic (Allium sativum)
Culinary Use: The queen of savory dishes, garlic is a staple in most kitchens. There’s nothing quite like the sharp, spicy taste of it.
Medicinal Use: Consume garlic if you want to reap a slew of health benefits, including a boost to the immune system and help to regulate your bodily functions such as blood pressure.
Little known fact: Fermented garlic is what’s known as black garlic, and I believe it’s even more delicious than regular garlic!
7. Dill (Anethum graveolens)
Culinary Use: This herb pairs exceptionally well with fish, and who hasn’t had a dill pickle.
Medicinal Use: You can use dill as a treatment for digestive issues.
Little known fact: Did you know that dill is actually related to the carrot family? It’s not surprising if you compare the feathery tops of both plants. They sure do look alike!
8. Savory (Satureja)
Culinary Use: A lesser known herb, you can use both savory’s winter and summer varieties in cooking. Its flavor is similar to thyme, though the taste differs depending on the variety.
Medicinal Use: You can use it to soothe the throat and treat other ailments concerning the digestive tract.
Little known fact: The winter variety of this herb was once thought to reduce libido.
9. Bergamot (Monarda fistulosa)
Culinary Use: You’ll often find this unusual little flower as an ingredient in tea. Bergamot has a faint citrus aroma, and you can eat the leaves and flowers of this perennial.
Medicinal Use: You can use bergamot as a treatment for headaches and upset stomach. Native Americans utilized it as a cure for the common cold.
Little known fact: Bergamot, also known as bee-balm, attracts not just bees but hummingbirds, too.
10. Thyme (Thymus vulgaris)
Culinary Use: Milder than other medicinal herbs, thyme still provides a lovely flavor to all sorts of dishes. Pairs easily with many foods and tastes superb fresh or dried.
Medicinal Use: This plant can ward off insects and has anti-bacterial properties.
Little known fact: Thyme was once used in place of modern embalming fluid.
11. Ginger (Zingiber officinale)
Culinary Use: Technically this is a spice rather than an herb, but it’s widely used in cooking worldwide. Ginger fresh or dried is delicious in a variety of cuisines from Indian to Thai.
Medicinal Use: Commonly used in Chinese herbal remedies, ginger can treat digestive ailments. It’s a miracle worker for nausea.
Little known fact: Ginger may interact with blood thinner medication.
12. Basil (Ocimum basilicum)
Culinary Use: Probably one of the most popular herbs out there. I often have friends asking me for advice on how to keep their basil alive. The Mediterranean herb is delicious made into pesto or as a fresh topping on pizza. There are many varieties of basil each with a unique flavor.
Medicinal Use: Though the evidence is limited, there’s some belief that basil is a helpful option for treating stomach issues.
Little known fact: Basil is nicknamed Saint Joseph’s Wort, not to be confused with Saint John’s Wort.
13. Lavender (Lavandula)
Culinary Use: Lavender isn’t just a pretty face. You might think it’s only useful for bouquets and adding fragrance to soaps and other bath products. Au contraire. You can also use lavender, of which there are more than 40 species, in the kitchen. Lavender adds a delicious flavor to honey, and you can also use it in flavoring desserts. Lavender tea is also popular.
Medicinal Use: This medicinal herb can be used as an antiseptic, and it’s also helpful in treating sleep problems.
Little known fact: In French, lavender is called lavendre, which is the verb for ‘to wash.’
14. Parsley (Petroselinum crispum)
Culinary Use: Pretty much everyone has used curly or flat-leafed varieties of this herb as a garnish. But don’t just use parsley to top dishes. It has an intense, fresh taste that’s wonderful in spring soups.
Medicinal Use: There’s some evidence that this herb a diuretic. In the past, parsley was also used to treat conditions from skin lesions to cancer.
Little known fact: In large quantities, parsley is unsafe for pregnant women.
15. Sage (Salvia officinalis)
Culinary Use: Often used to flavor poultry dishes and as a garnish, this is a hardy perennial.
Medicinal Use: People use this medicinal herb as a useful remedy for a scratchy, tender throat.
Little known fact: Sage is also known as Salvia, but not all varieties are grown for culinary use. Dalmatian sage, also known as garden sage is the kind most often grown for kitchen harvests.
16. Fenugreek (Trigonella foenum-graecum)
Culinary Use: I first heard about this plant when watching HBO’s drama ‘Six Feet Under.’ Chefs in the culinary world love to use it for its slightly bitter flavor.
Little known fact: You can find this medicinal herb in imitation vanilla.
17. Borage (Borago officinalis)
Culinary Use: It’s pretty flowers don’t just attract bees, they’re edible, too. The plant also makes a tasty tea.
Medicinal Use: There’s evidence that this medicinal herb can regulate cortisol levels in the body. When you apply it topically, it may help treat skin conditions.
Little known fact: Plant borage next to your brassicas to ward off the dreaded cabbage worm (my arch nemesis).
18. Fennel (Foeniculum vulgare)
Culinary Use: Fennel tastes wonderful paired with fish. If you aren’t crazy about fennel’s anise-like flavor, you can mellow it out by cooking. For those of us who like the licorice punch, it makes a delicious addition to salads.
Medicinal Use: This highly nutritious plant provides myriad health benefits including regulation of blood pressure and improving digestion.
Little known fact: Fennel is an ingredient in some toothpaste.
19. Tarragon (Artemisia dracunculus)
Culinary Use: The French variety is what you’ll find in the dried herb aisle at the grocery store and the kind you should grow in your kitchen garden. Other types are fine to eat but aren’t particularly tasty. It’s a versatile medicinal herb used in many kinds of dishes including sauces and regional beverages.
Medicinal Use: Tarragon can potentially stimulate appetite and treat problems with digestion, but there’s little evidence to support these claims.
Little known fact: This medicinal herb is a cousin of the majestic sunflower.
20. Echinacea (Echinacea purpurea)
Culinary Use: None. It tastes sweet at first, but then turns bitter and make your tongue tingle.
Medicinal Use: You can use echinacea to reduce internal infections. An injection can help treat hemorrhoids, and you can also use it heal to clean sores and skin inflammation. Contrary to what you’ve probably heard, there isn’t much evidence to support taking echinacea to help with colds.
Little known fact: The name comes from the Greek term for a hedgehog, a reference to the prickly-looking flowers.
21. Feverfew (Tanacetum parthenium)
Culinary Use: None
Medicinal Use: Given the name, it shouldn’t surprise you that this plant is good for treating fevers. It can also help with migraines, inflammation, menstrual cramps and to relieve gas and bloating.
Little known fact: The oil contains a compound that can paralyze fleas.
22. Lemon Balm (Melissa officinalis)
Culinary Use: Lemon balm can replace lemon peel in recipes or anywhere you want a hint of lemon flavor. It makes a lovely tea. You can add the leaves to a salad for a citrusy punch.
Medicinal Use: Lemon calm contains a calming agent, which can help ease anxiety and put you to sleep. There’s also some evidence that it can help regulate benign heart palpitations. An extract on the skin can help with cold sores.
Little known fact: The Latin name Melissa officinalis comes from the Greek nymph named Melissa who spread the word about the wonders of honey. Since honeybees love this plant, the name is fitting.
23. St. John’s Wort (Hypericum perforatum)
Culinary Use: None, though people used to drink it to ward off evil spirits.
Medicinal Use: St. John’s Wort has a reputation for helping with depressive disorders including bipolar disorder because it impacts serotonin levels. Be careful, though, because it can interact negatively with other meds and the science isn’t conclusive. It can also help with anemia, congestion and urinary issues.
Little known fact: The tea made from this plant smelled so foul that people assumed evil spirits wouldn’t bother someone who drank it.
24. Nettles ( Urtica dioica)
Culinary Use: Nettles are delicious in soups, salads, and pasta. It’s also marvelous on pizza or on a warm grain salad.
Medicinal Use: Nettles are a valuable addition to a medicinal herb garden. They help with anemia, gout, skin disorders, urinary issues, arthritis, joint pain, and kidney stones.
Little known fact: Scientists believe that nettles developed those awful stinging hairs to ward off grazing animals. It works on cows, but goats still nibble on the plants.
25. Burdock (Arctium)
Culinary Use: While the leaves and flowers are useful in medicine, the culinary power of burdock lies in its roots. People in Japan know this plant as gobo. You’ll frequently see it along with sushi, but you can also eat it dried or pickled, too. You can add it to soups and stews as well.
Medicinal Use: Burdock does wonders for the skin. It helps treat eczema and psoriasis. Internally, it helps with a sore throat, colds, and tonsilitis. It’s also a diuretic.
Little known fact: Burdock was the inspiration for Velcro. The inventor was hiking with his dog and noticed how the burdock seeds locked onto his dog’s fur, and the rest is history.
26. Wormwood (Artemisia absinthium)
Culinary Use: Wormwood is most famous as an ingredient in absinthe, but you can find it in other liquors, bitters, wines, and flavorings.
Medicinal Use: You can use wormwood to help with stomach issues like nausea, loss of appetite and gallbladder disease. It can also help lower fevers and ease depression. You can apply it to the skin to heal wounds and insect bites.
Little known fact: Wormwood got its name from the goddess Artemis, who is the goddess of chastity and birth. In the past, people thought the herb could help promote chastity.
27. Motherwort (Leonurus cardiaca)
Culinary Use: Motherwort is a member of the mint family, but we don’t recommend using it in your cooking because it has a bitter taste.
Medicinal Use: You can use motherwort for cardiovascular issues like heart failure and irregular heartbeat. It also helps alleviate menstrual pain, can bring on menstruation, and eases symptoms of menopause. It’s an antioxidant.
Little known fact: Legend has that a town was built in a spot near a spring that bubbled up through motherwort plants. Allegedly, the people who lived in the city drank the spring water, and everyone lived over a century. That’s why we associate this medicinal herb with longevity today.
28. Catnip (Nepeta cataria)
Culinary Use: Catnip is also part of the mint family. Beyond giving it to your cat, it is tasty in salads, soups, and sauces.
Medicinal Use: Catnip is good for relieving nerves and calming the stomach. You can also use it to ease painful menstrual cramps. There’s also evidence that it can help with headaches and fevers.
Little known fact: Not all cats are susceptible to the impacts of catnip, but for those who are, it has an intoxicating effect.
Caution
Remember, of course, that consuming medicinal herbs is not a substitute for visiting a physician. If you’re experiencing repeated, unpleasant symptoms visit a healthcare professional to get a proper diagnosis.
Those on medication should be aware that certain active ingredients may interact with drugs you are taking. Pregnant women should take caution if they decide to supplement with herbs in large quantities.
Do you have a favorite herb that finds its way to your dinner plate often? Were you aware of the health benefits of said herb? We’d love to hear all about your experience in the comments below.
Do you know about the gift of nature to save the life of people from various health problems and make them feel secure by curing significant issues? How to live healthy in this world without having chronic diseases or illness or any other health issues which may hurt you physically and mentally? Due to dense population, people are trying to demolish the forest, garden areas to create shelter, so they forced to destroy the nature’s gift such as natural ingredients, secret medicinal herbs and more which are grown in wild forest, mountains and other places. When you read this review entirely, sure you will get chance to know about secrets medicinal ingredients, herbs and more used by our ancestor to get back the lost health without losing your life. Claude Davis was highlighted all the stuff in the form of the e-bookThe Home Doctorfilled with a list of natural ingredients and remedies that you can quickly grow in the backyard or at free space to include it in your routine diet or external usage to get well soon.
Carnivore’s Bible (is a wellknown meat processor providing custom meat processing services locally andacross the state of Montana and more. Whether your needs are for domestic meator wild game meat processing)
The Lost Book of Remedies PDF ( contains a series of medicinal andherbal recipes to make home made remedies from medicinal plants and herbs.Chromic diseases and maladies can be overcome by taking the remediesoutlined in this book. The writer claims that his grandfather was taughtherbalism and healing whilst in active service during world war twoand that he has treated many soldiers with his home made cures. )
Easy Cellar(Info about building and managing your root cellar, plus printable plans. The bookon building and using root cellars – The Complete Root Cellar Book.)
The Lost Ways(Learn the long forgotten secrets that helped our forefathers survive famines,wars,economic crisis and anything else life threw at them)
]]>
https://productiveorganizing.com/blogs/news/we-asked-15-bartenders-what-are-the-most-underrated-cocktail-bitters2023-05-30T09:13:52-04:002023-05-30T09:13:52-04:00We Asked 15 Bartenders: What Are the Most Underrated Cocktail Bitters?admin
If you’ve ever made cocktails at home, you probably have a bottle of Angostura bitters hanging out in the cabinet or on your bar cart. You know enough to shake a few drops of them into your Old Fashioned or Manhattan, but have you considered the bitters beyond? There are literally hundreds of kinds of bitters on the market, with flavors ranging from celery to mole and almost anything in between. But how do you know what’s worth adding to your selection with so many options? To track down the most interesting bitters, we asked bartenders to share some of the most underrated bitters out there. Here’s what they said.
The most underrated bitters, according to bartenders
Bitter Queens Tobacco Bitters
Black walnut bitters
Bittermens Elemakule Bitters
Bogart’s Bitters
Gran Classico
Cardamom and celery bitters
Yamazaki’s The Japanese Bitters in shiso and umami
Bogart’s Bitters
Cardamom bitters, lavender bitters, and celery bitters
“Bitter Queens Tobacco Bitters is a favorite bitter of mine that always seems to be overlooked. It adds an umami quality that is hard to find in beverages. It also pairs well with smoky flavors that peated Scotch or mezcal bring to the table.” —Jonathan Pizano, beverage director, Lazy Bird, Cira, Cabra, Chicago
“Black ealnut, or any walnut bitters for that matter, are super underrated to me. They add a little bit more depth than your typical Angostura or Jerry Thomas bitters, and that richness goes so far in a cocktail — especially a stirred bourbon drink. I also kind of love a dash or two with bright shaken drinks like a Gold Rush or a Mojito.” —Alex Cuper, beverage director, El Che Steakhouse & Bar, Chicago
“Bittermens Elemakule Bitters bring versatility and island flavors to a cocktail, adding layers and depth that elevates the drink from good to great. We don’t see these bitters used in the wild as often as we’d like!” —Lukas Garrett, head bartender, RT Lodge, Maryville, Tenn.
“Bogart’s Bitters was the first-ever bitters mentioned in what is regarded as the world’s first cocktail book, published in 1862. It has a welcome complexity, with notes of licorice, coffee, dark chocolate, and hints of spice. I’m a fan of the flavor and unique history. I’m surprised more bars aren’t using it!” —Shiva Thapa, head bartender, Miller & Lux, San Francisco
“Gran Classico is my go-to bitter to bring in an exceptional layer of flavor to any cocktail. It is a very dynamic bitter and can be applied in ways to amplify sweetness, provide a pleasant bitter backbone, and add an extra touch of body due to its viscous nature. It can be easily integrated into shaken cocktails to complement citrus, add a beautiful color and body to a spritz, or be stirred into a spirit-forward cocktail to complement bitter notes. And of course, and its core, is lovely on rocks with a splash of soda.” —Anna Thorn, bar manager, Boka & Alla Vita, Chicago
“Cardamom and celery bitters are full of flavor. They add such cool nuance to cocktails and should be reached for more often.” —Michael Carlisi, beverage director at Barrio, San Francisco
“Yamazaki’s The Japanese Bitters in shiso and umami would be the two I would highlight and recommend.” —Alicia Perry, beverage director, CH Projects, San Diego
“Unless you’ve been fortunate enough to have an Old Fashioned with Bogart’s Bitters, you’ve never experienced the cocktail how it’s meant to taste. The flavor profile of dark spice, coffee, rich cocoa, orange peel, and herbs create a wonderfully complex cocktail that draws no comparison from any other bottle of bitters. If you have yet to experience the pleasure of enjoying an Old Fashioned with this bottle, I suggest you make it a point to do so.” —David Miller, beverage director, Pennydrop Bar + Kitchen, St. Louis
“Cardamom bitters, lavender bitters, and celery bitters are some of my favorite bitters to use as they pack a nice punch of flavor. The names aren’t as interesting as their origin of flavor, such as cardamom bitters being from a seed pod of a plant in the ginger family. In the bitters game, less is more.” —Nicolas Albertini, mixologist, Reforma, Palm Springs, Calif.
“Scrappy’s didn’t make great forays into the professional bar scene until a few years back, but I was gifted a sample set of the Seattle, Wash.-based company’s bitters 12 years ago and I was immediately hooked. Their grapefruit, fire tincture, and chocolate varieties are tough to beat, though Bittermens Xocolatl Mole Bitters are a personal favorite for chocola-fying cocktails, particularly Negronis.” —Christopher Struck, beverage director, ilili NYC, New York
“My favorite underrated bitters are firewater bitters, which add an intense habanero heat to your cocktail. They are a must-have for your bar if you are a fan of cocktails with a kick. I love to pair it with sweeter, fruitier flavors to round out the profile of a drink.” —Lindsey Karlsson, beverage director, Wilson Hardware, Arlington, Va.
“I recommend having Scrappy’s Cardamom Bitters and Scrappy’s Firewater Bitters in your bars. The firewater saves you from having to run to the kitchen when you need to make a spicy cocktail. No need to get spice in your eyes; firewater has your back. I recommend adding one dash of firewater to a citrus- forward cocktail, the spice can round out quite well. I also like to have the cardamom because it adds depth in flavor in a short period of time. You can make any cocktail taste marvelous with these two additional bitters in your bars!” —Judy Elahi, bar directors, 101 Hospitality, Washington, D.C.
“My absolute favorite bitters are Bittered Sling Lem-Marrakesh and Bittered Sling Cascade Celery. The entire Bittered Sling bitters lineup offers beautiful complexity and depth to cocktails while helping highlight existing flavors in your cocktail.” —Kate Boushel, director of beverage and education, Groupe Barroco, Montreal
“They do get some love deep in the beverage community, but any form of chocolate bitters can add complexity to a wide variety of cocktails. I’ve used Scrappy’s and Fee Brother’s off and on for different stirred beverages, Manhattan and Negroni riffs, tiki drinks, takes on Daiquiris, etc. The bitterness hearkens to the complexity of cacao in its raw form, and using that specific chocolate flavor lends itself more to savory drinks as opposed to a dessert cocktail (though it would be effective in one of those as well). It works brilliantly with agave spirits, especially mezcal. Try an Oaxaca Old Fashioned with a couple dashes of Bittermens Xocolatl Mole Bitters.” —Caden Worley, beverage manager, Don Angie, New York
“Living in New Orleans and being exposed to the amazing products by El Guapo, I would say their Chicory Pecan bitters. They provide a bite and spice to any drink they are invited to. I personally love them in our Daiquiri machine (what we call frozen drink machines here in NOLA) concoction called Double Feature, which is an ode to the Coca-Cola Icee at your favorite movie theater. It features bourbon, Liquore delle Sirene, Coca-Cola, and, of course, El Guapo Chicory Pecan bitters.” —Roxy Eve Narvaez, beverage director, The Chloe, New Orleans
]]>
https://productiveorganizing.com/blogs/news/roasted-chickpeas-recipe2023-05-29T21:13:52-04:002023-05-29T21:13:52-04:00Roasted Chickpeas RecipeadminTransform your boring, everyday chickpeas into roasted chickpeas — a crispy and tasty snack or topping with tons of flavor and minimal effort.
Chickpeas, garbanzo beans, Egyptian peas — whatever you call them, they are a delicious and nutritious ingredient that has a million uses (like with tomatoes on flatbread). But, once you learn how to roast chickpeas, I genuinely think you will never look at them the same way again.
Once roasted in olive oil and seasoning, these chickpeas become crispy and easy to eat by the handful. It takes hardly any time or effort at all to elevate your chickpeas into a tasty snack or topping for salads and pastas, and they are super healthy, too.
Why You Will Love This Recipe //
This is the perfect low-carb snack for your diet!
Roasted chickpeas are inexpensive, healthy, and super easy to make.
They are perfect to toss with your favorite salad, sprinkled on pasta, or just as a snack!
Super versatile; just toss them with your favorite seasoning and chomp away.
Ingredients //
All in all, these ingredients shouldn’t cost more than a few dollars, given you will likely be raiding your spice cabinet as well.
2 cups cooked chickpeas
2 tbsp extra virgin olive oil
1 tbsp mint leaves
pinch of sea salt
1/2 tsp paprika powder
How to Roast Chickpeas // The Steps
Step 1: Preheat the oven to 400°F and line a baking sheet with parchment paper.
Step 2: Clean the chickpeas in cold water to remove any loose skins. Drain the chickpeas and transfer them on a kitchen towel to remove excess water.
Step 3: Transfer the chickpeas to the prepared baking sheet, then toss them with the olive oil, half of the paprika powder, and season with a pinch of sea salt.
Step 4: Once the oven is hot, bake the chickpeas for 20 minutes or until golden brown.
Step 5: Remove the chickpeas from the oven and toss with the remaining paprika powder and mint leaves.
Step 6: Transfer the chickpeas to plates and serve!
Variations //
I use paprika, salt, and mint, but you don’t have to stick with this method! Try out some other flavors and see what works best for you.
Spicy chickpeas: Toss your chickpeas in cayenne pepper, chili powder, paprika, or your favorite spicy seasoning to bring some heat to your snack.
Barbecue chickpeas: The best flavor of Corn Nuts! Mix some barbecue seasoning blend with your chickpeas, or if you are feeling adventurous, some barbecue sauce. You might not want to eat them with your hands, though.
Parmesan and herb chickpeas: Oregano or basil pair amazingly with grated Parmesan cheese and garlic powder or garlic salt.
Honey and cinnamon chickpeas: Make your roasted chickpeas into a sweet treat! Bake them in a layer of honey, then sprinkle over some cinnamon and a touch of sugar.
Curry chickpeas: A blend of curry powder, cumin, turmeric, and salt lend some comforting Indian-inspired flavors to your chickpeas.
Serving Suggestions //
There are so many ways you can enjoy these crispy chickpeas. Aside from munching them on their own, here are some ideas:
Replace the croutons in your salad: These chickpeas are crunchy and provide both texture and flavor to any dish. Replace the croutons in a salad, like my Kansas chopped salad, for a low carb alternative.
Use them in a buddha bowl: You’ve seen the Instagram-famous buddha bowls, filled with a range of grains, veggies, and proteins. These chickpeas would add an incredible crispiness to this dish.
Top your soup with them: Again, it’s all about the texture. Utilize your roasted chickpeas as a topping in a potato soup, butternut squash soup, or even a beef stew.
Add them to your snack board: Charcuterie boards are a popular and easy way to serve guests. Stick these chickpeas next to some prosciutto, salami, olives, crackers, and cheese, plus a glass of wine on the side.
FAQs //
Can I use other seasonings?
Sure! Feel free to use other seasonings like garlic powder or sumac. They go perfectly with these roasted chickpeas as well. Just use whatever seasonings you love best!
Should I use fresh or canned chickpeas?
You can use either, just as long as they have been cooked. If you are using canned, be sure to rinse them off thoroughly before you roast them.
How do I know when the chickpeas are done?
This can easily be checked by cutting or biting into a chickpea. I wouldn’t recommend roasting them for less than 20 minutes. If they are still not crispy, slightly starchy, or aren’t golden in color, keep cooking at check them at 5 minute intervals.
How to Store Roasted Chickpeas //
When stored properly, your roasted chickpeas should last up to 2-3 weeks. Simply let them cool, then place them in a clean and dry airtight container, ensuring it’s sealed tightly. If you have desiccant packets to absorb moisture, you can put one or two in the container as well to preserve the freshness of your chickpeas. Keep them in a cool and dry place like your cupboard or your pantry, out of direct sunlight.
Roasted Chickpeas
Yield: 4
Prep Time: 5 minutes
Cook Time: 20 minutes
Total Time: 25 minutes
Transform your boring, everyday chickpeas into roasted chickpeas; a crispy and tasty snack or topping with tons of flavor and minimal effort.
Ingredients
2 cups cooked chickpeas
2 tbsp extra virgin olive oil
1 tbsp mint leaves
pinch of sea salt
1/2 tsp paprika powder
Instructions
Preheat the oven to 400°F. and line a baking sheet with parchment paper.
Clean the chickpeas in cold water to remove any loose skins. Drain the chickpeas and transfer them on a kitchen towel to remove excess water.
Transfer the chickpeas to the prepared baking sheet, then toss them with the olive oil, half of the paprika powder, and season with a pinch of sea salt.
Once the oven is hot, bake the chickpeas for 20 minutes or until golden brown.
Remove the chickpeas from the oven and toss them with the remaining paprika powder and mint leaves.
Transfer the chickpeas to plates and serve!
Notes
Keep an eye on your chickpeas so that they don't burn!
]]>
https://productiveorganizing.com/blogs/news/before-after-3-brilliant-kitchen-transformations-filled-with-inspiration2023-05-29T09:13:52-04:002023-05-29T09:13:52-04:00Before + After: 3 Brilliant Kitchen Transformations Filled With InspirationadminBefore + After: 3 Brilliant Kitchen Transformations Filled With Inspiration
Interiors
by Christina Karras
Evergreen is kitchen renovation project for a professional couple in Clayton South, Melbourne.
It was a total transformation, complete with orange details right down to the coloured grout!
Functionality was the key focus of the redesign.
Despite working within the same layout, it’s barely recognisable in the before!
EVERGREEN
Beyond its warm finishes and playful orange detailing, the renovation of this kitchen was really all about functionality.
The Glade Design director Jacqueline Chen says one of the clients worked in the hospitality industry and presented her with a list of must-haves to incorporate in the design. The space had to have ample storage for appliances they used every day, in addition to creating a new island bench that could be ‘as large as possible’ to accommodate the baking and recipe testing they often used the kitchen for.
Instead of starting with the layout, which was ‘already fixed’ due to the position of the sink and electrical appliances, Jacqueline focused on the colour scheme and the joinery.
‘Because this is a small kitchen, I really had to plan the storage carefully,’ she says. ‘I made sure to note down what the clients would be putting in each cabinet and designed them to fit their items perfectly.’
‘The cooking side of the kitchen is almost the same as before, except I swapped out the sink for a single-bowl one and moved the dishwasher a bit closer. And with just that small adjustment, I was able to add spice drawers on both sides of the cooktop!’
In replace of the cold, monochromatic look and feel of the existing kitchen, she opted for a low-maintenance timber bench top and a ‘flower-inspired colour scheme’ featuring burnt orange and soft pinks, as a nod to the tones in the home’s bedroom. It’s now halfway between ‘zen minimalist to maximalist’, and has improved the client’s use of the kitchen, despite being the exact same size as before. Clever!
‘This humble abode belongs to me and my partner,’ The Glade Design director Jacqueline Chen says.
After living in the 1970s home for a year they decided to give our kitchen a much-needed makeover.
‘Since our house is surrounded by parks and native trees, we wanted to incorporate natural elements into our kitchen design.’
‘We also wanted to retain some of the 70s elements, such as the flooring and windows, to maintain a consistent look throughout the house, while giving it a fresh new feel.’
THE SAGE
When it came to updating her own home in Glen Waverley last year, Jacqueline and her partner looked to the existing features of their 1970s abode for inspiration. While they swapped out some of the dated (and broken) appliances for an induction cooktop as soon as they moved in, they decided to use the old kitchen for a year before they tackled the renovation, in order to identify ‘what was working and what wasn’t’.
‘Interestingly, there was a certain charm to the kitchen’s dark ambiance and cosy feel that we grew to love over the year. As a result, we decided to keep some of the existing elements when designing the new kitchen,’ Jacqueline adds.
They tackled all the functional issues — including the shallow counter, inadequate fridge space, tiny pantry, and rearranged the layout to create new joinery — while preserving the slate flooring and original timber window frames to blend the past with their modern aesthetic.
‘The 1970s were known for their bold and vibrant interior design, featuring natural materials, bold patterns, and open layouts,’ Jacqueline says. The renovation pays homage to this era with a calming sage green colour scheme, teak wood detailing and beige and grey limestone countertops. It’s a cohesive and fresh take on the retro references, and all of the finishes were carefully selected to play into the green, brown and orange tones of the slate floors!
They had originally opted for Japanese finger tiles as a feature, rather than the entire splashback. But when their chosen stone splashback cracked during the install, they decided to problem solve by using the tiles across the space — and despite the initial frustration, Jacqueline says they wouldn’t have it any other way now: ‘Sometimes, a mistake can even lead to a better outcome.’
Forty-One was a total renovation of a family home in Kew, Melbourne.
The kitchen brings a ‘warm and cozy feel’ to the house, in line with the family’s brief.
The full house interior renovation took six months to complete.
The before!
FORTY-ONE
Before being purchased by a family of three, this Kew home was in a state of disrepair. And the kitchen especially was in need of an upgrade.
‘The exterior of the house was to remain unchanged, and they wanted something between modern and traditional. They want a neutral colour scheme, allowing them to add colour through furniture,’ Jacqueline explains.
Their brief asked for a kitchen that was ‘extremely low maintenance’, without any small tiles or hard-to-clean joinery and benches. These non-negotiables meant natural stone was off the table, so Jacqueline looked to engineered materials as an alternative to create a similar look with the sophisticated benchtop.
‘We landed on Laminex’s Surf [for the cabinetry] a beautiful hue that strikes a balance between warm and cold tones,’ she says. ‘The absolute matte finish not only elevates the overall look of the kitchen, but it’s also fingerprint-resistant, a crucial consideration for low-maintenance.’
She also designed a walk-in pantry, complete with adjustable shelves, and gun metal handles with just a ‘hint of brown’ to help tie everything together.
‘The end result is a space that feels both calming and refined, a true reflection of the homeowner’s personality and style. That’s what I love most about this transformation – it’s a beautiful representation of how small details can truly make a big difference.’
]]>
https://productiveorganizing.com/blogs/news/74-game-changing-cooking-tips-as-shared-by-internet-users2023-05-28T09:13:51-04:002023-05-28T09:13:51-04:0074 Game-Changing Cooking Tips, As Shared By Internet Usersadmin
Culinary knowledge is one of those skills that once you master it, changes your life. Let’s face it, we will always need to eat, so knowing how to squeeze every ounce of flavor from even the most simple ingredients will pay dividends for the rest of our lives. But behind cookbooks and old family recipes, there are mountains of secret techniques waiting to be discovered.
A netizen wanted to hear others' favorite cooking hacks and the internet delivered. Some were common sense ideas that people discovered too late, others were weird tricks that actually work, so get your notebooks and get comfortable, there are some great hacks listed here. Be sure to upvote your favorites and comment your own cooking secrets below.
#1
If a recipe says to sauté onions and garlic together at the same time, DON'T. Do the onions first, and then add the garlic when the onions are just about done. Garlic can be over sautéed and it takes on a bitter flavor.
If your executive function is betraying you and you rely on microwaveable or premade meals, find something small you can add to make them more substantial and to feel more like a meal. Add chopped broccoli to ramen noodles. Cumin and red pepper flakes are great to toss in, too. Cook minute rice with a chicken boullion cube and some butter and pretend it’s risotto. Personal favorite is to dump a can of corn into a microwave-safe bowl and mix in a bunch of taco seasoning. And if clean-up is a struggle too, use paper plates and bamboo flatware. Disposable chopsticks are super cheap and easy to find online.
When you’re struggling with depression, fatigue, or anything that makes taking care of yourself harder, taking shortcuts isn’t laziness, it’s how you survive to make those more daunting tasks a little less scary.
Unrelated: if you’re making a soup or stir fry with lots of veggies, sauté the veggies a bit before adding other ingredients til the onions are translucent. I’m sure there’s some food science reason that this makes soups taste better but I have no idea what it is.
Cooking is an art but how creative are you actually while in the kitchen? Many of us tend to pick up tips and tricks from our parents, so when we get to cook for ourselves, we often repeat the already well-established pattern of actions and dishes. My grandmother’s favorite hack was to always fry the chicken a little bit before putting it into a soup to enhance the flavors of the broth, and now I do it myself when I am in the kitchen.
But for every great idea imparted by friends, family, or even random internet users, there are still hundreds more waiting to be discovered. This comes with that annoying risk that you find out about some mindblowing tip much too late. Imagine someone who never used my grandma’s trick, learning it in their fifties, finding out that they could have had hundreds of better bowls of chicken soup. So commit to lifelong learning.
#4
Baked potato: 3-5 minutes in microwave before going in oven.
#5
Microwaving broccoli is not only ok to do, it can also preserve the most amount of nutrients than any other method of cooking it.
- use an ice cream scoop with a sharp edge to spoon seeds out of a squash
- rub a raw clove of garlic on a piece of frozen bread to make quick garlic bread (the frozen texture of the bread kind of acts as a grater on the garlic)
- freeze left over tomato paste from a can into 1 table spoon chunks to use later - I also do this with freshly grated ginger to have it ready to go later
- keep grounded flax seeds in the freezer to use as an egg replacer in muffins (mix 1 table spoon of ground flax seeds with 3 table spoons of water)
- use a vege peeler to cut thin ribbons of vegetable (cucumber, carrots, etc.)
- use kitchen scissors to cut pizza
- get a bit more green onions out of your green onions if you don't need the bottom part, put the roots in water an the green part will regrow
A lot of good techniques just come down to mastering the order of operations and learning how to use your space effectively. If you have a massive kitchen, loads of equipment, and all the time in the world, you seem like you have the time and resources to do whatever you please. The rest of us, however, need to get every crumb of efficiency out of the things we already have. Take any yeasted dough, for example. Often, these have to sit in a bowl (sometimes multiple times) while they prove and rise. So now you have a large bowl that needs to stay warm, taking up space for hours. The solution? Leave it in your oven. Just make sure it’s off.
#7
If your food is bland even though you've added salt then it's missing acidity. Lemon juice, lime juice, or vinegar are easy additions.
I always take my cookies out of the oven a couple minutes or so before they're supposed to come out. They still cook a little bit when they're cooling on the pan, and as a result they come out nice and soft.
Now, planning is a large part of cooking and serving food. Plates need to be ready, cutlery and glasses cleaned, and so on. And of course, the beverages weren’t in the fridge long enough and now you risk serving lukewarm wine. Unacceptable. There are two methods. Fill a pitcher with ice and some water and dunk the bottle in. Nice, chilled beverages in minutes. A slightly more risky, but equally effective method is to wrap the bottle in a damp towel or piece of cloth and place it in the freezer. Just make sure you don’t forget it, as then you might end up with a block of flavored ice or even a shattered bottle.
#10
Revive veggies that have lost their water by cutting their edges and soaking them in cold water. Lettuce, carrots, celery will be crisp again.
Starting bacon in an inch of water has been a game changer for me and I'll never go back. Renders the fat and raises the temperature of the meat, then when the water is boiled off it crisps up *perfectly* in 2-3 minutes at low-medium heat.
#12
Preheat. Preheat the oven every time. Let your pan heat up, and let the oil heat up.
When I sauté veggies, (chopped onions, bell peppers, etc.) I prep the veggies first, **add salt** to the prep bowl, and let it sit for 10-20 minutes before adding the veggies to the pan. The salt will penetrate the veggies, and drive water out. Veggies taste better, and take less time to sear and pick up color.
If your frozen food has instructions for cooking from *thawed*, move that food from the freezer to the fridge the day before and cook it from thawed. It will almost always be better.
On the opposite side of the spectrum, a great way how to keep things cold is to wrap in in bubble wrap. It keeps warmth out, allowing your ice cream to hold its consistency and not become a container of soup. The downside is that it does look a bit silly and will not help your dining table look elegant in any way. But if you don’t have an ice box and need to transport ice cream or something similar, it’s a good bet. Just use more than one layer.
#13
Do you not like vegetables but want to learn to love them?
**Roast**.**That**.**S**t**.
Roasted veggies are like ambrosia of the gods. They taste amazing, require virtually no prep, and go with everything.
**Edit:** As a secondary hack - boil your dense/root vegetables *before* roasting if you're trying to get a crunchy exterior. Boiling something like a potato heats it evenly and causes moisture to be lost via steam as you let it cool. The result is a drier potato that will crisp more evenly and requires less time in the hot oven.
If you want to keep some veggies nice and crisp on a summer day, or you are going to have a fancy picnic with a cheese-covered charcuterie board, there are some ways to keep your ingredients nice and cool. Place ice in a ziplock bag (as long as it’s waterproof) then place, for example, a baking sheet or even lettuce leaves over it. Then put the whole thing in a walled container. This will create a nice, cool platform that will stop your cheeses from turning to mush and keep your carrots crunchy. Just make sure the vessel is actually waterproof, otherwise, you’ll have an impromptu soup. If you want to check out some other cooking hacks, Bored Panda has you covered, so click here, here, and here.
Wet paper towel around most things I put in the microwave.
For instance, the kids love those sgitty frozen pancakes. I put them on a microwave safe plate and cover in a moist paper towel. No hard nasty edges that need to be cut away. They taste damn near "fresh," lol
My coupe de Gras > Reheating Pizza
Get a pan nice and hot with a little oil and put your pizza crust side down, of course. Let that baby cook to crispen up. Then have a lid for your pan and turn your heat off. Add a splash of water and cover it and let it sit. That will heat and melt the cheese again. It is the ONLY way to reheat pizza properly. It's an absolute gamechanger. I like all the fixens on my pizza, and even with 13 toppings, it comes out like I just ordered it.
#20
start cooking with an empty dishwasher and fill as you go.
always have a red and a white wine specifically for cooking lying around.
farmers market produce keeps longer than most other produce.
let your lettuce sit in ice water until your ready to serve to maximize crunch.
If you're cutting up chicken or some other meat that will spoil, put the scraps into a Ziploc bag and put them in the freezer until garbage day. That way they will not make your garbage smell and you're throwing out chicken ice cubes basically.
If you’re making a savory dish that uses crushed/minced garlic, reserve a little bit of the fresh garlic and stir it in to the dish right before serving.
The fresh garlic adds a bit of a pop that you lose if it’s cooked.
Buy a 5 lb bag of onions, caramelize all the onions at once, divide up into portions and package individually, then freeze.
The onions cook down to a manageable size during caramelization. Only needs to be done once every few months this way.
----
*edit to clarify*
Yes, the slow cooker trick works (olive oil, salt, set on low overnight).
And yes, it really takes longer to caramelize onions than many recipe writers claim. There's a whole rabbit hole about cooking time: In 2012 Tom Scocca wrote a takedown of onion caramelization lie, and in 2017 Scocca wrote a followup because a very faulty Google algorithm was still lying and citing him as its source. Six years later the top Google returns on cooking time are still a jumble: everywhere from 15 minutes to 65 minutes. The truth is it takes around an hour on the stove. LPT: slow cookers are the way to go if you have one.
A pressure cooker won't do the job as well. The website Serious Eats still publishes a recipe yet they no longer recommend it due to negative user feedback about texture.
Take the time to learn how to cook from scratch or raw ingredients. Learn this as early as you can. You will eat better food and enjoy it far more by knowing exactly what’s in it and how it was made. As an added bonus it’s far cheaper in terms of monetary output. You still pay with your time but your overall quality of life will greatly improve.
#31
pretty much every soup can use a lil drop of lemon juice
You ever wonder why restaurant food tastes so good?
Why some food is so f****n rich in flavor?
Why you just can't stop eating that one kind of chip?
It's probably MSG.
It's perfectly safe in moderation, naturally occurs in many foods, and adds a delicious flavor to your food.
#33
Wash berries in white vinegar, then, rinse them in water.
Greatly extends their shelf life, the vinegar does a good job of killing mold and such, without effecting the taste.
Wash in vinegar, not soak. And rinse in water immediately.
#34
Cook meatloaf in a round bundt pan instead of a loaf pan. Increased surface area means more of the meatloaf is the outer crust, which is the best part of meatloaf.
I learned this from my wife and I'll never go back to making rectangular meatloaf.
#35
My kids like hard boiled eggs. I only make them in the air fryer now. I haven’t had a hard time peeling them since doing this
#36
When making stuffed shells by hand, mix the filling in a zip top bag, then cut a corner off and use it as a makeshift piping bag to fill the shells.
#37
My wife makes chocolate chip cookies that feel like cookie dough, well after they've been cooked.
The things Ive seen her do
a) Get eggs to room temp
b) Place the dough in the fridge for several hours after mixing
c) Place the cookies on a tray as tall cylinder shape, so when the cookies bake, the will cook out and and become huge.
She only makes them for parties, and unfortunately, there are never any leftovers.
#38
Whatever amount of garlic is in the recipe, double it.
#39
Microwaving potatoes before I roast them
#40
Not really cooking, but I’ll still give the tip lol
Any time I get sick or have a medical issue going on that involves tests and treatments that leave me tired and stressed..
I always order food from this one Chinese restaurant. The prices are amazing for 1 serving but you end up with 4 for what (to me) feels like the price of 1.
They reheat for a couple days better than anything I’ve ever reheated.
I can usually be sure there’s rice (easy on my stomach), chicken/protein, and vegetables.
#41
salt and pepper goes in everything
#42
Steak.
1. Meat thermometers cost less than the steak you're about to ruin.
2. The whole "pinch this finger or that finger and that's rare or medium or whatever" thing when cooking steak is b******t. Everyone's hands are different as are our senses of touch.
3. 50⁰C is rare. 60⁰C is medium. 70⁰C is well done.
4. You don't need to bring steak up to temp before cooking unless it's very thick (like a rump). The inside warms and cooks slower than the rest because its insulated. If you're cooking a thick piece of meat straight from the fridge you're going to get an overdone outside and undercooked inside.
5. Never cook a wet steak. Pat it dry and season it with salt and pepper. The salt breaks the steak down and makes it more tender and forgiving in the cooking process. It releases more moisture so pat it dry again. The longer you leave it salted the more the protein gets broken down.
6. You lose 30-50% of your seasoning in a pan so always over do it.
7. Plain steak is nice, but cooking it with additional fats (like butter) and aromatics like garlic, rosemary etc. make it amazing.
8. Sticky burned stuff on the pan? Good. Stick it on a high heat and add any tasty liquid. Wine, sherry, port, whisky, bourbon, stock etc. will break down the protein left in the pan and remove it while creating what's called a pan-sauce. Add flour to thicken or cream or milk to add volume. This is the perfect thing to do while you..
9. Rest the meat after cooking I.e. stop cooking it and leave it alone for 5 minutes or longer.
#43
If you're making a rich meat sauce, try blending up about 8oz of chicken livers and adding it in. I do it in my Bolognese and it adds a real richness and doesn't taste like liver at all. I use an immersion blender and it completely liquifies them.
#44
Rinse your sauce jars with a bit of water to clean them out and not waste any sauce.
If you buy jarred pasta sauce, add just a few tablespoons of water to the jar after you dump it and put the lid back on - give it a few brisk shakes & dump it with the rest of the sauce.
Also on board with the clean while you cook crew. Far easier than having a ton of mess afterwards. And clean *everything* - don't just give the stovetop a swipe. If you have a gas stove, take the burner grates off and clean around the burners, etc - and if the grates are dirty, give those a wash as well. Grease & dirt build up FAST in these areas and that's how you end up with a crusty stovetop.
#45
Freeze anything with liquid when there is extra. Open a tomato paste and need 1TB? Freeze the rest of the can in a flattened zip lock. Break a piece off when needed. Extra gravy from thanksgiving? Freeze it. Make extra sauce on pasta night and freeze the rest. Now you don’t have to settle for jarred stuff when having mozz sticks. Open a pineapple juice can for 2oz? Freeze the rest in 1oz increments. Leftover creamed spinach? Freeze it and either eat later or add to scrambled eggs for the best scrambled eggs you’ve ever had.
Do similar tasks all at once. Making potatoes and carrots? Peel both first, then chop, don't do one veg and then the other. You'll have a better rhythm with your tools and you'll only have to change tools once instead of three times. Breaking down a pack of chicken thighs? Do all the skins and fat at once, all the bones at once, then all the slicing at once.
Also, keep a damp rag next to your cutting board for cleaning your board and knife, and keep a dry rag over your shoulder for drying or wiping anything as needed. This saves a ton of trips over to the sink and/or towel holder.
Using almond extract in addition to vanilla when baking. It absolutely enhances the flavor.
#48
Prep everything before you start cooking.
If it's "missing something" but you don't know what, then add a pinch of salt or a splash of acid.
Whoever didn't cook, cleans up afterwards.
#49
Dont fry bacon on a stove. Place the strips on a cookie sheet, throw in the oven at about 400 until the doneness you like. Use parchment paper or aluminum foil and there is virtually no clean up.
#50
Find a seasoning blend you like (pre-blended or not; if not, make your own blend ahead of time for ease), and put it in everything. Well, not everything, but a lot of things, and use your own judgment on how much of it for each dish, but even a little sprinkle can really do wonders.
Silpat or knock off Silpat mats are amazing (I've used both the actual brand and random ones from Costco, no difference). Put one down on your baking sheet, bake away, mats are super easy to clean and you'll have very little clean up on the baking sheet itself.
I never end up following this, but clean as you go.
Also my grandma thought us this trick- if you made the meal, or most of it, sit down for a bit before you eat, maybe have a glass of water or something while you wait. You'll relax and break the "cooking mode" and be able to go into "enjoy the meal mode." She cooked for five kids and a husband in addition to herself, so she knew the value of it.
#51
Put a damp paper towel under your cutting board to prevent it from sliding around when you are cutting.
Something missing from your tomato pasta sauce? Add a splash of Worcestershire sauce. Makes it taste rich and fuller.
#53
Boiling stuff in broth instead of water. Rice, potatoes etc. When making mashed potatoes, boiling them in chicken stock seriously makes a world of difference.
#54
If a veggie grows underground, put it in the pot before it comes to a boil. Any other veggie, and everything else (spaghetti, instant ramen, rice, meat, seafood) put it in when it is boiling
edit, not rice idk why I said that
#55
The biggest one that comes to mind when I think of home cooks is not using time well. A watched pot never boils, yeah, but most everything you're going to make at home does NOT need to be babysat. While your pan is heating, using that 3 minutes to cut an onion or some veggies you need. You can fully julienne an onion in under 2 minutes with just a little technique and practice. After you put the beef in the pan, go ahead and wash the cutting board and knife, since it's gonna take at least another 2-3 minutes for the bottom side of the beef to cook. Give it a quick stir, then grate cheese or prepare bread or setup your plates, ANYTHING else relevant to preparing dinner besides just standing and watching/stirring. And for gods sake, wash the f*****g dishes BEFORE you go to eat. It takes all of 5 minutes; If you're using so many dishes in cooking one average meal that it takes longer than 5 minutes at the end to finish what's left of dishes, you're using **too many dishes**.
Now, for quick tips that might be more in line with what you had in mind (for home cooks).
Destemming herbs? Don't waste money on a special tool! Just grab the bunch by the stem, stick the tines of a fork just behind where the leaves start, and pull down. Repeat a couple times until fully destemmed. Less than 10 seconds.
Don't use beef leaner than 80/20 for burgers. The burgers need that bit of fat to hold them together and for optimal flavor. It's also incredibly easy for them to come out dry if it is leaner than 80/20.
BUY AND USE A DIGITAL THERMOMETER FOR YOUR MEATS. Don't worry about learning to "feel" how done it is like a tv chef does; you only need to learn to do that if you're cooking 50+ steaks a night.
Whichever cabinet you put seasonings in, just put your USDA meat temps on a piece of paper and tape it on the inside of the door.
In the same vein, do NOT put the thermometer directly downward into the meat. You can hit a hot/cold spot, or push through and register the heat of the pan. Always put it long ways, into the thickest part of the meat. Think of it like landing on a piece of metal, and it going through your stomach, versus landing on it and it going up your a*s. You wanna use the "up the a*s" ideology of temping meats. If the thickest part is done, the thinner parts are done.
Tired of cooking chicken breast, and by the time the thickest part is finally done, then thinner parts are dry and overcooked? Cut the breast in half and make 2 thinner ones. If the cut is even, the cook is even, and vice versa. If it HAS to be thick, cook it in the oven with some kind of juice/broth to maintain moisture.
Burgers keep turning into thick pucks when you're cooking them? When you press the meat out, don't just throw a ball down, press it by hand, and done.
Imagine packing a tin can full of ground beef. The walls prevent the beef from going outwards, forcing the strand of meat to compact in on themselves. Use your other hand to emulate the walls of the can, one side at a time, and pack down with the opposite hand. You DON'T have to pack it in with your 'can hand', just prevent it from going outward as it wants. That takes care of 90% of the thickness, you can just press out whatever comes up after that. Don't f**k around with whatever that thumb in the center b******t is, it doesn't work worth a s**t.
Don't put the blade (the smooth, not cog-looking wheel) of the rotary can opener on TOP of the can, so that you have to fish the lid out of the inside. Instead, rotate the can opener 90° so that the blade is cutting into the label, and do it that way. It's easier on your hands and take the entire top off, no more fishing lids out and f*****g up my knife tips. You can also open a can from Campbells Soup to a #8 Bean can and beyond with the same manual rotary can opener you have in your house.
And remember, cooking is an *art*, NOT a science. What I mean by that is, baking requires your measurements to be exact. That's why professional level baking is generally done by weight and not by conventional 'cups' or anything of the sort.
Cooking, however, does NOT.
You do not have to put EXACTLY 1 cup (8oz) of oil into this dish. If it's a little one way or the other (not including sauces), it's going to be *fine*. You are NOT going to be able to tell if a dish had 8 oz of oil or 7.7oz of oil. The amount of times you've eaten something at a restaurant with an ingredient that doesn't even come with it would astonish you.
Have fun with it! Cook with your senses!
What food do you think of when you smell a certain spice? When I smell cumin, all I think is "Tacos/mexican food". So, to me, it would be a clear winner to include in a mexican dish. Oh, I want a philly cheese steak, but with a bit of a mexican food zing to it? Add some cumin, onion powder, and jalapeño powder to the meat when you cook it, throw some of that mix on the veggies, top it with... I'd say chipotle gouda for the spice complexity, softness, and how well it melts. But what if you thought there was enough seasoning, and now you wanted a little of the cream richness from the cheese to balance it out? Boom, goat cheese. Still in line with your theme, cuts out the seasoning, gives you that heaviness of the cream to counter the savory of the seasonings, and you get a nice little 'tangy' flavor that may inspire you for a better seasoning blend to complement that aspect next time. Was it a little too bland? Well, seasoning or salt on the cheese would definitely overwhelm the flavor and defeat the point. So, add herbs to the cheese, perhaps cilantro, to complement the theme further. Maybe you hate cilantro? F**k it, it's your show! Think a parsley and chive combo would go better, though it's not really in line with the theme/culture? Go for it!
I prefer my tacos at home to have extra sharp cheddar at home. Sure, that's a f*****g *gringo* taco if I've ever heard of one, but I like the way the sharpness of the cheddar cuts directly through the savory and salty richness of the beef seasoning, in much the same way the cold of the cheese is juxtaposed to the warmth of the beef; the heaviness of the cream balances the savory and salty in the taco.
Sure, don't put peppermints on pizza, but your taste is an offshoot of your smell; If it smells like it would go good in it, it would probably taste good in it, too. Did it ruin the whole dish and make it inedible? Ok, you found something that doesn't work in that dish (for YOUR tastes), so that's one thing off the possible list. Throw it out for animals, throw it away. Don't experiment with your entire dinner for the week.
You don't have to be an expert or know all kinds of food science.
Let your nose do the shopping, let your hands do the work, and let your mouth do the relaxing.
#56
Have a "cheat sheet" for times things go in the oven and how long it takes so you can prepare side dishes to go with the entree.
I'm coming in too late for anyone to ever see this.
Shallots are the vegan equivalent of bacon. They make just about everything better.
#61
if you leave beans on water at least 12 hours before cooking will help release the gas, this will make them behave in your belly and not cause too much gas there??
#62
Instead of buying umpteen cook books full of recipes, buy a good book about cooking and general food science instead (e.g. [Harold McGee's On Food and Cooking](https://en.wikipedia.org/wiki/On_Food_and_Cooking)). It'll teach you a lot of valuable stuff *about* cooking that you'll use every day regardless of what you're cooking.
It's *the* single best (non-fiction) book I've ever bought.
#63
Never use margarine in a recipe, always use real butter. The taste of margarine is entirely different even if people claim it isn't.
When using Lipton's onion soup mix in a recipe, always add double what the recipe calls for.
#64
Taste as ya cook.
#65
Half a star anise in any beef mince dish. It just adds a tiny lift that I really enjoy. Ragu, Chilli, Crispy beef and broccoli etc. Just half is enough. I’ll also add it to steamed rice sometimes but also cardomam pods work well to perfume it.
#66
Hard boiled eggs.
Steam them in a veggie basket and they peel perfectly, no old eggs or new eggs trick or anything
Steam for 13 min and put in cold water. 98% success rate.
#67
Halving cherry tomatoes between two container lids
#68
Sandwiches taste better when cut into triangles
#69
Whenever you make poultry in the oven, do not waste the sweet drippins' on the pan when it's done. Thats pure flavor right there bubba, grab u some red wine vinegar and scrape the pan with a spatula. Then pour that good stuff over the meat. Easier than a sonofabitch and tastes damn good too. Bless.
#70
Wash your rice
#71
Whenever I use a pan, I preheat it by dropping a bit of water on it. When the water evaporates, I know the pan is hot. My sister taught me that trick about 15 years ago, and I do it every time. It helps things to cook more evenly
#72
If you don’t have cast iron pan, you are missing out on a lot.
#73
When you get a roaster chicken at the store, make your own broth with the bones and carcass when you're done. It's time consuming, but it honest to god makes wherever you cook it smell like home.
#74
If you're cooking with wine, use wine you would drink not cooking wine]]>
https://productiveorganizing.com/blogs/news/the-best-pantry-organization-tools-from-shelves-to-bins2023-05-24T21:13:51-04:002023-05-24T21:13:51-04:00The Best Pantry Organization Tools, From Shelves to Binsadmin
Our editors independently select the products we recommend. We may earn a commission on items bought through our links.
There’s no shortage of aspiring Kondos pumping out aspirational organizational content, from ASMR unboxings of spice racks to before-and-after videos of formerly chaotic garages now full of sterile plastic bins. The promise is that buying shelves, hooks, bins, and baskets is a foolproof way to organize your home — and, therefore, that organizing your home is a foolproof way to live a stress-free life. That’s an overstatement, but it is true that living in an organized house is better than the alternative.
If you’re eager to enjoy the benefits of organization, there’s no better place to start than the kitchen — a highly functional room that’s also a gathering place for the entire household — and no better project to tackle than the pantry. The best pantry organization tools can bring order to chaos in what’s probably one of the most highly trafficked rooms in any house.
The right tools can save time and frustration hunting for that crucial ingredient that’s in there somewhere. For both ambitious home cooks and those who rely heavily on prepackaged and ready-made food, an organized pantry will make trips to the kitchen that much more serene.
What the Experts Say
Mindy Godding, founder of Abundance Organizing and incoming president of the National Association of Productivity and Organizing Professionals, says that there are four factors to consider when organizing a pantry: accessibility, visibility, adjacency, and aesthetics. Any organization tool that doesn’t increase one or more of these is a waste of money.
“We have a lot of people in a shared space coming and going with different priorities, bringing in different stuff,” she says. “It’s an area where we’re coming together and communing as a family or as partners, but then also preparing food and nourishing ourselves. It’s a really important space to make sure that it’s functioning for you.”
Christina Hidek, a professional organizer at Streamlined Living, adds that it’s worth it to spend a bit more for durable containers made out of easy-to-clean materials like plastic and wood. They’ll cost less in the long run, and if the goal is a long-term solution, it’s worth investing in tools that will last a while. She also says that it’s crucial to ensure that the tools are right for the space.
“Measure the space, as well as what you intend to put in the organizer, to ensure it’s making good use of the horizontal and vertical space,” she says. “Too often I see the wrong storage bin or organizing solution being employed for the specific space.”
This rack from The Container Store can double the amount of stuff that can fit on any given pantry shelf. It also works as a way to reduce the number of items stored behind other items, which increases visibility and accessibility.
This shelf expands from approximately 16 to 32 inches when the pieces are arranged in parallel, but if they’re arranged perpendicular to one another, it can also fit in a corner. This flexibility means it will probably have a home in any pantry, no matter the size and shape. Bonus: its vinyl-coated wire construction is plenty strong and looks at home with most kinds of modern kitchen décor.
Godding often recommends turntables to her clients: “They’re an easy way to bring whatever’s in the back to the front without having to move items aside,” she says. This lazy susan from mDesign is a great size for most pantries. It’s small enough to rest on a shelf of average depth, but big enough to fit two layers of items — taller near the center, smaller around the diameter — that can be seen at the same time.
This tiered shelf is another tool that increases visibility and accessibility in any pantry. Instead of having to pick up items in the back to see what they are, it allows for a complete view of everything on the riser with just a glance. While these kinds of shelves are commonly used for spices, they’re also useful for cans, jars, and any other small items.
Storing dry goods in clear canisters reduces the visual clutter that comes with lots of different packaging sitting together on the same shelf. Godding adds that any clear canisters should have a silicon gasket in the lid to keep things sealed tightly. These shatter-resistant plastic Rubbermaid Brilliance containers check that box — plus, they come with scoops that make measuring extra-convenient. Lastly, by using these kinds of containers, it’s easy to shop in bulk, which is a more environmentally friendly (and less expensive) way to buy dry goods.
If there’s room between the door to the pantry and the shelves inside, an over-the-door storage rack is a no-brainer. They’re particularly great for storing kids’ snacks, keeping them both separate from the rest of the pantry and down low for smaller people to access. But, kids or no kids, this sturdy rack adds a ton of flexible storage space that would otherwise go to waste.
Bins are another key organizational tool for pantries. Godding likes that they group similar items together (adjacency!) and have right angles that don’t waste space the way curved baskets do. Particularly with items that are irregularly shaped — bags, pouches, produce, and the like — bins like this sleek metal option from mDesign are key. Just make sure to store it with its handles out for easy retrieval.
Even with as many clear storage items as possible, a label maker can come in handy. From flour and cornstarch to salt and sugar, there’s no shortage of lookalike ingredients, so it’s vital to label them to alleviate any confusion when cooking or baking. This label maker from Dymo is a solid option, featuring a rechargeable battery, QWERTY keyboard, wi-fi connectivity, and a wide array of font options.
BEST CAN STORAGE
Utopia Kitchen Storage Can Rack Organizer 16.5 x 12.5 x 13.5 Inch, Stackable Can Organizer Holds Upto 36 Cans for Kitchen Cabinet or Pantry (Bronze)
Cans are an item that pretty much everyone keeps in their pantry, so a rack made especially for cans makes sense for most people. This metal rack displays cans openly for the utmost visibility. It’s also slightly tilted, so the cans roll into place neatly, and stackable, for those doomsday preppers who want to keep a ton of cans ready in case global catastrophe hits.
Frequently Asked Questions About Pantry Organization Tools
Where should I start organizing my house?
There’s no universal right answer, but the kitchen is a good place for most people to start. It’s highly functional (there’s lots to use, move, and clean) and typically a place where the household congregates for an extended period of time. Godding adds that, by organizing the kitchen, it’s possible to cut down on food waste and develop healthier habits, both of which are benefits that don’t come with organizing other rooms.
What’s the best way to organize the kitchen?
Again, individual needs may vary, but Godding says the pantry is a good choice for most because it’s a small, contained space you can work on without getting overwhelmed. In other words, if you’re looking to develop your organizational muscle, it’s a great place to get some reps in.
Will buying kitchen organizational tools automatically make me an organized person?
Sadly, no. You need to do the legwork to figure out which kitchen organization tools are right for you, develop a system that uses those tools, and figure out a way to stick to that system over the long haul. It’s not a quick and easy fix, unfortunately, but that doesn’t mean it’s impossible.
]]>
https://productiveorganizing.com/blogs/news/springtime-rv-renovations-try-these-budget-friendly-upgrades2023-05-18T21:13:51-04:002023-05-18T21:13:51-04:00Springtime RV Renovations: Try These Budget-Friendly Upgradesadmin
8 Ideas for Springtime RV Renovations
RV season is finally here! After a long and cold winter, you’re probably excited to dust off the old camper and start adventuring again. But when you step inside your RV for the first time in months, you might notice that it’s time for some springtime RV renovations.
Although they function just fine, RV interiors tend to look old and outdated after a while. The idea of a full renovation may be daunting, but don’t worry! There are plenty of quick, budget-friendly projects that will make the space feel brand new.
We’ve collected several renovation ideas below. Of course, you can always opt for expensive remodels and materials, but most of these upgrades are achievable for those with small budgets. Read on to find inspiration for your next renovation and redecoration projects!
1. New fixtures
When you look at your RV, it’s easy to focus on the big elements like the appliances or the furniture. Although these certainly play a role in the design, you shouldn’t overlook the small things! Each RV has a collection of small fixtures such as doorknobs, faucets, cabinet handles, and so on.
They often blend into the background, but new fixtures can really tie a room together. Shop around for new fixtures and accents that could enhance your space. These are generally cheap to buy and install, plus they can add a pop of color to any space.
If you want a quirky look, try using mismatched handles for your cabinets! As long as it’s fun and suits your style, you can try any combination.
2. Backsplash
New backsplash is another popular choice for RV renovations. These fun additions add color and interest to any space. Some RVs come with backsplash in the kitchen or bathroom, but you can always replace or update it to better suit your style. Once again, this project comes with a lot of flexibility.
Most modern backsplash comes in a peel-and-stick format, so it’s quite easy to install. There are plenty of options, including products that mimic brick, tile, stone, wood, and decorative ceramics. You could even create your own budget-friendly backsplash out of materials like coins or buttons!
3. Curtains
Most RVs come with blinds or shades to block out the sun. Although these are practical, they’re not particularly stylish. So why not add some curtains as part of your RV renovations? Curtains come in a range of shapes, sizes, materials, and patterns.
The sky’s the limit with this project. You can buy pre-made curtains or save some money and make them yourself!
If you have some extra fabric, it’s easy to make curtains for your whole RV. This is also a good way to reuse blankets, clothing, or tablecloths that may no longer be useful. You can infuse your personality into the RV by incorporating these nostalgic elements.
On the other hand, pre-made curtains are affordable, and they’re also easy to find. You can choose from a wide selection of colors and patterns. There’s bound to be something that works for your RV!
4. mattress Topper
RV mattresses are one of the biggest drawbacks of this lifestyle. It might be better than sleeping on the ground, but not by much! Plenty of RVers have complained about waking up sore and stiff. A full mattress replacement can be expensive, but there are other ways to make your bed more comfortable.
For instance, an RV mattress topper is a great, low-cost upgrade that will help you sleep better. There are plenty of options below $50, and your back will thank you for investing! You can also make the rest of your RV more cozy by scattering extra blankets and pillows around.
5. Hanging storage solutions
Storage space has always been a pain point for RVers. After all, there’s only so much space in your cabinets and closets. It’s also a frustrating experience when you need something but have to dig around for it.
If you want easier access, try incorporating some hanging storage solutions throughout your vehicle. If you want something cheap and simple, try Command hooks! These use a strong adhesive to lock onto walls, so you don’t need to do any drilling to install them.
Other options include:
Wall-mounted baskets
Tension rods
Hanging nets
Magnetic spice racks/knife holders
All of these options are easy to install, and they put your items within reach. It’s a great way to store kitchen utensils, snacks, jackets, books, and much more.
6. Rugs
Rugs are a great piece of equipment for every RVer to travel with. You can use them both inside and outside to keep your living space clean. In addition, rugs add a bit of color and texture to break up the monotony of the floor.
Of course, rugs can be quite expensive depending on their size and material. However, there are also plenty of budget-friendly options that are perfect for RVers. If you want a sturdy outdoor rug, you can find great options for less than $50. Explore various colors and patterns to find the perfect fit for your decorating style.
7. Adhesive window film
Windows are essential for every living space. They let in natural light and allow you to enjoy the beauty of your surroundings. However, sometimes it’s hard to enjoy your personal space when people can walk by and look into your RV.
Adhesive window films are the perfect option for those who want easy and cheap RV renovations. These films perform different functions. Some of them “frost” the window by creating an opaque layer. This is a nice decorative touch that filters the light coming in and out of your living space. They come in a variety of patterns as well!
As an alternative, you can try one-way reflective coatings. These prevent people from looking in but don’t obscure your view at all. Blackout films are also available if you want to keep rooms cool and dark.
These films and window treatments are easy to apply. Many of them are also designed to come off cleanly if you ever want to remove them.
8. Furniture covers
Finally, let’s talk about furniture. Every RV has it, but it’s not always nice to look at. Most manufacturers prioritize function over form, so the furniture ends up looking boring and uninviting. That’s where furniture covers come in! This is one of the easiest RV renovations on the list, but it makes a huge difference.
Try simple slip-on covers for your cushions, sofas, and chairs. These covers come in fun colors and patterns. Plus, you can easily buy or make them.
You could permanently attach them if you want, but removable covers are easy to clean and replace. You could even swap them out on a seasonal basis!
Get tips from other RVers
RV decoration is one of the most enjoyable parts of this lifestyle. It’s not easy to tie everything together while increasing the functionality of your vehicle. But with the simple RV renovations above, you’ll be well on your way to creating a one-of-a-kind living space!
]]>
https://productiveorganizing.com/blogs/news/pork-chop-seasoning-dry-rub-for-pork-ribs-chops-and-more2023-05-16T21:13:51-04:002023-05-16T21:13:51-04:00Pork Chop Seasoning (Dry rub for pork, ribs, chops, and more)admin
This pork dry rub is a simple mix of herbs and spices that creates the perfect flavor for any of your pork recipes. This Pork Chop Seasoning can be used for pork chops, pork ribs, pork tenderloin, pork roast, pork shoulder, and more. It’s deliciously savory, with hints of spice and sweetness to balance things out. Keep it in your spice cabinet for quick cooking!
What’s in this Pork Chop Seasoning?
All you need for this pork rub recipe is a handful of herbs and spices, most of which you’ll probably already have in your spice cabinet. A real pantry staples kind of recipe!
Brown Sugar: This adds a rich sweetness into an otherwise savory mix. Be sure to pack it when measuring.
Chili Powder: This adds a bit of heat. Increase the amount just a bit if you want a spicier rub.
Smoked Paprika: Smoked paprika is slightly more intense than regular (sweet) paprika, but you can substitute if needed.
Cumin: This adds an earthy flavor.
Garlic Powder: This adds just a hint of garlic flavor, and won’t overwhelm the mix.
Onion Powder: This adds that savory pungency of onions.
Dried Thyme: This herb adds a light and savory flavor.
Dried Oregano: This has an earthiness that helps balance out the spices.
Ground Mustard: This adds in a bit of tanginess.
Salt & Pepper
For more information on each ingredient, check our guide to herbs and guide to spices. It will help you make decisions about substitutions if you need to.
How do you apply a dry rub to meat?
Use your hands to firmly rub the seasoning directly onto the surface of the pork, and be sure to get all sides of each piece of meat. For example, if you’re making pork chops, you want to liberally cover both sides of each chop.
Let the meat sit for a while so the seasoning can sink in. In some cases, 15 minutes is enough, but I recommend letting it sit for 2 hours or even overnight (in the refrigerator) to really let it absorb.
How do you make a dry rub?
It’s so easy to make a homemade dry rub. All you have to do is measure out each spice, whisk them together to make sure everything is evenly distributed, and then use it or store it.
What does this pork rub taste like?
This seasoning mix was created to bring out and complement the flavor of pork. So it’s a little bit sweet, but mostly savory.
What seasonings go well with pork?
The sweetness of brown sugar is a great balance to the natural savoriness of pork. Cumin, thyme, oregano, and mustard all mix beautifully with pork as well. And chili powder and paprika both add spice without overpowering.
How long will this spice mix keep?
As long as you store it properly in a sealed container, it will keep as along as any spice in your cabinet. It will be best made with fresh spices, stored up to 3 months. After that, it will lose potency (though it’s still fine to consume).
Can I make more?
To make a larger batch, just increase each spice while keeping to the same ratios. Double the amount of each ingredient, and you’ll have plenty to store for later.
How to Store a Dry Rub
You can mix this pork seasoning blend as you need it, then store extra. Or you can make it ahead of time so it’s ready to grab and use any time you cook pork.
Store it in a resealable bag or airtight container (like a spice jar), and keep it in your pantry or spice cabinet. Use it within 3 months for best potency.
You can also use this dry rub to make pork tenderloin (I use it in my sweet tea pork tenderloin), pork belly, pork ribs, pork shoulder, pork loin, pork roast, and more.
It tastes amazing with chicken as well, so try it next time you grill chicken breasts.
If you make this recipe be sure to upload a photo in the comment section below or leave a rating. Enjoy!You can also jump to recipe.
Whisk all ingredients together and keep in an airtight container. When ready to use, sprinkle the meat with a liberal amount of the seasoning and rub it in. Be sure to cover the entire surface. Allow the meat to rest at least 2 hours in the fridge (or overnight). Cook the meat as desired.
½ cup brown sugar, 2 tablespoons chili powder, 2 tablespoons smoked paprika, 2 teaspoons cumin, 1 teaspoon garlic powder, 1 teaspoon onion powder, 2 teaspoons dried thyme, 1 teaspoon dried oregano, 2 teaspoons ground mustard, 2 teaspoons kosher salt, 1 teaspoon black pepper
Enjoy!
Video
Notes
Storage: Store in a resealable bag, spice jar, or another airtight container. Keep in the pantry or spice cabinet up to 3 months for best quality.
]]>
https://productiveorganizing.com/blogs/news/tuscan-chicken-in-parmesan-cream-sauce2023-05-13T09:13:51-04:002023-05-13T09:13:51-04:00Tuscan Chicken in Parmesan Cream Sauceadmin
This Tuscan Chicken recipe features crispy, seasoned chicken breasts in a creamy Parmesan sauce with sun-dried tomatoes and spinach. It’s a classic Italian dish you’ll love eating for dinner, and it’s so simple to make. The creamy sauce is just irresistible!
What’s in Tuscan Chicken
The combination of simple-seasoned chicken with a creamy sauce can’t be beat. You’ll likely have a lot of these ingredients on hand, so your shopping list will be short!
Chicken: Use chicken breasts, pounded to thin them out into an even thickness. You can also use chicken thighs, but the cooking time will increase slightly.
Parmesan Cheese: This will be mixed into the flour mixture that coats the chicken, as well as mixed into the sauce.
Butter: Using a good quality butter will add an extra dimension of rich flavor into the sauce and chicken.
Flour: A flour and cheese mixture is used for dredging the chicken–this helps it get nice and crispy in the skillet. You’ll also need some flour to thicken the sauce.
Heavy Cream: This is what makes the Parmesan sauce so creamy!
Italian Seasoning: This savory blend of herbs and spices is a must for this recipe. It creates that signature flavor! If you don’t have this mix on hand, check your spice cabinet and try making an Italian seasoning blend at home.
Spinach: Baby spinach works best for this recipe. Keep in mind that if you use frozen spinach, it will likely be a bit soggy. Fresh is better!
Sun-Dried Tomatoes: If you don’t like tomatoes, try adding in some mushrooms for a similar texture instead.
Tips!
To even out chicken breasts, place them between two pieces of plastic wrap, and use a meat tenderizer/mallet to thin out thicker spots. Creating an even thickness throughout helps them cook faster, more evenly, and get a little crispy.
Add in More Veggies
If you want to add more vegetables to your Tuscan chicken dish, or just substitute something for the spinach and tomatoes, there are plenty of options.
Kale makes a great replacement for the spinach. It’s much heartier, and will add more texture compared to the spinach.
Artichoke hearts would make a delicious addition. Drain and chop into bite-sized pieces.
Mushrooms will have a similar texture to the sun-dried tomatoes, so they are a good substitute (though of course they taste different).
Why is it called Tuscan chicken?
This dish is called Tuscan chicken simply because it originated in the Tuscany region of Italy.
How long does it take to cook chicken in a skillet?
Initially, you’ll cook the chicken breasts for about 4-5 minutes on each side (8-10 minutes), and then set it aside. At the end, you’ll cook it a few more minutes directly in the sauce. So expect around 12 minutes total for the chicken, but check the internal temp to make sure it’s cooked through.
Store in an airtight container and refrigerate within two hours of cooking. Cooked chicken will be safe in the fridge for up to 3 days.
Reheat on the stovetop for best results. You can mix in some more heavy cream to freshen up the Parmesan sauce.
Can You Freeze Tuscan chicken?
Yes! Let everything cool, then store in a freezer-safe container. Freeze up to 3 months.
To reheat, first let it thaw in the fridge overnight. Then reheat on the stovetop until chicken is fully heated through.
What to Serve with Creamy Tuscan Chicken
The creamy Parmesan sauce makes this perfect for serving along with pasta. Cook up some penne, spaghetti, or your favorite noodle, and top each plate with a chicken breast and plenty of sauce.
Heat a large skillet over medium high heat. Add the 2 tablespoons butter and stir/melt.
2 tablespoons European Style Butter
Cook the chicken (in batches if necessary) for 4-5 minutes per side or until its fully cooked (165F in the center and no longer pink) and browned on both sides. Remove from the skillet and place on a plate. Cover with foil.
Wipe the skillet clean and return the skillet to medium high heat and add the remaining ¼ cup butter. Use a wooden spoon to scrape the bottom of the pan as the butter melts. The brown bits hold a lot of flavor, so no need to remove.
¼ cup European Style Butter
Add the garlic and sun-dried tomatoes and cook for 1-2 minutes or until fragrant.
4 garlic cloves, 8.5 ounces sun-dried tomatoes
Whisk in the flour and allow to thicken for approximately 1 minute.
1 tablespoon flour
Whisk in the heavy cream, chicken broth, parmesan cheese, Italian seasoning, and pepper. Stir to combine.
½ cup heavy cream, 1 cup low sodium chicken broth, ½ cup parmesan cheese, 1 teaspoon Italian seasoning, ¼ teaspoon black pepper
Add the spinach and reduce heat to simmer. Allow to cook until the sauce slightly thickens and the spinach wilts.
1 cup baby spinach
Add the chicken back into the skillet and turn to coat in the sauce. Allow to continue to simmer until the chicken is heated through, 2-3 minutes. Garnish with fresh parsley.
Fresh parsley for garnish
Enjoy!
Video
Notes
Cook your chicken in batches if needs be, so you don’t overcrowd your pan.
You can also use chicken thighs. Make sure to check doneness.
You can check the doneness of your chicken by inserting a meat thermometer into the thickest part of the chicken – it should read at least 165F.
After cooking the chicken and just before making the sauce, use a wooden spoon to scrape the bottom of the pan as the butter melts. The brown bits hold a lot of flavor, so no need to remove.
]]>
https://productiveorganizing.com/blogs/news/grilled-chicken-thighs-chicken-thigh-seasoning2023-05-12T21:13:51-04:002023-05-12T21:13:51-04:00Grilled Chicken Thighs (Chicken Thigh Seasoning)admin
These juicy Grilled Chicken Thighs are made with the most delicious, sweet and spicy chicken thigh seasoning. Grab a few things form your spice cabinet, including brown sugar, paprika, and chili powder, and then cook the perfect chicken thighs on the grill in about 20 minutes!
What’s in Chicken Thighs on the Grill?
Chicken thighs are coated in a sweet, savory, and slightly smoky spice blend that goes well with any and every style of cuisine. Get the grill out for summer and make this recipe in just 20 minutes!
Chicken Thighs: Thighs are perfectly juicy for grilling! I like bone-in, skin-on for maximum moisture retention and flavor.
Brown Sugar: Adds just a touch of sweetness to the thigh seasoning, and helps the chicken to brown beautifully.
Olive Oil: Keeps the chicken from sticking to the grill and burning.
Pro Tip: If you’d like to use boneless chicken thighs (or chicken breasts), you’ll need to reduce the cooking time.
Variations on Grilled Chicken Seasoning
Personally, I think this grilled chicken thigh seasoning is absolutely perfect as is! However, if you’re looking to change it up a bit, there are a few things you can try. If you’re watching your sugar or sodium, you can leave out the sugar and/or salt, but the rub won’t be as flavorful.
To make it a bit spicier, add more chili powder or a pinch of cayenne pepper. You could also try using ground coriander instead of cumin for a slightly different flavor profile! And this dry rub is so versatile, great to use on seasoned chicken breast or Air Fryer chicken thighs as well.
How long do you grill chicken thighs?
Chicken thighs take about 10 minutes to cook on the grill.
At what temperature do you grill chicken thighs?
You should grill chicken thighs over medium-high heat, or about 400-450°F.
How do you grill chicken thighs without drying them out?
To grill chicken thighs without drying them out, grill them quickly, for about 4-5 minutes per side. If they haven’t reached 165°F yet, move them to a cooler part of the grill to finish cooking. This will ensure they remain juicy!
How often do you flip chicken thighs on the grill?
You should only need to flip the thighs once during the grilling process.
Can you make grilled chicken thighs in the oven instead?
Yes! To make these thighs in the oven, place the thighs in an even layer on an oven-safe grill pan and bake in a 425°F oven for about 10-15 minutes, flipping halfway through. To get that extra char, you can broil the thighs for 2-3 minutes at the end of the cook time.
How to Store and Reheat
Store leftover grilled chicken thighs in an airtight container in the refrigerator for up to 3 days. To reheat, place them on a wire rack set in a rimmed baking sheet in a 400°F oven for about 15 minutes.
You can also make up a batch (doubled, tripled, or more) of the chicken thigh seasoning ahead of time, and store it in an airtight container, Jair, or resealable bag. Store it in your spice cabinet or pantry until you’re ready to use it.
How to Freeze Grilled Chicken Thighs
Freeze chicken thighs in an airtight container or Ziplock bag for up to 3 months. Let thaw overnight in the refrigerator before reheating.
Combine the brown sugar, salt, chili powder, smoked paprika, cumin, onion powder, garlic powder, and oregano in a small bowl.
1½ tablespoons brown sugar, 1 teaspoon kosher salt, 1 teaspoon chili powder, ½ teaspoon smoked paprika, ½ teaspoon ground cumin, ½ teaspoon onion powder, ½ teaspoon garlic powder, ½ teaspoon dried oregano
For Grilling
Heat the grill to medium-high heat (about 400-450°F).
Rub the seasoning and olive oil over the chicken thighs to evenly coat.
]]>
https://productiveorganizing.com/blogs/news/homemade-brisket-rub2023-05-12T09:13:52-04:002023-05-12T09:13:52-04:00Homemade Brisket RubadminGive your meat a sweet and smoky burst of flavor with this homemade brisket rub. You’ll want to make brisket again and again with this seasoning.
There is nothing better than a brisket cooked to perfection. Well actually, one that’s covered in this rub and then cooked to perfection would be even better. You all know I love to prepare a brisket, be it my Jewish brisket, root beer brisket, or a slow cooker brisket. They are up there with one of my favorite meals to prepare.
You can buy a pre-marinated brisket or dry rubs at the store, but why spend more when you already have all of the ingredients at home? And this way, you can control the flavors that go into your meat and make it sweeter, spicier, or smokier. Once you taste this homemade brisket rub, you will want to put on everything.
Why You Will Love This Recipe //
It is so rewarding making your own rubs and spice mixes for your food because you really have control over the flavors that go in.
The smoky flavor of the smoked paprika is divine with this meat.
You can make as much of this rub as you like, then store it for later use.
It takes just 5 minutes to make!
Ingredients //
This is a recipe that can be altered to fit whatever you have in your spice cabinet, but most of these ingredients are readily available at your local grocery store.
1/3 cup brown sugar
2 tbsp paprika
1 tbsp smoked paprika
3 tsp black pepper, freshly ground
2 tbsp coriander seeds, gently crushed
1 tbsp garlic powder
1 tbsp onion powder
1 tsp salt
½ tsp mustard powder
¼ tsp cayenne pepper
How to Make Homemade Brisket Rub // The Steps
Step 1: Pour all the ingredients into a bowl and mix with a spoon until nicely combined.
Step 2: Place in an airtight container and store in a dry place.
Variations //
You can alter this rub as much as you like. Use what you have on hand, or go to the store and pick up some new ingredients to change the flavors! Here are some ideas:
Spicy brisket rub: Make an even spicier rub by incorporating more cayenne pepper and/or add in some ginger powder, chili powder, and cumin.
Asian-inspired brisket rub: Mix together some soy sauce powder, brown sugar, Chinese five-spice, ginger powder, sesame seeds, brown sugar, onion powder, and garlic powder for an Asian-style brisket.
Mocha brisket rub: Yes, coffee and chocolate are amazing on a brisket. Mix some ground coffee, cocoa powder, brown sugar, chili powder, salt, and pepper. It will rock your world.
Serving Suggestions//
This recipe is obviously to go on a brisket, but don’t feel limited to just this type of meat. You can also rub it on chicken, steak, pork chops, ribs, or lamb. I hesitate to recommend this rub for fish because the flavors can overpower a delicate dish, but feel free to try your hand at any of these.
FAQs //
My rub is really spicy, why is this?
Some smoked paprikas are a little spicy, so look for a sweet one if you aren’t a fan of chili. You can also leave out the cayenne pepper if you prefer, but I find that most of these spices level out once cooked.
I don’t have garlic powder, can I use fresh garlic instead?
You can use fresh garlic in the brine when cooking the brisket, but you can’t put any fresh ingredients into your rub as it will clump and won’t stay fresh if stored. The same goes for any herbs.
What size brisket can you use this rub for?
It can be used for a 6-pound brisket or smaller. You can easily double or triple the quantity of your brisket rub, or make even more if you like, because it can be used over and over.
How to Store Homemade Brisket Rub //
Be sure to store your brisket rub in an airtight jar or container. Keep it in a cool, dry place like the pantry of cabinet for up to 4 months. The sugar may clump over time, so if you are planning on keeping your rub for upwards of a couple of weeks, combat this by placing a few grains of rice in your rub to absorb any moisture.
Homemade Brisket Rub
Yield: 12
Prep Time: 5 minutes
Total Time: 5 minutes
Give your meat a sweet and smoky burst of flavor with this homemade brisket rub. You'll want to make brisket again and again with this seasoning.
Ingredients
1/3 cup brown sugar
2 tbsp paprika
1 tbsp smoked paprika
3 tsp black pepper, freshly ground
2 tbsp coriander seeds, gently crushed
1 tbsp garlic powder
1 tbsp onion powder
1 tsp salt
½ tsp mustard powder
¼ tsp cayenne pepper
Instructions
Pour all the ingredients into a bowl and mix with a spoon until nicely combined.
Place in an airtight container and store in a dry place.
Notes
Keep a few grains of rice in your brisket rub to absorb any potential moisture and keep your sugar from clumping.
Since a very young age, I have been curious about how things work. Thanks to my dad, my curiosity was satiated with an ample supply of tools and knowledge. In 6th grade, I got my first experience with a soldering iron and it all took off from there. Very quickly, I set up a work bench to do my projects on. Over the years, the working setup improved, moved and evolved.
The electronics lab bench has been optimized over the years and redesigned to fit in a smaller space. Its very functional, customized and economical. I use high quality tools but only where it makes sense. Most of the products I use, I have used for a while and have tested other cheaper alternatives, only to land on the current one. Some, I am still figuring out the best version of.
In this article, I will dive deep into every part of my workbench and show you the structure, organization, tools and parts I have collected over the years. The idea is that with this guide, my bench can be replicated with the same functionality in minimal time. Lets get into it. Feel free to navigate to parts you are interested in.
The bench is built using a 78″x24″ table top from Ikea and two Alex drawers to support it. The grey matt on the bench is a Weller ESD mat with high temperature resistance. I also have a cutting mat stowed underneath the bench for any cutting needs I may have.
The lighting is done using two 90+ CRI LED strips mounted underneath the lowest shelf, each with a different color temperature. They are controlled using a touch switch and powered from a 24V PSU. The light can be too bright at times so I am planning to add PWM control in the future to modify brightness and net color temperature as well. It also doesn’t spread too evenly so I am looking into a diffuser as well.
All the power distribution is done using a long 12 port power strip that is mounted on a wire management tray. All the PSU’s and power wiring is managed on the tray to avoid a dangly mess underneath the desk.
I also have a bench PC that is extremely useful to collect data, interact with the oscilloscope and view schematics, datasheets etc. The display for the bench is mounted on the wall with a swivel arm.
The main appeal of my bench is the organization. I obsess over the little details and have spent a lot of time to organize every part of the bench. Organization is an ever going process though so it will never be done, it will just keep getting better.
Overview
Lets look at the organizational structure I have implemented. Everything is placed in a way that the most used things are the easiest to get to. Most frequent tools, instruments and components are out in the open. Less frequently used stuff is stored in drawers, bins and compartment boxes. I like to keep things consistent as much as possible since it makes storing them easier.
At this point, I would like to point out that you need a way to label things. Masking tape and a sharpie work great but you can get fancy with a label maker or label printer. I use them all based on what I am labelling and how permanent/important I expect it to be.
Bench Top
Lets start with the bench top. I have a main bin of tools that always holds a certain set of tools and based on what I am working on, will store additional tools as well. It serves as a quick way to stow away tools when not needed and easily retrieve them when needed.
The soldering iron and hot air rework station are to the right since I am right handed. They are quick to reach but also not in the way. Other things are lined up where they fit like the power supply, solder wire, USB charging station etc. I keep the left area clear so I can spread out my project further. I also usually keep a smaller bin to hold components I am actively using on the left.
Parts/Consumables Storage
There are 3 primary types of containers I use to store all my stuff:
Small Drawers
Compartment Boxes
Bins
For the drawers, I use Akro-Mills drawers as they are decent quality and come in a variety of configurations. I use these to store electronic components. Most of the drawer space is taken by my tracked inventory of components for PCB designs. I also have other electronic components like relays, panel mount switches, magnets etc. in the drawers. They are all labelled and organized in a logical way so that similar stuff is together. For example all SMD components are grouped together.
I mainly use 2 types of compartment boxes. One is the clear 10.8x7x1.8″ box that is cheap and good for a variety of parts due to its modular compartments. I store connectors, hardware, modules and dev boards in these boxes. I usually buy kits of thing from Amazon and each comes in its own unique box so I have found it better to shift the parts to these standard boxes. They are much easier to store and navigate when you are looking for something. These are stacked on the second shelf. I also do have smaller compartment boxes for some of the smaller connectors. For example all JST SH connectors go in a small box. But I have tried to have a few different sizes and stick to those instead of having each connector be its own type of box. Initially, that can work but as you add more types of parts, it gets annoying. The smaller boxes are stored in the main drawers. There are some things like connectors which come in so many shapes, sizes and use cases that I find it best to store them appropriately in different containers and different locations. My more frequently used connectors are in the drawer next to me but the less frequent ones are in the larger compartment boxes.
The other type of box I use is the Aidetek SMD component storage box. I absolutely love these things and they amazing to store a large number of components in a small volume. I have all my frequently used components in these boxes and I keep them on the first shelf for quick access.
There is a lot of things that cant fit in either of the above two options so I use bins for those. Again, I have tried to use only two sizes so that its easy to store them and they look visually more aesthetic. The top shelf is taken by bins for larger things like tapes, adhesives etc. I have larger bins with parts in the closet that hold things I very rarely need to access.
Drawers
The drawers on both ends of my desk are used to store a variety of tools, parts and consumable supplies. But more importantly, I use small organizing containers to keep things inside the drawers fairly well organized. I use these ones for the shallow drawers and these for the deep ones.
The drawers I can access most easily are the top left two drawers and they hold more tools and soldering supplies. The top drawers on the right are unfortunately blocked by the soldering station wires so I keep things I use less frequently in those.
In the lower drawers, I keep more supplies and parts like wires, heat shrink, connectors etc.
Test Lead Holder
On the left edge of the shelves, I have a test lead holder that I use to hang all my test leads including oscilloscope leads, Minigrabber leads, alligator jumper cables etc. Not only does this keep them straight, it also keeps them untangled and ready to use.
Component Inventory System
I have more than a thousand different electric components for PCBs and trying to find which one I have became very time consuming. So I spent even more time coming up with an inventory system for the components. The system is based on Airtable and it stores entries for each component. It automatically generates a nice label that I can use to re-bag the components since they consume so much less space in my bags compared to what LCSC, Digikey etc. send them in. I also have automation scripts to add components into the database from CSV files.
I will go into much more depth on the inventory system in a separate post that I will link here when its up. There are a lot of details about the system I want to document and share.
I have a used a lot of different tools, parts and supplies over the years. Slowly, I have moved towards the best balance of quality and value in each of these categories. In the following sections, I will go over my recommendation for things needed to get started. As you work on projects, you will add more stuff based on project specific needs. Links are provided to where you can buy everything. I have also added what I like about each item based on my personal experience using them.
Test Equipment
UNI-T UT61E Digital Multimeter
Much better value than a Fluke. Fast auto-ranging. All the features you would need including data-logging.
These will get you through most applications but you can certainly buy them in different colors, higher quality and material based on your use case. I have accumulated a variety of tubing but use the aforementioned 99% of the time.
My experience with silicon coated wires from Amazon has be great. They are not the best quality you can get but they are good enough for most prototyping applications. You can get them in any gauge and color combo your application demands. But don’t get PVC coated wires since they generally melt very easily and are poorly made. For those, you should turn to Digikey and be ready to pay a premium.
Tapes
Frog Painters Tape
Great for temporary taping of things like SMT stencils.
My electronic component inventory is massive with more than 1000 unique components. This inventory has built up over the course of many projects. I will write a separate blog post in which I will cover my curated list of components to get started with.
Fasteners
Having a variety of fastening hardware on hand helps to quickly prototype designs. The screws I use the most are course threaded screws that can thread into 3D printed plastic. I also have used threaded inserts and fine thread screws. While you can get screw kits from Amazon, the quality wont be particularly good. Hence I recommend getting them from McMaster-Carr.
I have stocked up on a variety of development boards, modules and tools to quickly prototype ideas. The specific hardware that would be most useful for you would depend on the type of projects you want to tackle. Here are some things to keep in mind in your quest.
Adafruit has a large selection of high quality dev hardware. You cant go wrong with those.
Amazon has cheaper options but be careful about the quality as some might use fake components.
Don’t buy original Arduino boards. The clones are a much better value.
Below are some basic staples of my lab and some interesting tools I have found over the years. I will do a more detailed post with all my recommended development hardware later.
Arduino Nano
My go-to for simple projects that require a microcontroller.
While most of the hardware work is done on the lab bench, all of my programming work is done on the computer workstation. It is the perfect complement to the lab bench and allows me all the room, screen real estate and power to test and program anything I want.
The desktop PC is a custom built unit with decent specifications. It easily handles anything I can throw at it. It has the following components.
The triple monitor setup just cant be beat for both productivity and entertainment. Coupled with high quality peripherals, makes the setup very comfortable and effective. Following are things that make up this setup.
LG UltraGear QHD 27-Inch Gaming Monitor 27GL850-B (Amazon)
Most of the time, the desk looks like this and is filled with prototypes and parts of the current project I am working on.
3D Printer
A 3D printer is a very useful and powerful tool to have. Not only can you use it to optimize your lab but you can also prototype enclosures and mechanisms for your designs. There are too many options out there and the best option for you will be based on what is it that you are looking for. You can get cheaper units that can do basic printing well and might require a bit more attention and care. Or you could go for higher end units that just work and require minimal tinkering.
I have found the Ender 3 Pro with some basic upgrades to be a great value for money and the best place to get started with. Once you feel like you need a more capable printer because you need to print an engineering material or print larger quantity, you can invest in a higher end model.
Following are links to the printer and recommended upgrade parts.
I hope this guide will provide some inspiration for you to spice up your setup. Let me know if you have any questions. Pleaseany recommendations for products you have found useful around the lab.
]]>
https://productiveorganizing.com/blogs/news/ikea-drawer-organizers-vs-rev-a-shelf-drawer-organizers2023-05-09T21:13:51-04:002023-05-09T21:13:51-04:00IKEA Drawer Organizers vs. Rev-A-Shelf Drawer Organizersadmin
Which drawer inserts and organizers work best for your IKEA kitchen design?
More than ever, homeowners are designing all-drawer IKEA kitchens, which means drawer organization is more important than ever. With hundreds of organizing options to choose from, where do you start?
If you have an IKEA kitchen, it makes sense to start at IKEA. However, many of our customers want to avoid settling for the first organizer they come across. Rev-A-Shelf’s line of innovative drawers and drawer organizers provides more function and usable storage space than the IKEA alternatives.
Find out why IKD customers prefer Rev-A-Shelf’s drawer organizers over IKEA’s in the article below.
Personalized IKEA Kitchen Designs
Created by Certified Designers
RAS Double Knife Block vs. UPPDATERA Tray with Knife RackIn this case, size matters. IKEA’s UPPDATERA tray with knife rack stores four knives. If you have a few favorites, IKEA’s in-drawer knife storage might be enough for you. However, we prefer designing with the Rev-A-Shelf Double Knife Block (4WDKB-1), which stores up to 55 knives. If you have a professional set or even a basic countertop knife block that you’re hoping to get off the counter, UPPDATERA isn’t going to cut it.
For our customers who believe the double knife block has too much storage, we also design with a Rev-A-Shelf insert that holds 19 knives (4WKB-1) and an ultra-convenient knife-holder/cutting board combo (4KCB-419HFLSC-1) that holds about eight knives.
“When we were discussing our design goals with IKD, we mentioned wanting to have less stuff on the counters in our new kitchen. We knew drawer inserts existed for knives and spice jars because IKEA had them, but they were so small. Albert designed a whole organizational system using Rev-A-Shelf. We were sold.” –Tessa, IKD customer
RAS Wood Spice Drawer Insert vs. UPPDATERA Tray with Spice RackVariety is the spice of life. That’s why our IKD designers design with the Rev-A-Shelf spice drawer insert (4SDI-36-1) rather than the IKEA UPPDATERA tray. The RAS insert comes in three sizes and a walnut or maple finish. They fit up to a 36” W drawer and can be trimmed to fit smaller sizes.
UPPDATERA is a small tray insert, available in white plastic or bamboo. The average width of a spice jar is about two inches, meaning you can fit about twelve spices in one UPPDATERA tray. If you only stock the basics, that size might be right for you. However, most of our customers prefer to spice things up, and Rev-A-Shelf’s insert holds up to 48 jars.
“One of our favorite Rev-A-Shelf inserts is the spice rack. It’s so much easier to open a drawer and see all of the jars than search through a cabinet or spice rack on the counter. IKD gave us exactly what we wanted, and I don’t hate cooking anymore.” –Fred, IKD customer
RAS Wood Cutlery Tray Insert vs. UPPDATERA Flatware TrayWhen it comes to cutlery and utensil trays, IKEA has stepped up its game. You get the usual color options (white and bamboo) but can choose from multiple sizes and configurations. Combine trays and inserts to create a customized utensil insert, or buy a pre-designed flatware tray. The UPPDATERA bamboo trays have removeable inserts that let you change compartment sizes.
Still, most of our customers prefer a functional design solution that looks like it was custom built for the drawer. We turn to Rev-A-Shelf, which has cutlery and utensil trays made of maple and walnut. Depending on the size of your drawer, you can combine multiple RAS inserts, like the knife block insert, spice insert, or even a stainless-steel foil insert (4FWI-16SS-1). The Wood Cutlery Tray Insert (4WCT-1) comes in multiple sizes and is also designed to be trimmed to fit the width of your drawer.
None of IKEA’s trays offer this level of functionality or cohesion.
“We updated our kitchen, and we had the budget left over to update our organizers, too. IKD handled that part of the design process for us. We had no idea they could provide internal organization designs, and we were very impressed. We didn’t want to build this nice, new kitchen just to end up with messy drawers. Rev-A-Shelf’s cutlery organizers make the drawers look like they were built just for us.” –Marie, IKD customer
Bonus: RAS Drawer Organizers for the Home Office
While kitchens may always be the most popular rooms for IKEA’s SEKTION cabinet and MAXIMERA drawer designs, your home office will benefit from the tidy storage and sense of calm that Rev-A-Shelf brings to IKEA designs.
We enjoy utilizing the following drawer inserts in our IKEA home office designs:
The Maxx Drawer (4WTMD-24HSC-1): This two-tier drawer is made for organizing anything that would typically end up in a junk drawer, like pens, pencils, paper clips, stationary, and other office necessities. The first compartmented tier folds out in two pieces when the drawer is fully extended, revealing another level of compartments beneath.
Charging Drawer (4WCDB-18HFLSC-1): The modern home office requires technology, and technology requires charging cables. Rev-A-Shelf’s charging drawer can fit one laptop or several smaller devices, like phones, tablets, and smartwatches. Choose from USB outlets or a combination of standard and USB charging ports in the drawer.
Pullout File Drawer System (RAS-FDSM-DM15-1): Designed for 18” base cabinet drawers with a 1.5” face frame, this is the perfect solution for storing hanging files in your home office.
Bonus: RAS Drawer Organizers for the Bathroom
The bathroom is another area where Rev-A-Shelf and IKEA shine. We organize MAXIMERA drawers for the bathroom in several ways with the help of Rev-A-Shelf.
Here are three RAS bathroom products we love:
Vanity Drawer Organizer Insert (4VCOS-22-1): This is another example of Rev-A-Shelf’s trim-to-fit wonders. The insert is specially designed to store cosmetics and hair care products and includes two compartments with clear lids that could work for items like cotton balls or swabs.
Vanity Drawers (4VDO-15SC-1): Rev-A-Shelf’s tiered vanity drawers come in various sizes and configurations. The compartments and acrylic dividers are great for storing everything from nail polish to clippers.
Vanity Outlet Drawer (4VOD-18FLSC-1): This drawer not only stores your hair dryer, curling iron, and clippers, but it also gives you a spot to plug them in. We’re big fans of these organizational multitaskers.
IKD uses Rev-A-Shelf organizers in IKEA kitchen designs.
Comment “IKEA’s organizers satisfy the basics, but we feel that if you’re upgrading your kitchen, you should also upgrade how you organize your kitchen. There are better, more innovative alternatives to the basic kitchen utensil tray and spice storage that takes up too much counter or cabinet space. Rev-A-Shelf makes kitchen tasks easier, and that gives you more time and energy to enjoy your home.” –Mike from IKD
Get a Professional IKEA Kitchen Design – All Online
Work with our certified kitchen designers to get a personalized kitchen designed around your needs and vision. If you’re interested in learning more about our service, make sure to check out our IKEA Kitchen Design Services.
]]>
https://productiveorganizing.com/blogs/news/bottom-round-beef-roast2023-05-06T00:01:34-04:002023-05-06T00:01:34-04:00Bottom Round Beef Roastadmin
Here’s the roast that’s likely the best dinnertime value in the entire meat case! Bottom Round Beef Roast is an economical cut of beef that simmers low and slow until it’s fall-apart tender and juicy.
Fork-Tender Bottom Round Roast Recipe
Please tell me what could be better than a delicious, savory roast beef meal on a cold day. Talk about classic comfort food that everyone adores.
When you need something hearty and soul-warming for your family and friends, this bottom round roast is just the ticket, especially when served with mashed potatoes and creamy gravy on the side.
I’m sharing my favorite way to make a fork-tender bottom round roast, simmered low and slow in your oven. You don’t need tons of cooking experience to make a rich and juicy roast, I can assure you, and I’ve done it for years.
All you need are a few common ingredients and seasonings, a bottom round roast, a Dutch oven or pot for cooking, and about 4 hours of oven time to allow the roast to slowly braise and get very tender.
So exactly HOW do you cook a perfect bottom round roast? I’m here to share all my best insider tips and tricks to make sure your roast turns out just right.
WHAT TO LOVE
Bottom round roast is one of the most economical beef roasts in the entire meat case.
Because there is no bone in a bottom round roast, your family can eat the entire piece of meat – what a great value!
This roast is braised low and slow until all the flavors are simmered into the meat – talk about rich and savory.
My family enjoys all kinds of roast beef meals – we are total carnivores around here.
Beef Tri Tip Roast (WithCrispy Potatoes!) is a favorite beef roast that I like to make for my guys, and so is Eye of Round Roast. **Eye of round roast is another great boneless beef roast, just like bottom round roast in this recipe – such a great way to stretch your food budget!
Bottom round roast – these are typically about 3 pounds in size (give or take a few ounces) in most grocery store meat cases, here in the Midwest.
Your favorite steak seasoning – I use Montreal Steak Seasoning.
Oil – for searing and browning the exterior of the roast. You can use olive oil, vegetable oil, canola oil, or even peanut oil.
Yellow or white onion
Fresh garlic – or substitute minced garlic from a jar or even granulated garlic (garlic powder)
Diced tomatoes – use what you have on hand, I used Roma tomatoes.
Tomato sauce – whatever you have on hand is fine, you don’t need anything special or fancy.
Water or substitute chicken broth, if preferred. Chicken broth adds more flavor, but also more sodium.
Fresh basil – may substitute dried basil leaves (from your spice cabinet).
Dried oregano leaves
Salt and pepper, as desired
HOW TO MAKE A DELICIOUS BOTTOM ROUND ROAST STEP-BY-STEP
**PRINT THE FULL RECIPE FROM THE RECIPE CARD AT THE BOTTOM OF THIS POST
Preheat the oven to 250 degrees F. Remove the rump roast from refrigeration and unpackage. Season the roast on all sides with steak seasoning. Let the roast rest on the counter, uncovered, for an hour before you begin the cooking process to allow the chill from refrigeration to subside a bit. **Don’t skip this step! Allowing the roast to rest is important for the cooking process and a good eating experience.
In a Dutch oven or large pot, heat a good swish of olive oil; add the onion and sauté for 2-3 minutes, then add the garlic and tomatoes, cooking an additional 1-2 minutes.
Stir in the tomato sauce and water or chicken broth; add the oregano and fresh basil.
Meanwhile, add a good swish of olive oil to a deep, skillet over medium high heat. When the oil is hot, use a pair of long-handled tongs to add the seasoned roast to the skillet, searing it on all sides, just until nicely browned and caramelized all around.
Place the seared roast into the pot with the onion/tomato sauce mixture; ladle some of the tomato sauce mixture over the top of the roast. Cover the pot with a tight-fitting lid.
Place the covered roast into the preheated oven on the center rack. Let the roast slowly braise (simmer) for 4 – 4 1/2 hours, or until the roast is very fork-tender and 195-205 degrees F. at the center when tested with an instant-read meat thermometer.
Remove the roast from the oven and let it rest, covered, on the counter for 20 minutes. Serve the roast with mashed potatoes, topped with some of the tomato gravy in the pot. Delicious!
WHAT IS A BOTTOM ROUND ROAST?
Bottom round roast is a very lean cut of beef that is best cooked low and slow in preparation. Because it is considered a tougher cut of beef, it is often a better price point in the meat case than other more tender roasts.
WHERE DOES BOTTOM ROUND ROAST COME FROM ON THE COW?
Bottom round roast is a cut of meat that comes from the hind quarters of the cow. Because this muscle gets a lot of use, it is a tough cut of beef.
ARE THERE OTHER NAMES FOR BOTTOM ROUND ROAST IN THE MEAT CASE AT THE GROCER?
Yes. Bottom round roast can also be referred to just as bottom round, rump roast, and London broil. Top round roast is a similar cut of beef since it comes from the same area of the cow.
WHAT IS BOTTOM ROUND ROAST USED FOR?
Because bottom round roast is a very lean cut of beef, it is mainly used for roasts, deli meat, and beef jerky.
HOW DO YOU TENDERIZE BOTTOM ROUND ROAST?
The best way to tenderize a bottom round roast is by cooking it very slowly at a low temperature. Because bottom round roast is low in fat, it takes more cooking time to get the muscle in the roast to break down and become tender.
HOW DO YOU KNOW WHEN A BOTTOM ROUND ROAST IS FULLY COOKED AND TENDER?
When any roast is fully tender, it means you can easily stick a fork into the center of the cut without any resistance as you do so.
WHAT DOES FORK-TENDER MEAN?
Fork-tender means that when you insert a fork into the cooked roast to test for doneness, it goes easily into the meat. If you give the fork a twist, the meat around it will give way and come apart, indicating the roast is finished cooking and ready to eat.
WHEN A ROAST IS FORK-TENDER AT THE CENTER, WHAT WILL THE INTERNAL TEMPERATURE BE?
The internal temperature of a fully cooked, fork-tender roast will be 195-205 degrees F. when temped with a meat thermometer.
IF MY BOTTOM ROUND ROAST IS TOUGH, WHAT DID I DO WRONG?
If you bottom round roast is tough and chewy, it usually means that the roast was cooked in too much of a hurry and at a temperature that wasn’t low enough. Cooking a good bottom round roast requires patience! It should be cooked at no more than 250 degrees F. for at least 4 hours, often even 5 hours for a 3 pound roast. The larger the roast, the more time it will take to cook until fully tender and delicious.
DOES MARINATING A BOTTOM ROUND ROAST MAKE IT MORE TENDER?
Marinades add great flavor to meat and acids in the marinade can break down connective tissues somewhat, helping the meat be a little more tender. However, the best way to help a bottom round roast become tender is always going to be cooking it slowly at a low temperature (no more than 250 degrees F.) for several hours.
WHY IS BOTTOM ROUND ROAST CONSIDERED TO BE A GOOD VALUE IN THE MEAT CASE?
Because bottom round roast is very lean and can be more challenging to cook (say in comparison to a chuck roast with more fat and connective tissue throughout) it very often costs less per pound. And, because there are no bones within a bottom round roast, there is zero waste because the entire cut of beef can be eaten.
DOES BOTTOM ROUND ROAST FREEZE WELL?
Yes! When I find bottom round roast on sale, I usually grab 2-3 from the meat case and freeze them to use at a later time. A well-wrapped roast from the meat case will keep perfectly fine in the freezer for up to 6-8 months.
HOW DO I TAKE THE INTERNAL TEMPERATURE OF A BOTTOM ROUND ROAST AS I’M COOKING IT?
The easiest way to know if a bottom round roast is done is by checking to see if it is fork-tender since this can be done very quickly. To test the internal temperature of a roast, insert the temperature probe into the very center of the meat, making sure you aren’t touching any bones or the sides/bottom of the pan. When the temperature stops rising after a few seconds, this is the internal temperature of the roast. A fully fork-tender bottom round roast should be 195-205 degrees F. at the center.
IF I WANT TO SLICE THE COOKED BOTTOM ROUND ROAST, CAN IT BE COOKED TO JUST MEDIUM RARE?
Bottom round can be cooked to medium rare doneness IF you are planning to slice it VERY THINLY like shaved deli meat. Medium rare doneness is 130-135 degrees at the center of the meat, with residual cooking of the meat raising the final temperature of the meat (as it rests out of the oven) to 140-145 degrees.
WHAT IS THE BEST WAY TO SLICE A ROAST (OR ANY MEAT) INTO VERY THIN SLICES?
Cook the meat and then allow it to fully cool. Place the meat into refrigeration until fully chilled. Next, place the meat into the freezer for 1 – 2 hours (depending on how big your roast is), just until the meat is PARTIALLY frozen. Now take your sharpest knife (or an electric slicing knife) and slice the roast ACROSS THE GRAIN into VERY THIN slices. Partially freezing the meat gives it more structure as you slice down, making the task much easier.
WHY IS IT IMPORTANT TO SLICE THE BOTTOM ROUND ROAST AGAINST THE GRAIN?
Slicing meat against the grain means slicing across the direction that the muscle/protein fibers run. Slicing across the fibers of the meat shortens them, making the meat more tender and easier to chew.
HOW DO I KNOW IF I’M SLICING THE MEAT ACROSS THE GRAIN AND NOT WITH THE GRAIN?
Lay the piece of meat on a cutting board. Look for the lines of the meat to see which direction they are running. Turn the meat so the lines (fibers) of the meat are running horizontally on the cutting board, then slice ACROSS the grain of the meat into slices.
SHOULD YOU ALWAYS CUT ACROSS THE GRAIN NO MATTER WHICH CUT OF MEAT YOU ARE SLICING?
Yes!! Whether it’s a steak or a roast, meat should always be sliced against the grain to shorten the protein fibers, making the meat easier to chew. If the cut of meat is a more tough cut, make sure the slices are thin and sliced on the bias, too.
MORE FAVORITE RECIPES TO ENJOY –
TACO RICE CASSEROLE – You are just 4 steps and mere minutes away from a big delicious 9×13 pan of shredded chicken with Mexican seasonings and tender rice, topped with melty cheese.
Here's the roast that's likely the best value in the entire meat case! Bottom Round Beef Roast is an economical cut of beef that simmers low and slow until it's fall-apart tender and juicy.
Remove the rump roast from refrigeration and unpackage. Season the roast on all sides with steak seasoning. Let the roast rest on the counter, uncovered, for an hour before you begin the cooking process to allow the chill from refrigeration to subside a bit. **Don't skip this step! Allowing the roast to rest is important for the cooking process and a good eating experience.
In a Dutch oven or large pot, heat a good swish of olive oil; add the onion and sauté for 2-3 minutes, then add the garlic and tomatoes, then cook an additional 1-2 minutes.
Stir in the tomato sauce and water or chicken broth; add the oregano and fresh basil.
Meanwhile, add a good swish of olive oil to a deep, skillet over medium high heat.When the oil is hot, use a pair of long-handled tongs to add the seasoned roast to the skillet, searing it on all sides, just until nicely browned and caramelized.
Place the seared roast into the pot with the onion/tomato sauce mixture; ladle some of the tomato sauce mixture over the top of the roast. Cover the pot with a tight-fitting lid.
Place the covered roast into the preheated oven on the center rack. Let the roast braise (simmer) for 4 – 4 1/2 hours, or until the roast is very fork-tender at the center and 195-205 degrees F. when tested with an instant-read meat thermometer.
Remove the roast from the oven and let it rest, covered, on the counter for 20 minutes. Serve the roast with mashed potatoes, topped with some of the tomato gravy in the pot. Delicious!
We love hearing from our readers and followers. Leave us a comment if you would kindly do so – we truly appreciate your feedback.
If you don’t hear back from us shortly, know that we may not have seen your comment. Feel free to reach out to us by email: ChefAlli@ChefAlli.com.
LET’S GET YOU COOKIN’, CHEF ALLI
Please Note: We do use referral and affiliate links here for products and services that Chef Alli loves and recommends. We may receive a small compensation when you use these links. This really helps us keep the recipe blog moving forward. Thank you so much.
]]>
https://productiveorganizing.com/blogs/news/portfolio-bringing-the-inside-out2023-05-04T00:01:36-04:002023-05-04T00:01:36-04:00Portfolio: Bringing the Inside Outadmin
A standalone portable grill can cook food outdoors. But a built-in version, complemented with accessories and accompanied by amenities one would find indoors, is much more fun…and much more requested.
Outdoor living, which combines both cooking/grilling and entertaining, has become increasingly important for many people who want their exterior spaces to perform like those indoors. An outdoor space is no longer just a grill and a couple of patio chairs. These days, it’s built-in appliances – such as grills with ventilation hoods, refrigerators and ice makers – being joined by sinks, pantries and even islands. Televisions and expansive lounging areas with fireplaces encourage guests to hang out outside with the chef.
This month, KBDN asked designers to share outdoor kitchen projects that bring the inside out.
Extending indoor living
COVID-19 has certainly changed much about people’s lives, including how they feel about their interior – as well as exterior – spaces.
“It’s no secret that the pandemic inspired folks to create outdoor living spaces for their families as a way to gather safely,” says Jill Jarrett, CMKBD/CAPS/co-owner of Jarrett Design in Emmaus, PA. “Increased awareness around the health benefits of being outdoors has also spurred interest in outdoor kitchens.”
For those who are making an investment outside, Jarrett has seen basic outdoor grilling areas with metal cabinets and grills set into masonry being upstaged by large outdoor kitchens with custom cabinetry and a plethora of outdoor-rated materials, inspired in part by Instagram and other social media platforms that highlight beautiful outdoor kitchens.
Case in point is this dream space that she and Jesse Jarrett, CKBD/co-owner, designed in collaboration with Awosting Construction.
Jill Jarrett has seen basic outdoor grilling areas being upstaged by large outdoor kitchens with custom cabinetry and a plethora of outdoor-rated materials, such as this dream space that overlooks a lake and mountains. This G-shaped configuration was inspired by the curved deck foundation where seating follows the arc. — Photos: Jesse Jarrett
The new-construction home overlooks a lake and mountains and sits within a century-old community of summer cottages with white clapboard siding, green trim and green roofs. Her clients sought to maintain that vibe in their outdoor kitchen.
“Our clients wanted a gorgeous and functional outdoor kitchen that would serve as a place to gather and entertain,” she says. “It also had to reflect the style of their home and feel like an extension of their indoor living spaces. A hearty appliance line-up was high on their wish list, too.”
With regard to appliances, they included an Evo flattop grill, 48″ Caliber Appliances grill, Perlick refrigerator/freezer drawers and The Galley workstation and tap. A critter-proof stainless steel pantry built into the lower bar area keeps food and supplies protected. All are set within NatureKast gray teak cabinetry trimmed with stainless steel and topped with Cosentino’s Dekton sintered stone, both of which were chosen for their ability to withstand the elements. Added winter protection, given the home’s northern climate, is provided by custom boat covers.
“The cabinetry offers a great aesthetic and abundant options for interior accessories,” she explains, noting the inclusion of roll-out trays, a pull-out cooking utensil organizer, a pull-out spice cabinet, a tray/cutting board cabinet, a double trash cabinet and a special cabinet that neatly organizes The Galley sink accessories. “And the countertops were chosen for their ability to stand up to the elements. Plus, the material’s white and gray colors work well with the home’s exterior.”
Because of the extensive appliance list, Jarrett focused on creating a layout that was functional for the cook, yet allowed for adequate seating and interaction with guests. Its G-shaped configuration was inspired by the curved deck foundation, where abundant seating at a raised bar fittingly follows the arc and comfortably seats six. The round shape of the flattop grill also speaks to the curved deck, thus its inclusion on the seating side. The focal-point appliance even has its own curved-front cabinet/countertop where the homeowners can tuck away the lid when the grill is in use.
“I love including appliances like the Evo,” says Jarrett. “It’s great for a morning breakfast and it provides an easy way for making a meal while getting guests involved.”
As a complement, the traditional grill is situated on the adjacent perimeter. Its retractable top allows for an unobstructed view while cooking.
“Our clients wanted the cooking appliances to face the lake,” she indicates.
Positioning the refrigerator and freezer drawers near the entrance of the kitchen allows for easy access to beverages without getting in the way of the chef, and locating the sink against the wall of the house provides some winter protection for the plumbing.
Tall stainless steel posts that match the deck railing support a large sail that provides shade on sunny days. Custom fabricated, they also include lighting that sets the mood at night.
“They didn’t want a permanent structure, which would make it dark inside the house,” she explains.
Space to spread out
Like Jill Jarrett, Lisa Sherry has seen more clients gravitate toward outdoor living, especially in the past several years.
“We’re definitely doing more outdoor kitchens…that are also more luxurious,” says the principal designer of Lisa Sherry Interieurs in Charlotte, NC. “That trend started before the pandemic, but it became a bigger push during the ‘stay at home era’ where everyone wanted more space to spread out. Clients felt that if they couldn’t travel to a resort, they wanted to make their homes a resort. Having more cooking and entertaining capabilities outside definitely seems to be the trend.”
Those exterior spaces are also shifting toward a luxurious contemporary and streamlined aesthetic with a more monochromatic color palette, similar to what Sherry has seen happening inside the home.
“We used to see a lot of stone and masonry with a more traditional look,” she says, noting a current preference for materials such as concrete and ‘clean’ woods. “Outdoor kitchens used to look a lot more ‘outdoor.’ But now, in terms of actual design, there are so many similarities to what we’re doing inside, where, in general, we’re seeing a more cleaned-up look that is a little more linear. And manufacturers are also providing materials with a more modern aesthetic that give us the durability needed for outdoors. I’m less traditional and more modern in my design style, so I love it.”
Those trends are evident in two recent outdoor spaces that, although visually at opposite ends of the color spectrum, both showcase contemporary design.
“Both of these clients, like most, are looking to move from entertaining inside to entertaining outside…with easy access,” she explains. “Typically, my clients who are putting in outdoor kitchens also have a pool and an expansive outside area that is perfect for entertaining, so they want to be able to do so easily.”
This outdoor living space is easily accessible via sliding doors from the open-concept floor plan interior of the new-construction home that Lisa Sherry completed in collaboration with Joyce Building Co. and Cluck Design. Cypress wood on the walls and ceiling combine with a steel backsplash and concrete countertop to create an earthy and moody vibe. — Photo: Brie Williams
In one case, the outdoor living space is easily accessible via sliding doors from the open-concept floor plan interior of the new-construction home completed in collaboration with Joyce Building Co. (builder) and Cluck Design (architect). It includes a cooking/grilling area, a sofa and chair for lounging and a custom dining table with unique live-edge legs and seating for plenty of guests, all protected beneath a roof. Cypress wood on the walls and ceiling combine with a steel backsplash and concrete countertop to create an earthy and moody vibe, which juxtaposes the home’s light interior.
“The darker materials used in this kitchen really make it feel special…and a bit moodier, which is great for nighttime entertaining,” Sherry relates. “And, it’s almost all enclosed, with the exception of the two sides that are screened.”
A Hestan natural gas grill and Perlick refrigerator make entertaining easy, while a sink makes for easy cleanup.
“A great grill and refrigerator are two must-have elements,” she indicates. “I also like to include a trash pull-out and plenty of counter space. I’m also seeing people include warming drawers, pizza ovens and even dishwashers.”
This outdoor kitchen, designed by Lisa Sherry in collaboration with Thompson Custom Building Group, is in an open space between the house and a covered lounging area. Light and bright were considerations for this client and, since it is uncovered, she included materials and appliances that were intended for outdoor use. — Photo: Brie Williams
Another recent outdoor kitchen project, designed in collaboration with Thompson Custom Building Group, is in an open area between the house and a covered lounging area. Light and bright were considerations for this client, who didn’t want to lose light inside the home by covering the outdoor kitchen.
“This kitchen is smaller and doesn’t necessarily have a lot of bells and whistles,” she relates, “but it’s still conducive to entertaining.”
Since it is uncovered, Sherry made sure to include materials and appliances that were intended for outdoor use, including the built-in Delta Heat 32″ grill with rotisserie, Big Green Egg kamado grill and bluestone countertop and floor.
From unkempt to amazing
Southern California is conducive to outdoor living, where open-air spaces are often a top priority for homeowners, including these clients who wanted to transform an unkempt and neglected backyard into a clean, contemporary oasis where they could entertain friends and hang out with family.
“Their backyard was overgrown with vines that covered everything, and the curvy barbecue area just didn’t match their style,” recalls Nicole Valentine, senior designer, JRP Design & Remodel in Westlake Village, CA. “We cleaned it up, reconfigured the layout and incorporated contemporary design elements to give them the perfect blend of beauty, form and function. Now the space is open and inviting with an amazing barbecue and lounge area to complement the pool, which is visible from anywhere in the yard.”
A focal-point media center sits at the heart of this outdoor space by Nicole Valentine. To one side, she included essentials related to cooking, such as a grill and storage components. An undercounter refrigerator and a pantry are positioned on the opposite side. — Photos: JRP Design & Remodel
A focal-point media center sits at the heart of the grilling/entertaining area where a large TV is positioned above a built-in fireplace.
“Being able to watch sporting events with friends was a big concern for the husband,” the designer recalls.
To each side of the television, Valentine and the design/construction team incorporated the outdoor kitchen essentials. One side relates to cooking, such as the 42″ Lynx grill and PCM components that include a trash pullout, double doors that conceal storage and a trio of stainless steel drawers, the latter of which also features a place for paper towels as well as spatulas and other cooking utensils.
“I always encourage clients to consider a trash pullout and a paper towel holder,” she advises. “Cooking outside is messy, so it’s great to have a place to drop your trash. And, if you spill something, it’s nice to have paper towels handy for cleanup.”
A Lynx undercounter refrigerator and a PCM pantry are positioned on the opposite side of the television.
“The barbecue area is a bit of a walk from the interior kitchen, so it has to function on its own,” Valentine relates. “The pantry is great for storing glassware and plates so my clients don’t have to run back into the kitchen. We included the refrigerator close to the pool so guests can easily grab a drink without being in the way of the cook.”
Selecting materials that could withstand the elements was paramount as well, thus the inclusion of a Cosentino Dekton countertop and ipe cabinetry, which adds a richness and warmth that juxtaposes the concrete.
“We used Dekton in this project. It has been available for a while, but there are some new countertop materials becoming available that are blowing our minds,” she relates. “For example, quartz companies that make indoor countertops are now coming out with collections that can be used outdoors.”
Given its typically sunny climate, providing shade was an important consideration, too, which was accomplished via a pergola.
“The shade structure plays with the light and casts shadows, which was intentional to reinforce the linear elements in the backyard,” notes the designer, adding that it is foiled by the curvy, free-form pool.
“The curves of the pool create contrast,” she continues. “I believe that good design should also include what I call a ‘foil.’ The backyard is a grid with a lot of straight lines, so having one element that is more curvy helps to break things up.”
Valentine also appreciates the contribution made by the bright teal tile that was used to resurface the pool.
“Designing outdoor spaces requires a different way of thinking,” she explains. “When you’re outside, you don’t usually have a ceiling or walls that enclose you. There’s also direct sunlight so we have to think about lighting differently, which gave us the ability to play with the shadows from the pergola. There’s also a different ruleset for materials. For example, the pool tile…it’s an amazing 1″x1″ bright teal tile. I’d never use it inside a house, but it works perfectly for the pool!”
OUTDOOR LIVING GOES VIRAL
When this outdoor kitchen was posted to its community’s Facebook group, it went viral.
“The entire next day I sat at my desk answering calls,” says Marissa Moore, principal designer/Allied ASID, Interior Style by Marissa Moore in Aldie, VA, who designed the space in collaboration with Maruca Design Build.
Moore credits much of its popularity to its uniqueness. Outdoor living and entertaining are important to homeowners in this community, which is located in Loudoun County where large renovation/construction budgets support large homes with large yards. This client was no different in that respect, however, she did want her outdoor space to be unlike any others in the neighborhood.
When this outdoor living space, designed by Marisa Moore, was posted to its community’s Facebook group, it went viral. Moore credits much of its popularity to its uniqueness, such as its two-level design that encompasses the kitchen and a seating area on the upper deck and a dining area, freestanding fire pit and large living room with a built-in fireplace, TV and sofa on the lower level. — Photos: Andrew Sample Photography
“There are a lot of outdoor spaces here, but everyone tends to do the same thing,” she relates. “It’s a very cookie-cutter neighborhood. Everyone’s house is the same. But this outdoor entertaining area is completely different. There isn’t anything else like it around here.”
One distinguishing characteristic that sets it apart is its size. The entire outdoor entertaining/cooking area is substantial, encompassing two levels with the kitchen and a small seating area on the upper deck. A dining area, freestanding fire pit and large living room with a built-in fireplace, TV and sofa are on the lower level, which leads to a pool. Tall ceilings accented with beams and skylights provide protection from the elements and retractable screens and glass walls add to the outdoor ambiance and provide easy access to the yard.
While it is considered an outdoor space, Moore’s client wanted it to feel like an interior space.
“She wanted it to be as cool as any interior kitchen,” she relates, adding that this request has become popular with many of her other clients as well. “People want to spend time outside and they want a luxe entertaining space that makes them feel like they are inside. They want it to be an extension of their home. They want to bring the inside outside.”
With regard to this kitchen, that translates to the inclusion of several elements that can be found in a typical indoor counterpart. For starters, the designer included an island, complete with seating, an undercounter refrigerator and plenty of storage.
“People want seating…at an island or a bar,” she relates. “Outdoor spaces are all about entertaining, so when the chef is at the grill, guests can interact.”
For an added ‘wow’ factor, the granite countertop falls vertically with waterfall edge details on each end. Since this kitchen must perform independently from the interior kitchen, the designer also included a sink for easy cleanup.
Around the perimeter she included a second undercounter refrigerator along with a 60″ Lynx grill and Big Green Egg kamado grill, both equipped with a ventilation hood.
“Everyone, including this client, wants a bigger built-in grill, and if the space is enclosed, it needs a ventilation hood,” she relates.
Moore repeated the granite countertop around the perimeter and complemented it with a porcelain tile backsplash, giving it an interior vibe with a contemporary design style. A television is mounted on the wall within easy viewing of guests and the cook.
“Everyone wants a TV that they can see from the kitchen area!” she indicates.


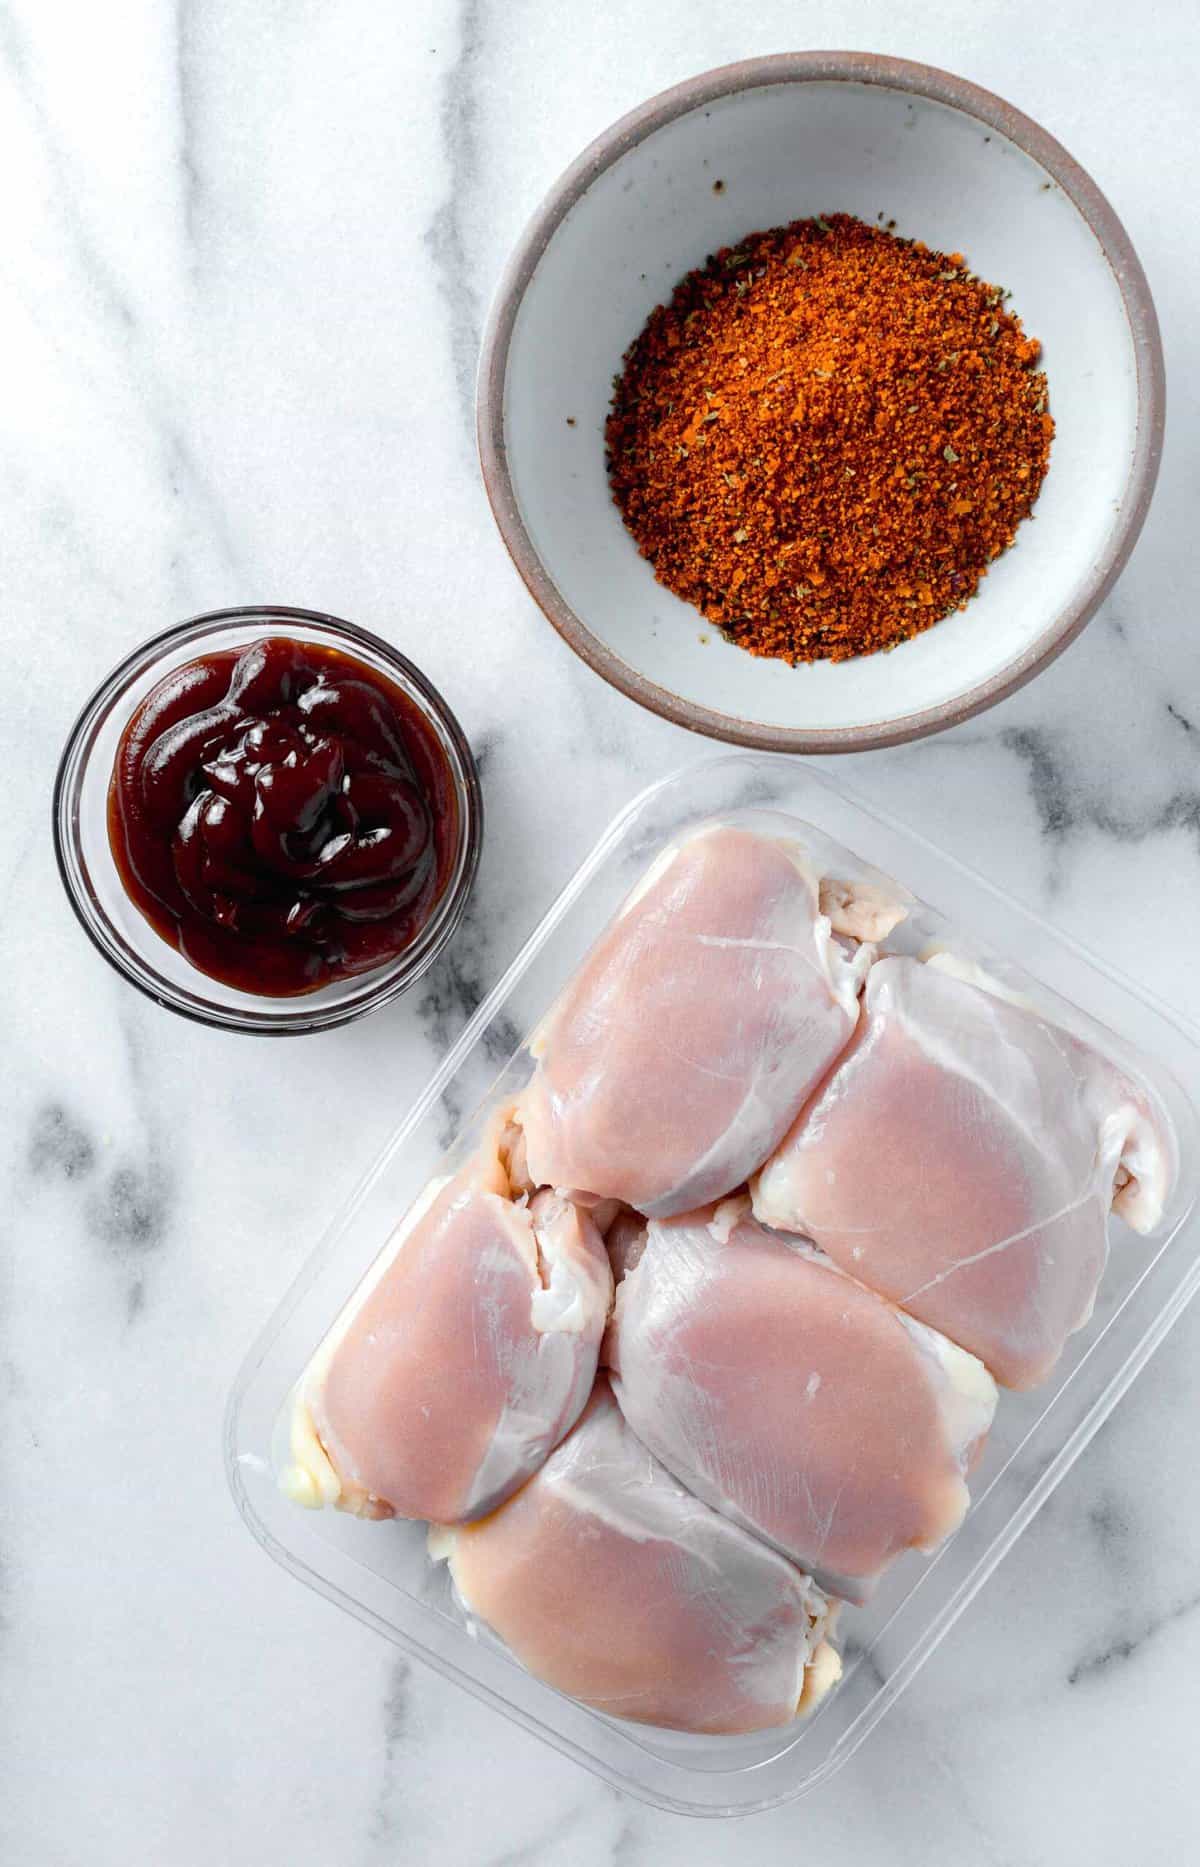
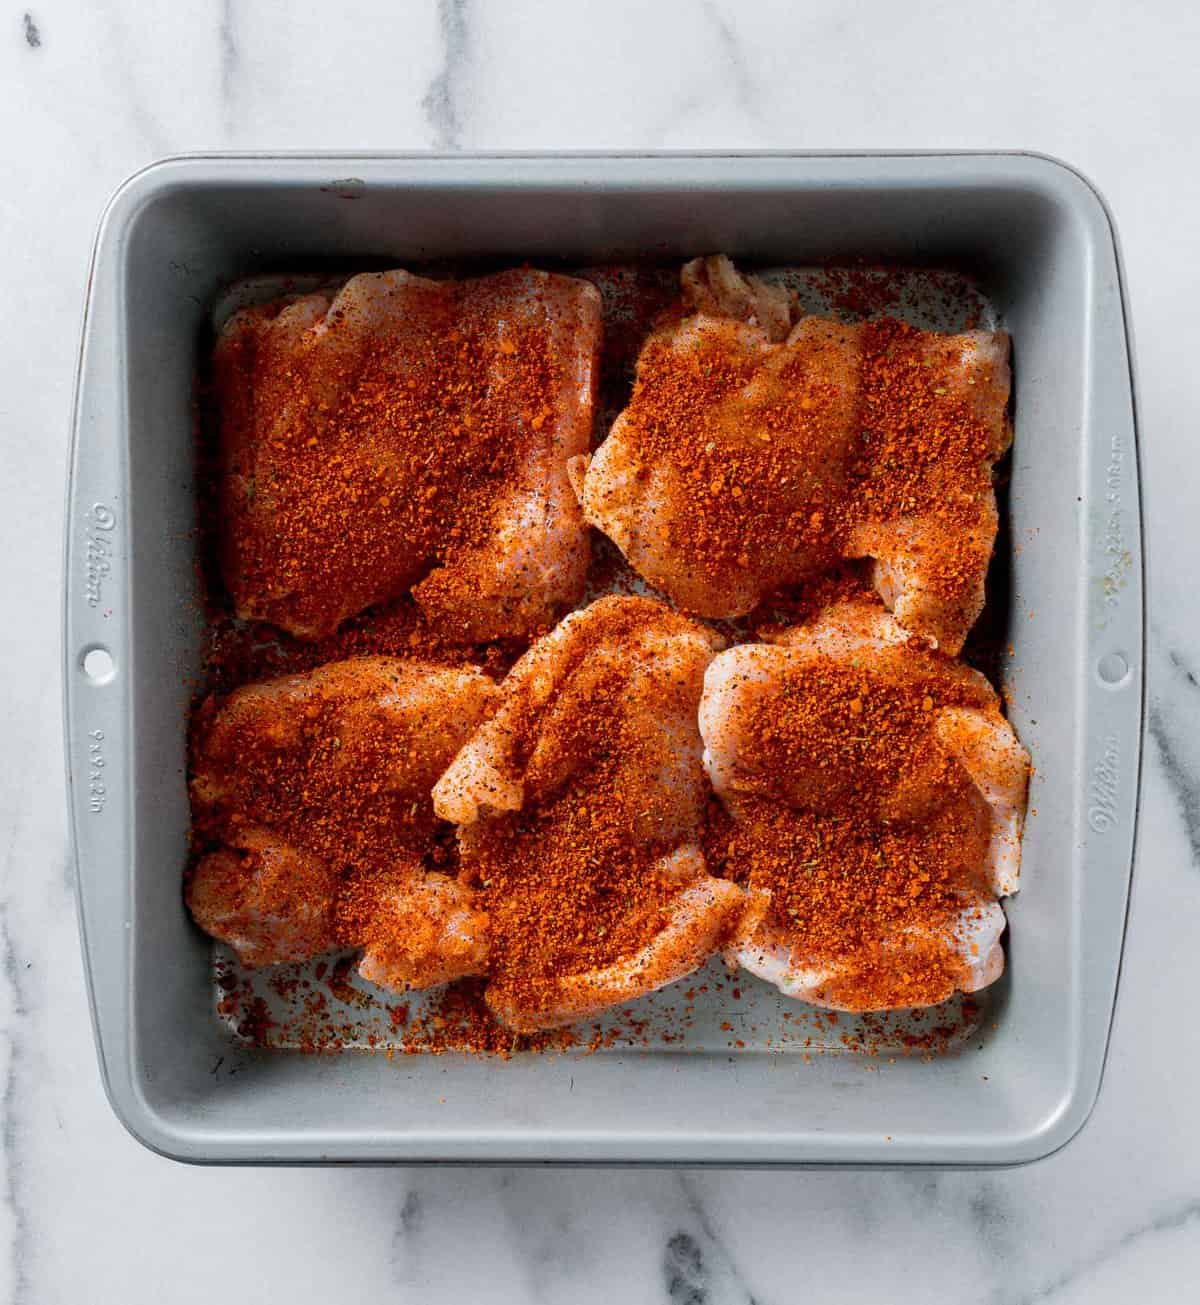


 The designer: Tony Lister at Simon Taylor Furniture