Comparing Cabinetry Options From Big Box Stores
How I saved on our kitchen renovation by purchasing unassembled kitchen cabinets.
I'm breaking down the differences in quality and pricing among the four types of cabinets available from most big box hardware stores.
I've used three of the four options for my DIY projects over the years and have come up with a favorite!
After much research on what type of cabinet to use for our basement kitchenette project, I decided to go with unassembled kitchen cabinets for the first time ever, and I'm so glad I did! I'll be sharing the benefits of these easy-to-assemble cabinets.
I showed you the plan for our basement kitchen last fall, and have been hard at work since then. I have so much progress to share!
Because this is the first time I've started a kitchen space from scratch (see my big DIY kitchen renovation from our old house!), I did a lot of research before starting.
One thing that shocked me was the price of quality assembled cabinets. It seemed they were increasing in price by the day! 😬
I didn't consider custom cabinets just because I can add so many of the fancy details myself.
I've always used in stock unfinished cabinets for my DIY builds, partly because I'm usually impatient and want to go get them when I want them, but mostly because the price is fantastic and they can easily be updated a number of ways.
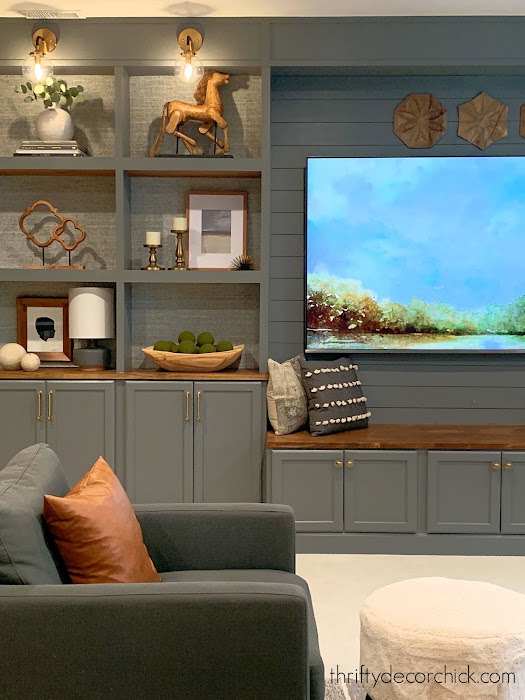
But I wanted a little higher quality for this space, so after looking at options for our new kitchen, I decided on unassembled cabinets:
This post may contain affiliate links for your convenience.
I may earn a small commission when you make a purchase through links.
See my policies and disclosure page for more information.
We choose the Hampton Bay Avondale shaker cabinets from Home Depot. I found you get a lot of the bells and whistles of higher end cabinets, but they cost way less because you're doing most of the work. :)
I set up my cabinet assembly on our long dining table in the basement with a big drop cloth and scrap cardboard from the cabinets on top.
The only hard part of this cabinet building was getting them down the stairs. The boxes were HEAVY (these are made with plywood instead of the cheaper furniture board the less expensive versions are made of).
For the larger cabinets, we opened them up and took the parts down in trips.
Once down there though, the process was pleasantly easy and quick. I'm one of those weirdos who doesn't mind furniture assembly, so this was almost fun for me...like a puzzle.
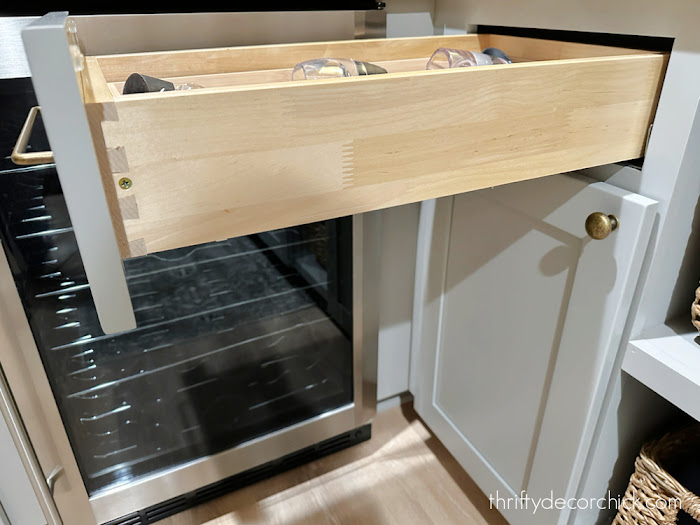
After a couple I had the process down by heart. I was thoroughly impressed with the quality -- the drawers have dovetail joints:
You don't need any fancy tools for this cabinet assembly. A mallet and drill or screwdriver is all you'll need.
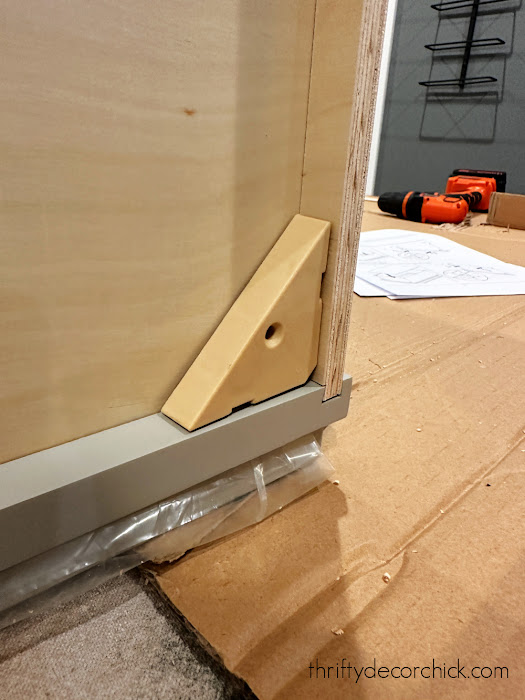
The sides slide together and then are easily joined with the provided corner braces and screws:
And the cabinets come with everything you'll need -- including soft close drawer and door hardware:
When I got going, the process went quick! I assembled nine cabinets in a couple days -- the smaller ones only took about 30 minutes each. The more complex drawer units took about 45 minutes to an hour.
Let's look closer at the different cabinet options.
I'm breaking down the three types of cabinets I've used and their price, plus throwing in details of more custom options as well.
(These are based on Home Depot's pricing just because that's where I've purchased from most often.)
1. First up, the unfinished cabinets.
These are what I use to make ALL of my DIY built in units:
They come unfinished and are very basic. No frills, no soft close, no paint.
The units are typically made of particle board, which is not great, but I've found it holds up just fine for DIY projects like these built ins.
They are inexpensive and very easy to update yourself!
I like using these for bookcases like this because I don't have to worry about priming and painting over a paint finish. I can finish them however I want.
2. The second option are assembled and painted in stock cabinets.
This option is what I used for our pantry -- I installed the Hampton Bay Courtland Laminate cabinets:
These cost more than the unfinished versions, but come assembled and painted. And they come in a few more configurations (sizes and options) as well.
This option doesn't come with soft close drawers or anything like that, and are also made with cheaper materials.
Overall I wasn't thrilled with the quality on these and wish I would have gone with the versions I used in the basement. The pantry cabinets are holding up just fine, but the basement kitchen ones have all the bells and whistles!
3. Unassembled cabinets (what I used for our kitchenette).
These are by far my favorite of the three I've used in our home, because of the quality and high end details that are included.
It's the little things -- the drawers are FULLY extendable. This is a detail on our kitchen cabinets that I love! You can access everything in the drawer easily:
They also come with soft close drawers and doors. No need to DIY the soft close yourself!
The assembly wasn't hard at all -- a beginner DIYer could easily do it. It may take more time if you've never assembled furniture.
Home Depot provides great instructions and how-to videos for these as well.
4. Special order custom cabinets.
I've never used custom cabinets in our homes, so I can't speak to them personally. But they can be made to fit your room specifications and the drawer and door design options are endless!
Custom cabinets can also be built with useful organizational additions like pull out shelves, spice racks, etc.
As expected, these are usually the most expensive of the four options.
Comparing the price of these cabinet options.
Let's talk pricing, as it varies quite a bit depending on what you pick!
I gathered prices for two cabinets (a base cabinet with drawers and a 36" sink base) to compare the pricing for each. (Again, these are all Home Depot cabinets.)
Thirty-six inch wide sink base:
- unfinished sink base/$189
- assembled in stock sink base/$200
- unassembled finished sink base/ $339
- custom sink base option/$658
Thirty-six inch drawer base cabinet:
- unfinished (largest size I could find is 24")/$215
- assembled in stock drawer base/$462
- unassembled finished drawer base/$360
- custom drawer base/$1073
For the most part, the unassembled cabinetry goes waaaay further for the money.
I highly recommend going with the unassembled cabinets if you're looking for a deal and don't mind the extra time and work they entail.
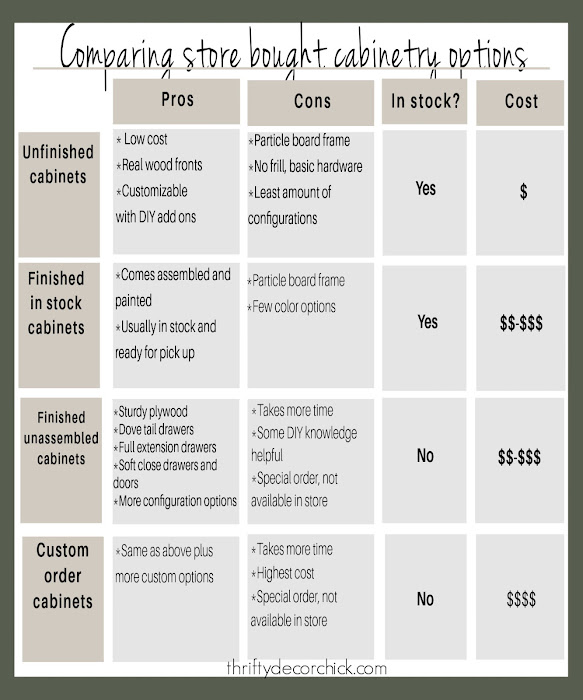
I made a helpful graph so you can see the pros and cons in one spot:
I should mention, IKEA is always a great option for cabinets, but I'm overwhelmed every time I look into them. There are so many options and parts, it freezes my brain. :)
Not to mention they usually end up costing more than the hardware store options I've used.
We had our cabinets installed by contractors and I'm so glad we did. I've installed many cabinets, but not with the number of corners and spacers we needed for this space.
Here's a peek at how they came together:
We started with these cool brass pulls that are installed over the top of the drawer fronts, but they were a little modern for my taste, and they were so jiggly.
I replaced them with these antique brass finish pulls and knobs and they work so much better!:
My little built in shelves work so well for us! We had some awkward space available so I decided to use it for baskets.
Instead of using the fridge enclosure parts available in this cabinet collection, we used plywood ripped down to size to frame it out:
I shared how to enclose an existing refrigerator years ago -- this is one DIY project that will go a long way to adding a custom look to your kitchen!
You can see a bit of the flooring in these pics. I finally got that installed over the holidays and I can't wait to show you.
I've been eyeing this dusk cherry luxury vinyl flooring (LVP) for years! I'm SO happy with it:
So much to catch you up on! I'll be sharing more progress soon!
Have you used any of these cabinet options in your home? I'd love to hear your experience.
Never miss a post by signing up to get posts via email.
This content is property of Thrifty Decor Chick LLC. If you are reading this on any other site other than www.thriftydecorchick.com or one of the blog's social media platforms, please contact TDC immediately (thriftydecorchick at gmail dot com). Any other use of this content is strictly forbidden.


