
DIY Spice Drawer Organizer {The BEST, Simplest Spice Rack!}
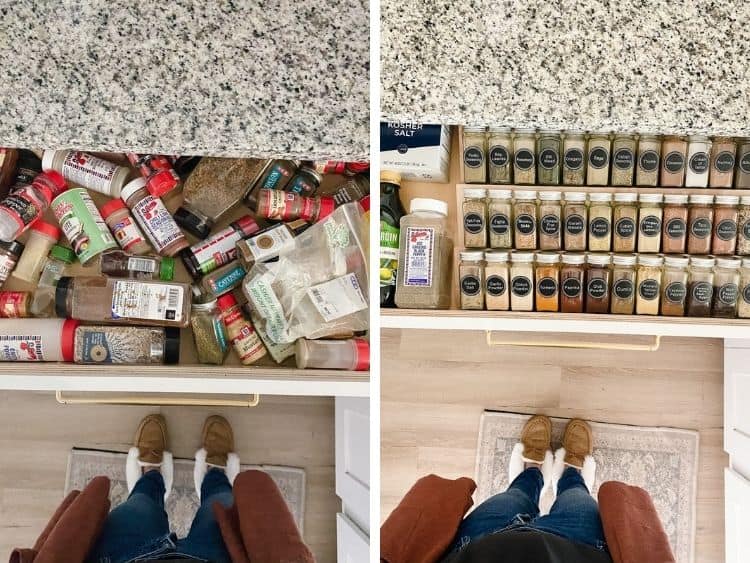
Hello, my name is Amanda and I have never had an organized spice drawer. What is it about spice drawers (or cabinets)? Why are they always a disaster? Why is this so hard?!
Don’t worry – I’ve solved the problem. I made a DIY spice drawer organizer this week that was so simple (it took me about an hour to build and can be done with just two tools), affordable ($10 in wood!), and satisfying.
In fact, let’s just kick this post off with a little before and after action, shall we?
This post is sponsored by Arrow Fastener.
Y’all, I’ve always wanted to be a person with an organized spice drawer. And now I am!
And, honestly, with how simple it was to build this little spice organizer, I think I can always be a person with an organized spice drawer.
There’s really not much more I could ask for, you know? A lifetime of organized spices!
Ready to learn how to make a simple, durable spice drawer organizer that’ll whip your disastrous spice drawer into shape in an afternoon?!
This is a great project for small kitchens, kitchens with a not-so-awesome pantry (raising my hand here), or any kitchen that just needs some help with organization.
That covers all of us, right?
DIY SPICE DRAWER ORGANIZER
You’ll need…
- 2×2 sheet of 1/2″ plywood
- A circular saw (learn how to use one here!)
- Wood glue
- Arrow T50AC + nails
- Wood filler (optional)
- Spice jars (optional)
step one: Measure your drawer and jars
First up, you have three separate measurements you need to take for your planning. This is an important step and if you rush past it, things might not fit the way you want them to!
The drawer
Start by measuring the width of the drawer you plan to use as a spice drawer.
We have a very wide drawer that we’re working with (and we have lots of spices), so I made each of my spice rack shelves 2′ long. This leaves a little bit of space over to the side for our larger spice containers or things that just don’t make sense for the spice jars I bought.
If you have a less, um, robust collection than we do, you can easily just make your spice racks the exact size of the interior of your drawer so it fills the whole thing!
You’ll also want to measure how far your drawer pulls out to see how many spice racks you can fit. Typically, a standard spice jar is about 4″ tall, so you can assume about 4.5″ for each spice rack shelf. I started with a three-tier system, but I was able to fit four tiers comfortably. For now, we’re using the back rack for empty drawers so we have overfill if we add more spices.
The spice jars
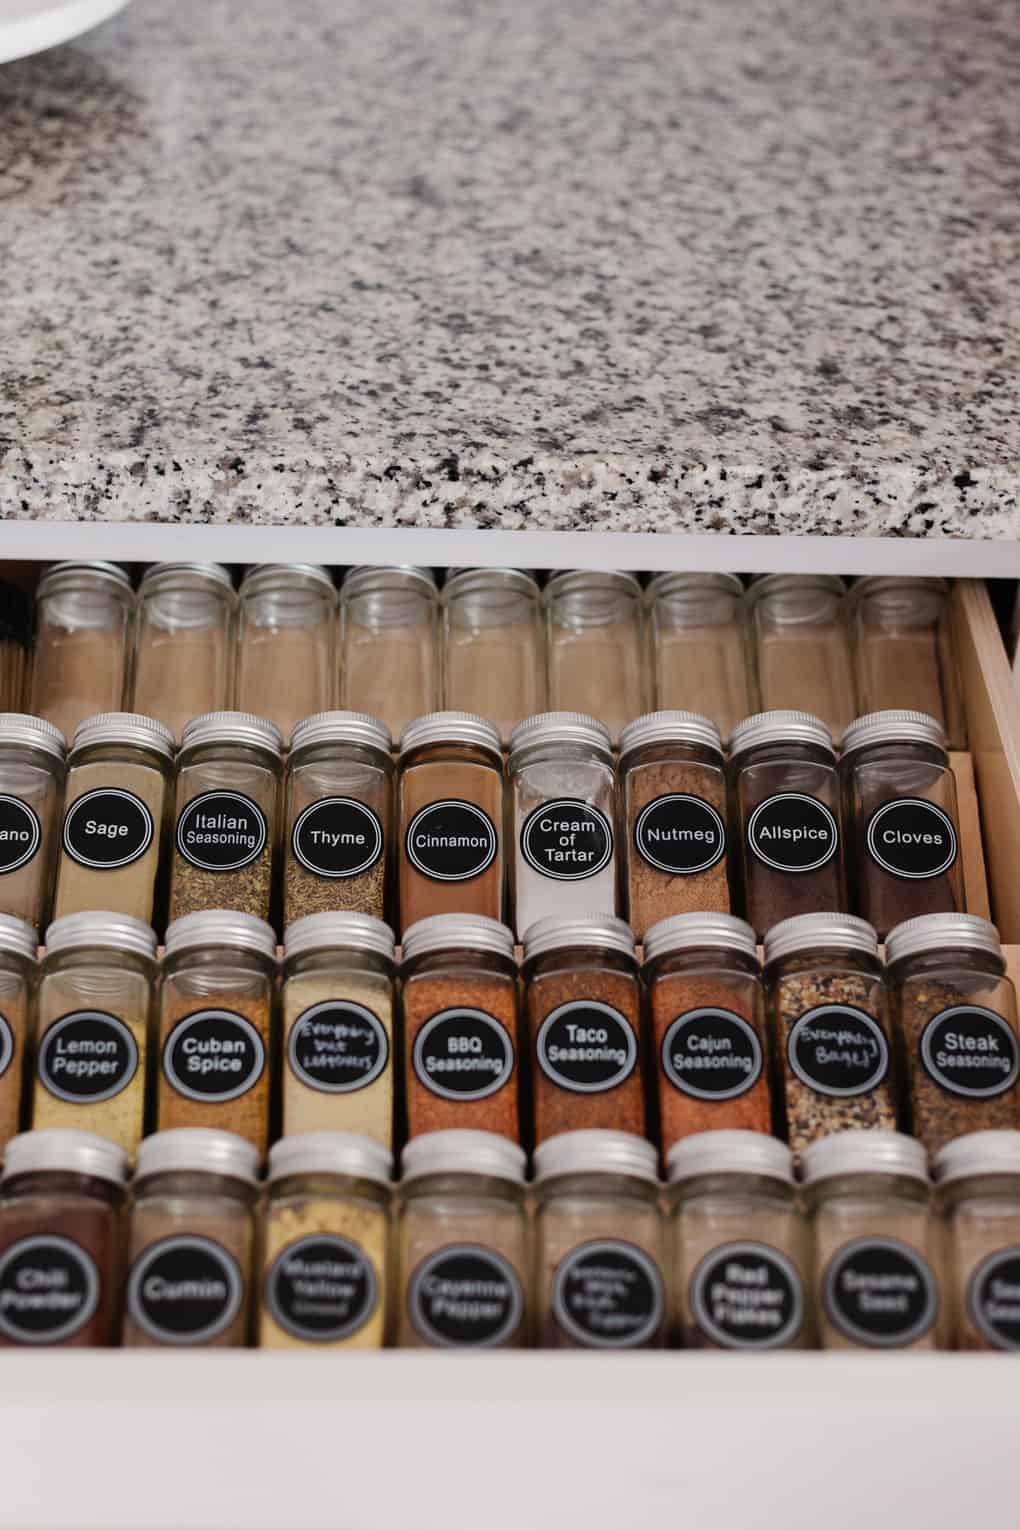
Once you know the dimensions of your drawer and how many spice racks you want to make, take the largest spice jar you plan to place on the shelves and measure how tall it is. Personally, I prefer a more uniform look so I bought a big set of spice jars from Amazon and transferred all of our spices over. This is absolutely not necessary, though, if you want to just stick with what they come in!
Just measure the tallest spice jar you plan to place on the rack, then add about 1/2″ to it for a little bit of breathing room. My spice jars were 4″ tall, so I went with 4.5″ for this measurement.
The drawer height
Finally, you need to know how deep the drawer is so you know what the best angle is for your spice rack risers.
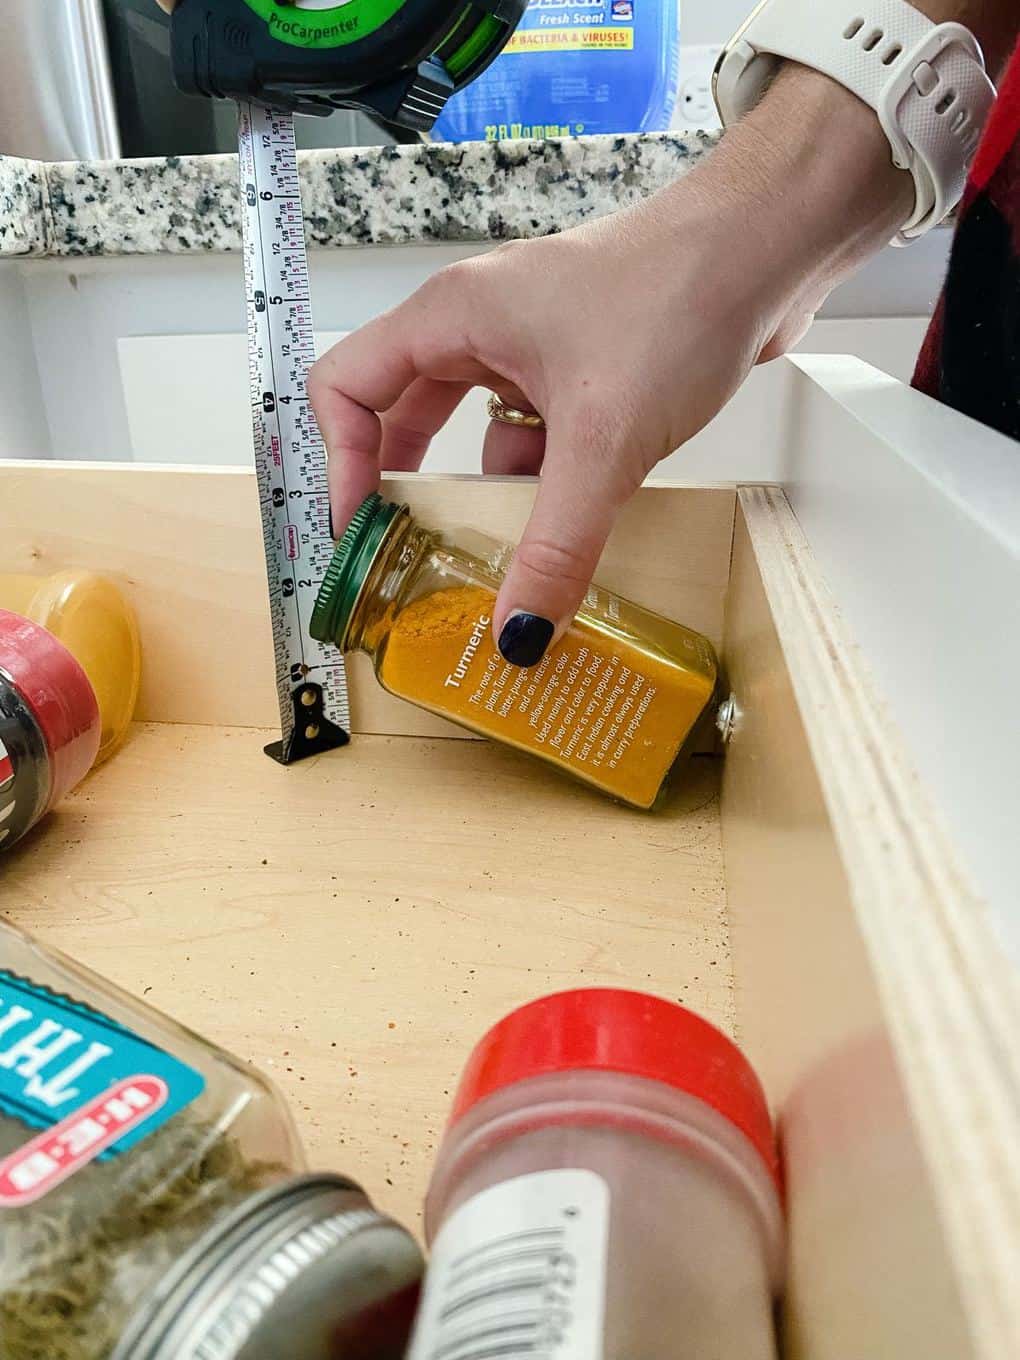
There’s probably some complicated mathematical formula you can do to determine this angle, but I took the (much easier) route of just holding up a spice jar and measuring it!
Hold one of your jars at an angle so that it’s close to the top of the drawer but not past it – you want to be able to close the drawer once everything is in place! Then, grab a tape measure and see what the space is from the bottom of the drawer to the bottom of the top part of the spice jar, as shown in the photo above.
This measurement is what you’ll use for the risers on the spice rack. For me, it was 1.5″!
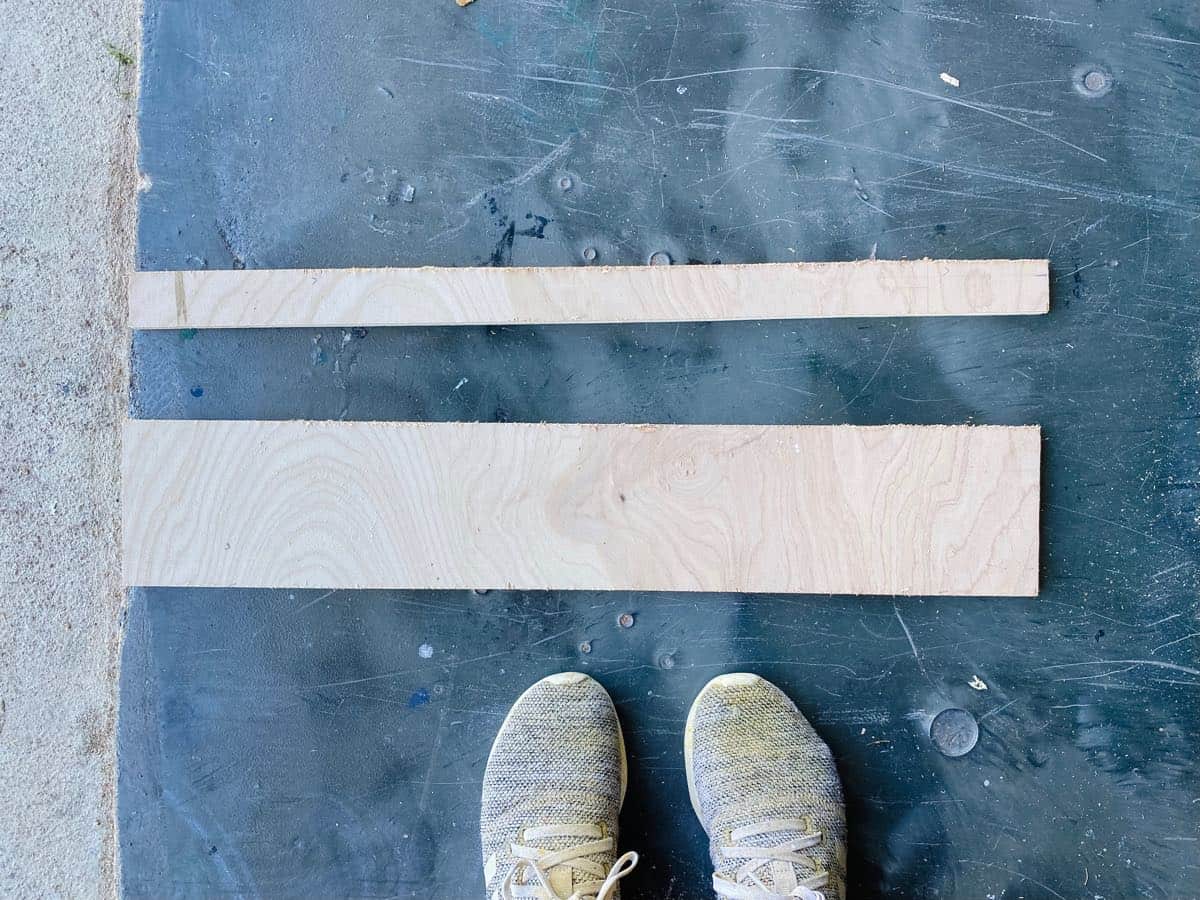
Step Two: Cut Plywood
Now, you’re ready to start cutting your plywood.
You’ll need two pieces of plywood for each spice rack shelf you place in the drawer. One will be wider and will be where you rest the spice jar, and the other will be the riser that adds an angle.
For my drawer, my base was 4.5″ and my riser was 1.5″.
Cut four of each of these pieces to create four shelves. I used my circular saw for this, but if you have a table saw that’s even easier!
I’d highly recommend clamping a level to the plywood as you work to help you cut in a straight line. You can see a detailed look at what I mean on this post!
After you cut all of the pieces for your spice racks, you’re almost done. Seriously!
A quick note: Once I placed my spice racks in the drawer, I realized the first row pushed the spice jars up a bit due to the front of the shelf. There are two easy ways to remedy this:
- You could just make the base of the first spice rack 1/2″ longer to account for this.
- You can cut some small pieces of scrap plywood to set in front of the spice rack. This pushes it away and lets the jars sit the correct way. This is the method I used!
step three: Assemble spice racks
Now, you’re ready to assemble your spice racks!
There are multiple ways you could go about this, but I think the wood glue + brad nails method is probably the fastest, easiest, and most reliable.
All you need to do is add a line of wood glue along the edge of the plywood and line the second piece up where you want it. Then, add a few brad nails to hold everything in place while the glue dries.
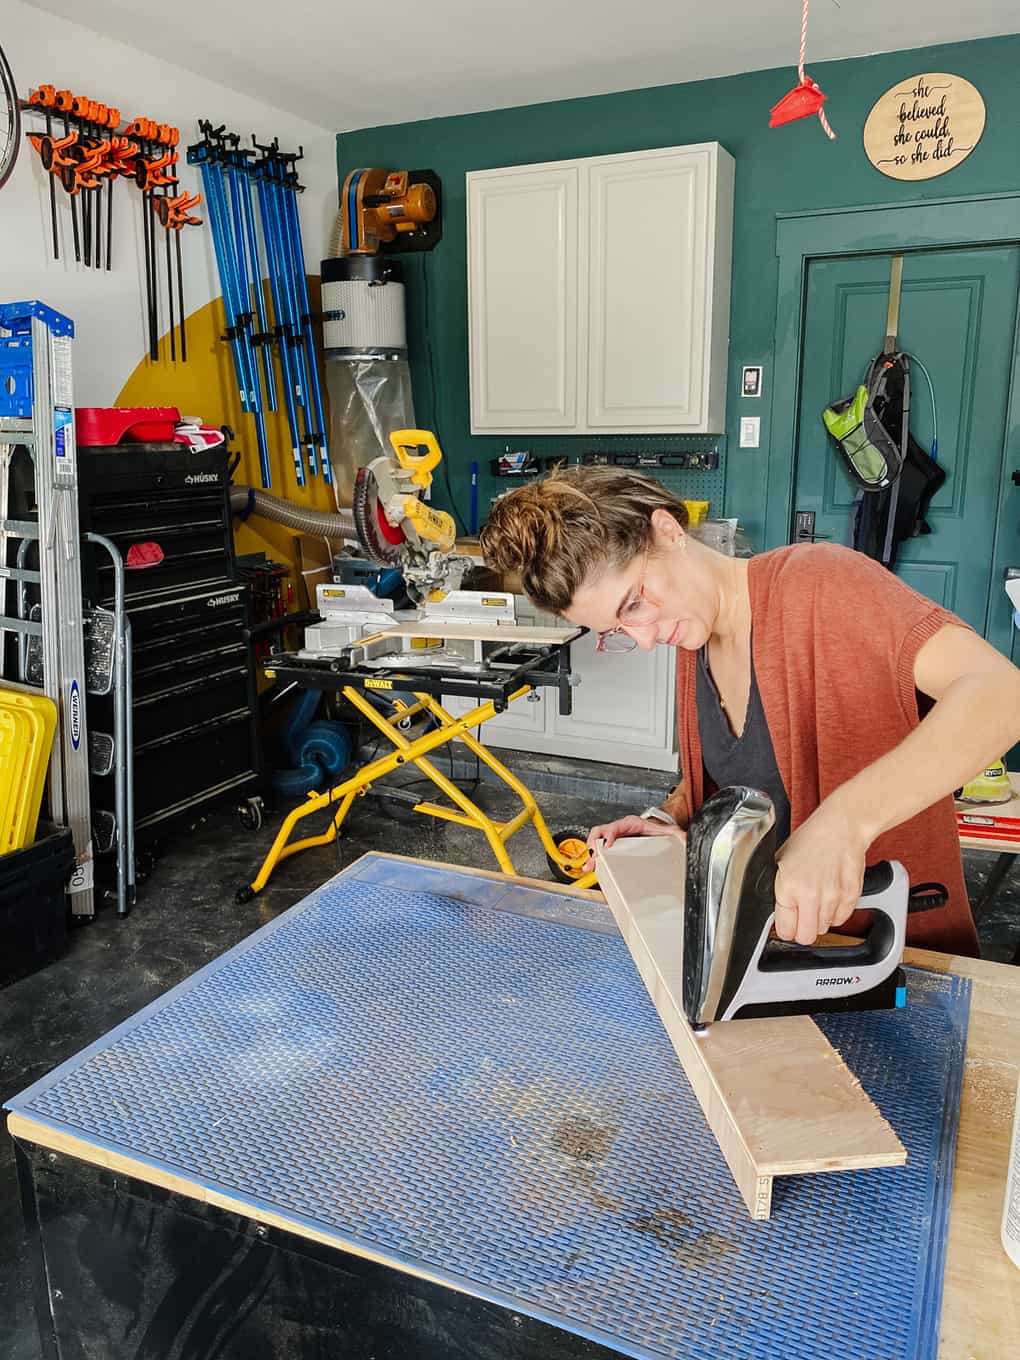
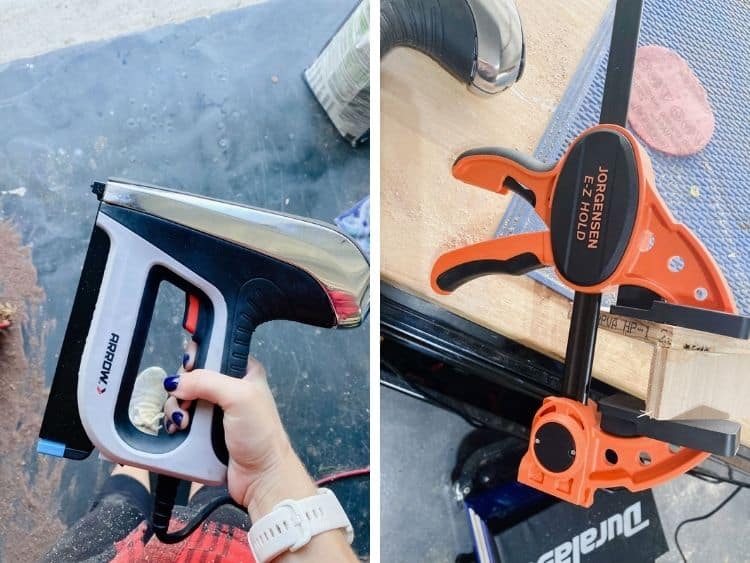
I also grabbed a couple of clamps (these are my favorite) to give everything some extra support as I was assembling, and as glue was drying. Sometimes it can be hard to wrangle all of the pieces and keep everything in place while you work. A clamp can act as a second set of hands!
For this project, I used my Arrow T50AC. It’s a really unique and versatile tool because it’s a staple gun and a brad nailer in one tool. This is a perfect tool for someone who does a lot of crafting or smaller projects. It eliminates the need for two separate tools and feels a lot less intimidating to use than a big brad nailer might!
It’s really lightweight and comfortable to hold (key when you’re working on a project where you’ll be using it a lot), and it’s great for a range of projects. You can use it on upholstery, repairs around the house, adding trim, and tons more crafts and other projects.
This was my first time using my T50AC as a brad nailer (I’ve used it as a staple gun a few times, like on this project, and it’s the best staple gun I’ve ever used!), and I’m a big fan. It’s definitely one I’ll be pulling out again and again for small projects like this.
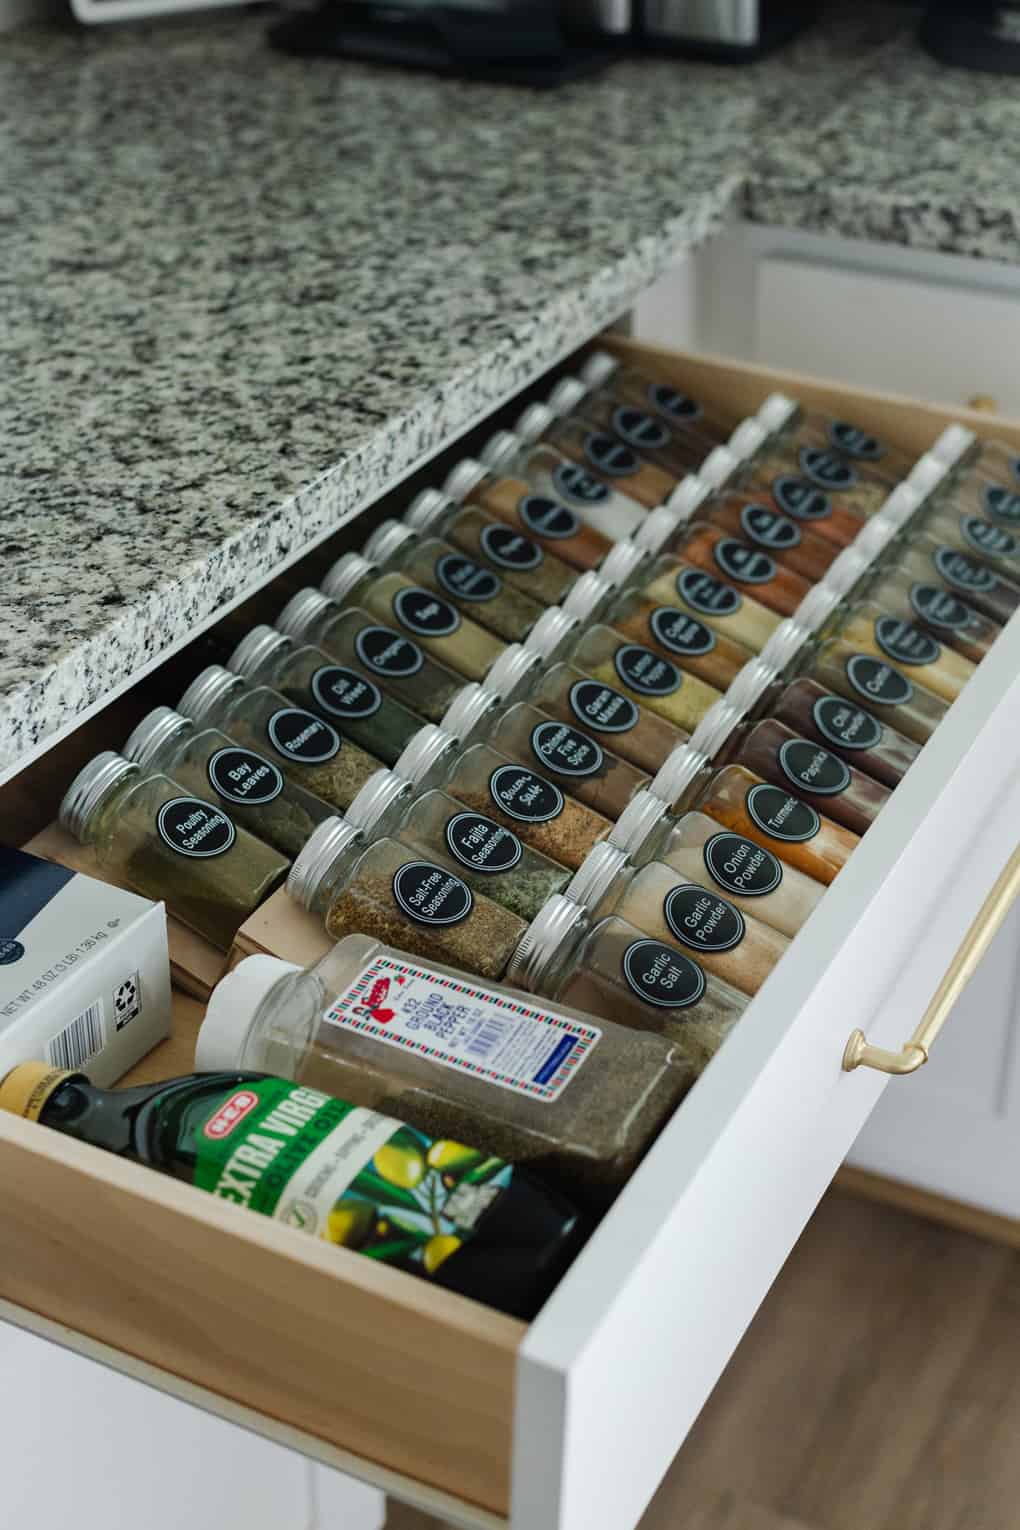
Once I let the glue dry on the spice racks and I knew they were fully secure, I used some wood filler to cover the small nail holes. This isn’t a totally necessary step, but makes things a little more polished. Then, the spice racks were complete and ready to go into place!
Step four: organize your spice drawer!
With the spice racks built, I was ready to get my herbs organized. “Installation” only took about 10 seconds, as I just tossed each of the spice racks into the counter. If you want to add a drawer liner to the bottom of your drawer first, it will help things stay put. I need to grab some more liners, so I didn’t. But, I may add this later!
With the spice racks in place, I grabbed my new spice bottles and the labels and went to town.
Corey and I debated how to organize the new jars. My systematic brain wanted to do them alphabetically, but he’s the chef and he argued that categories made more sense. He put herbs together that would likely be used for the same recipes, to make it easier to find what he needs. And, let’s be honest, that makes way more sense.
We had some duplicates and extra bulk spices, we just put them in a basket at the top of a cabinet, since we won’t access them often. We tossed our olive oil, salt, and large container of pepper off to the side. Boom, done!
I love that with this setup we can see all of our spices at a glance, and don’t have to dig around to find what we need. This is a much better way to keep things organized, and it looks pretty darn awesome too.
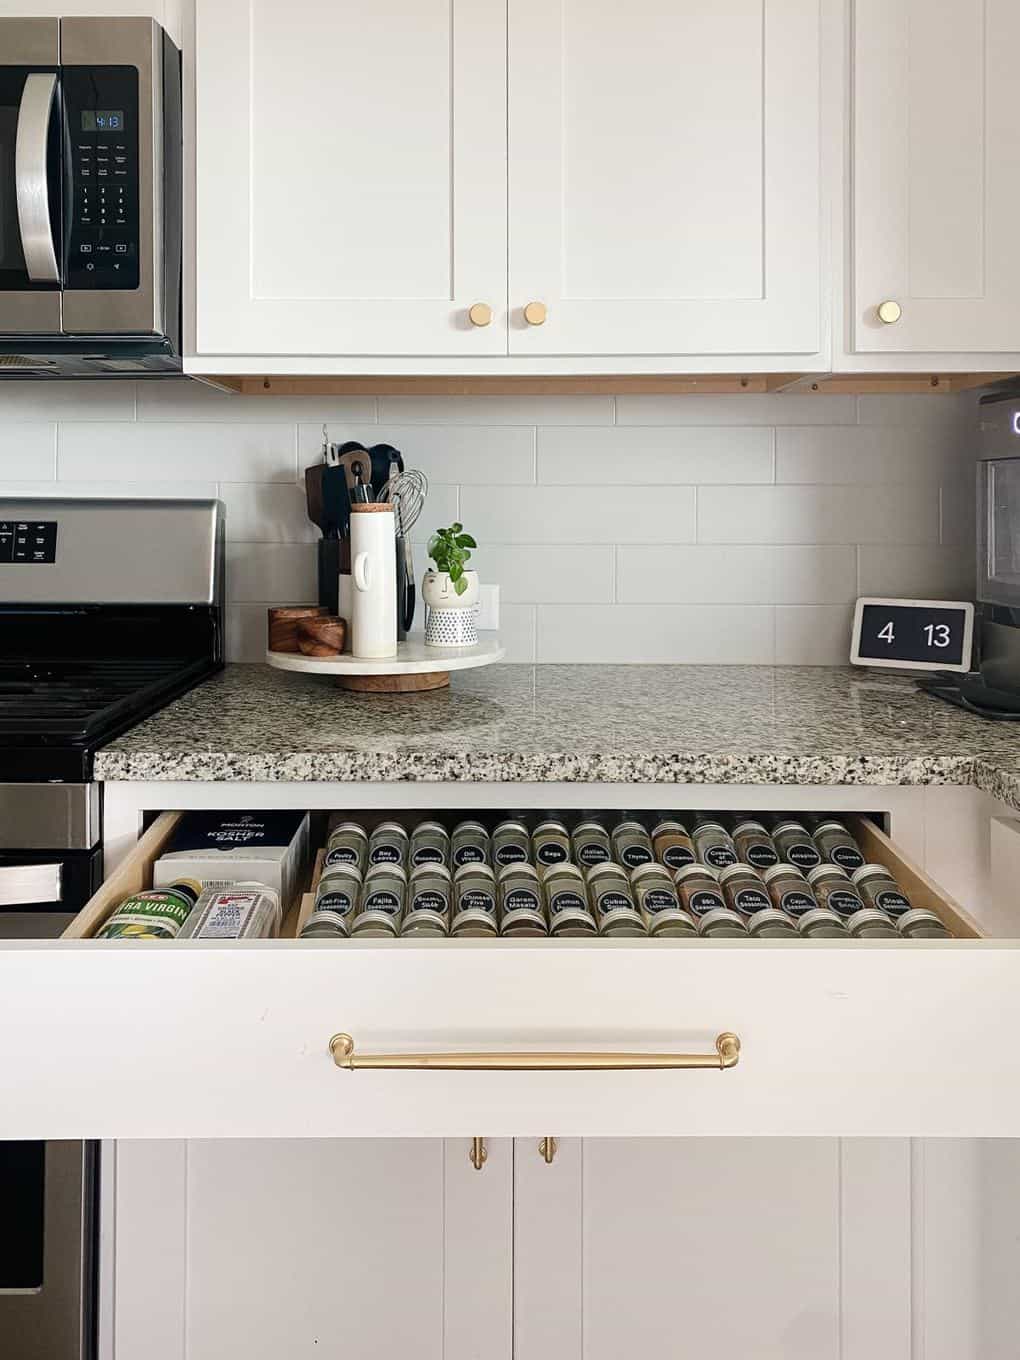
If you purchase a spice drawer insert, countertop spice rack, or a tiered spice rack for your upper cabinets, you’ll likely end up spending upwards of $50 to get all of your spices organized. But, with this DIY method I was able to do the whole thing for under $20!
I’m genuinely kind of in love with how this turned out. It might sound silly but there’s something about having a tiny little corner of your home be totally organized that’s so dang satisfying!
Don’t forget to check out Arrow’s line of products – their staple guns and nail guns are fabulous, and they’re perfect for this kind of project!
The post DIY Spice Drawer Organizer {The BEST, Simplest Spice Rack!} appeared first on Love & Renovations.